FlarmView and FlarmView57 Flarm collision avoidance display Version 1.01 LXNAV d.o.o. • Kidričeva 24a, 3000 Celje, Slovenia • tel +386 592 33 400 fax +386 599 33 522 info@lxnav.com • www.lxnav.
FlarmView Version 1.01 1 Important Notices 1.1 2 3 November 2013 3 Limited Warranty 3 Packing Lists Basics 4 5 3.1 LXNAV FlarmView at a Glance 3.1.1 Features 3.1.1.1 LXNAV FlarmView Features 3.1.1.2 LXNAV FlarmView57 Features 3.1.2 Interfaces 3.1.3 Technical Data 4 System Description 7 4.1 Push buttons on FlarmView 4.2 Rotary encoder with push button on FlarmView57 4.3 Switching on the Unit 4.4 User Input 4.4.1 Buttons on FlarmView 4.4.2 Text Edit Control 4.4.3 Selection Control 4.4.
FlarmView Version 1.01 1 November 2013 Important Notices The LXNAV FlarmView system is designed for VFR use only as an aid to prudent navigation. All information is presented for reference only. Traffic data and Collision warnings are provided only as an aid to situation awareness. Information in this document is subject to change without notice.
FlarmView Version 1.
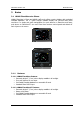
FlarmView Version 1.01 3 November 2013 Basics 3.1 LXNAV FlarmView at a Glance LXNAV FlarmView is Flarm and ADS-B traffic and collision warning display with preloaded FlarmNet database. The 2’’ QVGA sunlight readable display has 320*240 RGB pixels resolution. For simple and quick manipulation four push buttons on FlarmView and rotary push button on FlarmView57 are used. Flarm View monitors vertical speed and altitude of each object on the screen. 3.1.1 Features 3.1.1.
FlarmView Version 1.01 3.1.2 • • • Interfaces Flarm / ADS-B port input/output on RS232 level (Standard IGC RJ11 connector) 3.1.3 • November 2013 Technical Data Power input 3.3V DC (for FlarmViews serial numbers below 30), all others have 12V-16V DC input. In case flarm has no 12V output, we have provided an adapter. Consumption of LXNAV FlarmView is (0.
FlarmView Version 1.01 4 November 2013 System Description 4.1 Push buttons on FlarmView With four push buttons it is possible to zoom, choose between the targets, and adjust FlarmView settings. In some cases, long press to push buttons have some function. On picture below is an example. Long press to upper button will move cursor for one position to the left. Long press to lower button will cancel all changes. 4.
FlarmView Version 1.01 November 2013 In FlarmView57 up and down means rotating left and right the knob, Short press is same as Edit, long push is same as Close 4.4.1 Buttons on FlarmView Buttons have dynamicaly set functions. When you press a button, on the button side, will appear a blue labels, with the action assigned to that button in that context. On main screen, top button always performs the function of switching between pages.
FlarmView Version 1.01 4.4.3 November 2013 Selection Control Selection boxes, also known as combo boxes, are used to select a value from a list of predefined values. Use the up/down buttons to select the appropriate value. 4.4.4 Checkbox and Checkbox List A checkbox enables or disables a particular parameter. Press EDIT button to toggle the value. If an option is enabled a check mark will be shown, otherwise an empty rectangle will be displayed. 4.4.
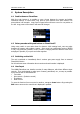
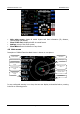
FlarmView Version 1.01 • • • • November 2013 Main radar screen, shows all visible objects and their information (ID, distance, vertical speed and altitude) Flarm Traffic list is displayed traffic in textual format. Settings, setup of the whole system Flarm Watch shows the direction of any threat. 4.6 Main screen Description of LXNAV FlarmView Main Screen is shown on next picture.
FlarmView Version 1.01 November 2013 All targets are displayed as a glider symbols. User can change that symbol to another type. It's alsp possible to change object color, depending on relative altitude to us. All received targets (Flarm or PCAS) are marked with same type of symbol except undirected targets, for which we don't know from which direction they are comming from. Flarm and PCAS targets can be separated only by their ID. 4.6.
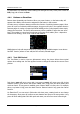
FlarmView Version 1.01 November 2013 The screen indicates relative position of threat. In the first image two gliders are approaching from left side at the same altitude and one from back right, the second screen one glider is approaching from right side (4’o clock), Last screen is an example of undirected warning (AC mode). Middle number shows horizontal distance to the target, last picture indicates obstacle warning. 4.8 Traffic list mode On this page all traffic is displayed in list form.
FlarmView Version 1.01 • • November 2013 If you want to have the buttons on left side the complete screen can be rotated. If “always hidden” is checked then the button labels are not displayed on main screens. 4.9.2 Warnings Warnings can be enabled for three different levels (low, important and urgent), separately A/C (undirected warnings can be enabled), also a distance of A/C warning, where will be displayed flarm watch. If Alert on A/C mode is disabled, A/C mode distance is not applicable.
FlarmView Version 1.01 November 2013 If Target label is active, near glider will be displayed chosen value. Show A/C range Shows A/C ring on flarm radar screen Lock on nearest automatically selects nearest target and displays its data 4.9.4 Sounds In the Sounds setup menu volume settings for the LXNAV FlarmView and alarms settings can be modified. • • • • • 4.9.5 Volume The sounds slider changes the alarm volume.
FlarmView Version 1.01 4.9.7 November 2013 Flarm Info On this page, we can see information about flarm device and do some configuration about flight recorder, flarm and aircraft. Those settings will work only if FlarmView is the only one device which communicates with flarm. If other devices are connected (Oudie), there will be a conflict between transmit lines of RS232 from Oudie and FlarmVeiew and communication will not work. 4.9.
FlarmView Version 1.01 • November 2013 00666 Resets all settings to factory default 4.9.9 About In about page is information about firmware versions, hardware versions, serial numbers, status of flarm net database.
FlarmView Version 1.01 5 November 2013 Installation 5.1 Installing the LXNAV FlarmView The LXNAV FlarmView cutout is very simple. A square hole with dimensions 14mm x 15mm, need to be cut. Peel off protection film and stick FlarmView to the instrument panel. 5.2 Installing the FlamView57 The FlarmView57 is installed in one standard 57mm (2,5’’) cutout. If there is none, prepare it according to the picture below. 2 1/4“ 4,5mm φ57mmh11 φ66.
FlarmView Version 1.01 November 2013 5.3 Connecting LXNAV FlarmView FlarmView can be connected to any Flarm or ADS-B device with FlarmView cable. 5.4 Installation of options Optionally more FlarmView devices can be connected through FlarmSplitter. 5.4.1 Ports and Wiring 5.4.1.1 LXNAV FlarmView port (RJ11) 123456 Pin numbers Pin number Description 1 (Power input) 12VDC (On version 2) 2 (Power input) 3.
FlarmView Version 1.01 6 November 2013 Flarmnet Update Flarm net database can be updated very easily. • • • • • • Please visit http://www.flarmnet.org Download file for LXNAV (LX8000, LX8080, LX9000) or click on following link: http://www.flarmnet.org/files/lxfile.php FLN type file will be downloaded. Use FlarmNetParser application, to convert FLN file to FLX file. The new .flx file must be named “flarm.flx” Copy flarm.flx file to SD card of FlarmView. On FlarmView is also user.
FlarmView Version 1.01 7 November 2013 Firmware Update Firmware updates of the LXNAV FlarmView can be easily carried out using the SD card. Please visit our webpage www.lxnav.com and check for the updates. You can also subscribe to a newsletter to receive news about the LXNAV FlarmView automatically. 7.1 Updating LXNAV FlarmView • • • • Download the latest firmware from our web site, section downloads/firmware http://www.lxnav.com/download/firmware.html. Copy fview.fw file to FlarmView’s SD card.
FlarmView Version 1.01 8 November 2013 Revision History June 2012 August 2012 September 2012 November 2012 February 2013 April 2013 September 2013 November 2013 Initial release of owner manual Release of HW2 with 12V DC power supply input Update of version 0.94 Ch.4.5, Ch 4.6.2. Ch 4.6.3 Added new chapter 6 Added/updated chapters 4.4.1,4.4.2,4.4.3,4.6,4.6.1,4.8,6 Firmware 0.98, Added/updated chapters 4.9.6 4.9.7 Firmware 1.00 Added/updated chapters 5.1 4.9.7 4.9.1 4.7 Firmware 1.