
Operation Manual

LX90xx system Version 4.0 February 2014
Page 65 of 151
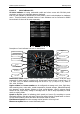
If the digital TE option has been used TE compensation should be set to 100%.
It is important to note that the method of TE compensation is set up when the
instrument is installed by virtue of the pneumatic connections made to the TE and
static ports. Changing the compensation type in the setup screen below WILL
NOT change the method of compensation - the pneumatic plumbing has to be
changed first.
If the TE tube has been connected TE compensation should be set to 0%. The
quality of the TE compensation depends entirely on the location, size and
dimension of the TE tube. The installation must be leak-proof.
The digital TE compensation can be fine-tuned during flight using the following procedure.
It is essential that this is only done in smooth air; it is not possible to tune the TE accurately
in turbulent air.
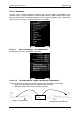
Set TE compensation to 100%. Accelerate up to approximately 160 km/h (75 kts) and keep
the speed stable for a few seconds. Gently reduce the speed to 80 km/h (45 kts). Observe
the vario indicator during the manoeuvre. At 160 km/h the vario will indicate about –2 m/s
(-4 kts). During the speed reduction the vario should move towards zero and should never
exceed zero (slightly positive indications are acceptable). If the vario shows a climb the
compensation is too low; increase the TE%; and vice versa. Try another “zoom” to assess
the change and make further adjustments if necessary.
Digital TE compensation is only effective when the Pitot tube and static sources are co-
located and the pneumatic lines to the instrument are approximately the same length. The
best sensor to use is the combined Pitot/static Prandtl tube. If problems are experienced
with the digital TE compensation the most likely cause is the glider's static source. The
static source can be checked by plumbing the pneumatic tubes for digital TE compensation
and then setting the TE: to 0%. In still air accelerate to approximately 160 km/h and slowly
reduce the speed. Observe the vario indicator. If the static source is good the vario should
immediately start to move to show a climb. If the needle firstly shows increased sink and
then moves to a climb, the static source of the glider is unsuitable and there is no way to
provide successful digital TE compensation. The use of a dedicated and accurate fin-
mounted Pitot/static source such as a Prandtl tube might help.
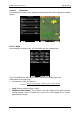
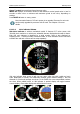
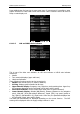
6.1.12.1.2 SC Switch
The vario unit has an input for an external speed command switch which is wired to the
vario unit cable set. Using the external switch it is possible to switch between SC and Vario
manually. Setting the SC switch to ON means that closing the switch will cause the
instrument to enter SC mode and setting SC switch to OFF means that closing the switch
will select Vario mode. There is a third option by setting SC switch to TASTER and
connecting a push button to the input; each key press will toggle between SC and Vario
(mandatory setting for LX Remote).
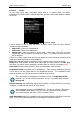
6.1.12.1.3 Temperature Offset
The system is supplied with an external outside air temperature (OAT) sensor. With the
offset setting it will correct static errors of temperature measurement.
There is another input called VARIO PRIORITY. When this input is activated by
grounding the appropriate wire the unit will change over to Vario immediately.