3 NANO Flight recorder (including NanoConfig configuration program) Version 1.0 LXNAV d.o.o. • Kidričeva 24a, 3000 Celje, Slovenia • tel +386 592 33 400 fax +386 599 33 522 info@lxnav.com • www.lxnav.
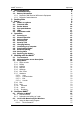
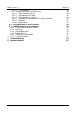
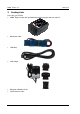
NANO3 Version 1.0 1 April 2014 Important Notices 5 1.1 Limited Warranty 1.2 Battery information 1.2.1 Disposal of Old Electrical & Electronic Equipment 1.2.2 Disposal of waste batteries 2 3 Packing Lists Basics 3.1 3.2 3.3 3.4 3.5 3.6 4 5 8 9 NANO3 at a glance Technical data Rocker button Four push buttons LEDs NanoPower cable 9 10 10 11 11 12 Operation 4.1 4.2 4.3 4.4 4.5 4.6 4.7 4.8 4.9 4.10 4.
NANO3 Version 1.0 April 2014 6.2.1.2 Task declaration 6.2.2 Changing parameters with NanoConfig 6.2.2.1 Flight recording interval 6.2.2.2 Automatically finish flight 6.2.2.3 Start recording on power on 6.2.2.4 Automatically turn off Nano, when flight is finished 6.2.2.5 Bluetooth 6.2.2.6 NMEA output 6.3 Using Bluetooth or serial interface 6.4 NANO3 config for Android devices 6.4.1 Connecting and pairing the NANO 6.4.2 Main page 6.4.3 Downloading flights 6.4.4 Editing pilot info 6.4.
NANO3 Version 1.0 1 April 2014 Important Notices Information in this document is subject to change without notice. LXNAV reserves the right to change or improve their products and to make changes in the content of this material without obligation to notify any person or organization of such changes or improvements. A Yellow triangle is shown for parts of the manual which should be read very carefully and are important for operating the NANO3 flight recorder.
NANO3 Version 1.0 April 2014 1.2 Battery information NANO3 is powered by a rechargeable battery. The battery can be charged and discharged hundreds of times, but it will eventually wear out. Only use the approved battery and recharge your battery only with approved chargers. Unplug the charger from the electrical plug and the device when not in use. Do not leave a fully charged battery connected to a charger as overcharging may shorten its life.
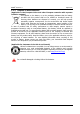
NANO3 Version 1.0 1.2.2 April 2014 Disposal of waste batteries (Applicable in the European Union and other European countries with separate collection systems) This symbol on the battery or on the packaging indicates that the battery provided with this product shall not be treated as household waste.
NANO3 Version 1.
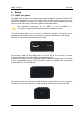
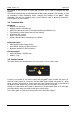
NANO3 Version 1.0 3 April 2014 Basics 3.1 NANO3 at a glance The NANO3 flight recorder is the smallest flight recorder designed in accordance with the IGC “All Flights” specification. It has an IGC approval for all flights including world records. It features an integrated 56-channel GPS receiver with built-in antenna, altitude sensor, ENL sensor, security micro-switch, Bluetooth module and 1800mAh battery. The operational temperature for the NANO3 is from -20°C(68°F) +60°C(140°F).
NANO3 Version 1.0 April 2014 At the back of the unit there is a mini USB connector, this is used for charging and data transfer. The internal solid state disk is preloaded with the Nanoconfig program. This program is used for uploading a flight declaration and/or changing the settings of the NANO3. Flight declarations can also be uploaded using a serial interface cable or Bluetooth connection. (See chapter 0 for more details). 3.
NANO3 Version 1.0 April 2014 3.4 Four push buttons Nano3 has four push buttons, which have a dynamic function. The function of each push button is described on the blue label adjacent to the button. A label can have two options with the second option coloured red on the label. This indicates that the button has two functions. The blue option is operated with a short press and the red option with a long press.
NANO3 Version 1.0 April 2014 3.6 NanoPower cable The NanoPower cable is a special device which converts 12V to 5V providing a power supply for the NANO3 and a PDA. It also translates a serial signal to match the NANO3 signal level and a PDA or computer signal level. Connect the red and black wire to 12V power supply. Red is positive. Maximum input voltage is 24 Volts. The NanoPower has two plugs. On one side there is a standard USB-A connector.
NANO3 Version 1.0 4 April 2014 Operation There are two modes of operation: Data transfer mode and Normal operation mode. When in the data transfer mode, flights can be downloaded and the NanoConfig program can be run. Normal operation mode is when the logger is ready for recording flights. The mode in which the NANO3 is operating can be determined from the main screen or LEDs, when the screen is off.
NANO3 Version 1.0 April 2014 If you press or move the rocker button or any other buttons, when in the data transfer mode, the NANO3 will revert to normal operation mode 4.2 Normal operation During normal operation mode, the user can use the NANO3 as a flight recorder and a simple navigation and vario system. There are four pages (information page, waypoint page, task page and setup page). You can read more about pages in Ch.5.1.
NANO3 Version 1.0 April 2014 4.4 Powering off Press the rocker button for a long time and the red LED and the adjacent green LEDs will start blinking. Once you see the LEDs blinking you may release the button and the unit will power off. 4.5 Security void When the security (secret key) is lost at power on, the red light will be on and the remaining four green LEDs will start blinking and “DIGITAL SIGNATURE FAILED” message will appear on the screen.
NANO3 Version 1.0 April 2014 Open this device to see its content. In the root folder you will find the flights created by the NANO3 and the NanoConfig program. The NanoConfig program will run only on Microsoft Windows operating systems. Double click to run it. On first connection of the NANO3 to a computer, it may not be recognized immediately. Disconnect the NANO3 from the computer and connect it again in order for it to be recognized.
NANO3 Version 1.0 April 2014 4.8 Downloading flights Turn off the NANO3 and connect it to a computer using a USB cable. Navigate to the root folder of the NANO3 and use your preferred method of copying files. Flights are stored in files with the IGC standard filename. If you find it difficult to decode this standard, we recommended that you switch to detailed view to see the date of the file. In detailed view, the file date and time shows the landing time of the glider.
NANO3 Version 1.0 April 2014 4.11 Replacing the battery The battery can be replaced by the user. You will need a screwdriver with cross head (Phillips). Unscrew the three screws. Open the cover and remove the battery. Insert a new Nokia 3310 battery (Li-Ion). Make sure that the contacts are properly aligned. Close the cover and put back the three screws gently.
NANO3 Version 1.0 5 April 2014 Working with the NANO3 5.1 Tree structure The NANO3 has four modes, info, Waypoint, Task and Setup mode. Info mode has two subpages, where you will find all the necessary information about the status of the NANO3. 5.2 Main navigation screen description The main navigation screen consists of a map with coloured airspace, waypoints with names, vario tape on the left and status bar on the top.
NANO3 Version 1.0 April 2014 5.3 Setup Menu 5.3.1 Flight recorder Under this page; flight recorder, pilot information and glider data are configured. • Recording interval sets the interval when the GPS position will be stored in flight • Auto Finish will allow the automatic finish of the flight, under certain conditions. Uncheck this item for wave flying.
NANO3 Version 1.0 5.3.3 April 2014 Graphics This menu gives you the option to show or hide the Vario tape, Waypoints on the map, the size of the Plane icon, the Map orientation (track or north up), the Transparency of the Nav boxes, the colour of the Task Zone, the Transparency of the task zone and the Zone line width. 5.3.
NANO3 Version 1.0 5.3.7 April 2014 Hardware In the Hardware menu there are four sub items: 5.3.7.1 Vario Vario submenu allows you to adjust the Vario filters for the Vario needle and the vario sound, the time constant for average vario and vario tape range. 5.3.7.
NANO3 Version 1.0 April 2014 5.3.7.4 Sounds This menu has three items. Volume of vario sound, enabling of system sounds and enabling of vario sounds. Vario volume can be also adjusted using rocker button, but only in GPS info page. 5.3.8 Files Airspace and waypoints files can be selected here. The NANO3 supports CUP file format for waypoints and CUB file format for airspace.
NANO3 Version 1.0 April 2014 The password menu is only used for maintenance at this time. There are no passwords available for users at the moment. 5.3.11 About Under about menu, user can see the version and serial number of the NANO3 5.3.12 Shutdown Pressing the button adjacent to this item on the NANO3 screen will shut down the NANO3 after confirmation.
NANO3 Version 1.0 April 2014 6 Configure NANO3 Flight • • • • declarations can be uploaded to the NANO3 in four different ways: Directly on the NANO3 Using the NanoConfig program on PC, Bluetooth (NanoConfig for Android, Oudie, XCSoar,..) Serial interface (PDAs, Oudie, XCSoar) Declarations are stored in the SYSTEM folder in a file called decl. The declaration file is formatted as a standard IGC header file. It is recommended that you do not try to modify this file yourself. 6.1 Directly On NANO3 6.1.
NANO3 Version 1.0 April 2014 Each waypoint can have a custom zone or area applied. These areas can be modified by pressing to Zone button. 6.2 On PC with NanoConfig for Windows Use the NanoConfig program to configure the NANO3. A flight declaration can be uploaded or various parameters can be modified using this program. The NanoConfig program consists of two major screens. A flight declaration screen and a settings screen.
NANO3 Version 1.0 April 2014 All NANO3 configuration variables are stored in the SYSTEM folder of the NANO3 in a file named “system.ini”. It is strongly recommended that you do not modify this file yourself. If you need more information about the “system.ini” file please contact us. 6.2.1 Using the Nanoconfig program Run the NanoConfig program and go to the declaration screen. The declaration screen is split into two groups.
NANO3 Version 1.0 6.2.2 April 2014 Changing parameters with NanoConfig Run the NanoConfig program and go to the settings screen. The settings screen is split into two sections. Settings dedicated to the NANO3 and settings for NanoConfig. Parameters for the NANO3include recording interval, NMEA output and Bluetooth enable settings. In NanoConfig you can change the distance units used in the task declaration and the format of latitude and longitude. 6.2.2.
NANO3 Version 1.0 April 2014 6.2.2.4 Automatically turn off Nano, when flight is finished This option is very useful for NANO3 when installed more or less permanently into the glider. If this option is enabled, the NANO3 will automatically switch off 30 minutes after the flight is finished. 6.2.2.5 Bluetooth Check the Enable Bluetooth checkbox if you want to turn it on. By default Bluetooth is disabled.
NANO3 Version 1.0 April 2014 6.4 NANO3 config for Android devices NanoConfig can be downloaded from LXNAV web site or Google Play Market. The NanoConfig is a configuration tool for the NANO3. The user can easily modify flight recorder parameters, edit pilot and glider information, edit the declaration, and transfer flights from the NANO3 to a smart phone. NanoConfig consists of four tabs: Main, Logbook, Pilot, Task and Settings. 6.4.
NANO3 Version 1.0 April 2014 After downloading of the logbook data is finished, a short press on the desired flight will start the download process. If the flight size is big, the download may take more than minute. Flights are downloaded into the NanoConfig folder. With a long press on the flight, the downloaded flight can be shared with other applications installed on your smart phone (Gmail, SeeYou, OLC (not available) , Google Docs, Facebook). 6.4.
NANO3 Version 1.0 7 April 2014 Troubleshooting Q: My computer does not recognize the NANO3 as a USB mass storage device? A: Make sure that the NANO3 is turned off before connecting to the computer. Q: When I power on see all green LEDs blinking and the red LED is illuminated. A: This means that your flight recorder has lost security. Contact us for further details. Q: When I power on I see one green LED and the red LED is illuminated. A: There is a problem with internal Solid State Disc.
NANO3 Version 1.