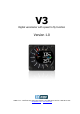
V3 Digital variometer with speed to fly function Version 1.0 LXNAV d.o.o. • Kidričeva 24a, 3000 Celje, Slovenia • tel +386 592 33 400 fax +386 599 33 522 info@lxnav.com • www.lxnav.
V3 Version 1.0 1 Important Notices 1.1 2 3 November 2012 5 Limited Warranty 5 Packing Lists Basics 6 7 3.1 LXNAV V3 at a Glance 3.1.1 LXNAV V3 Features 3.1.2 Interfaces 3.1.3 Options 3.1.3.1 External Options 3.1.4 Technical Data 4 7 7 7 8 8 8 System Description 9 4.1.1 Push Button 4.1.1.1 Power Button 4.2 Rotary Switch 4.3 Switching on the Unit 4.4 User Input 4.4.1 Text Edit Control 4.4.2 “Spin” Control 4.4.3 Selection Control 4.4.4 Checkbox and Checkbox List 4.4.5 Slider selector 4.
V3 Version 1.0 November 2012 8.1 Installing the LXNAV V3 8.2 Connecting LXNAV V3 8.3 Cutout of V3 8.4 Ports and Wiring 8.4.1 LXNAV V3 ports 8.4.2 Main port 8.4.2.1 8.4.3 External Audio port 9 24 24 25 25 25 26 26 26 Firmware Update 9.
V3 Version 1.0 1 November 2012 Important Notices The LXNAV V3 system is designed for VFR use only as an aid to prudent navigation. All information is presented for reference only. Information in this document is subject to change without notice. LXNAV reserves the right to change or improve their products and to make changes in the content of this material without obligation to notify any person or organisation of such changes or improvements.
V3 Version 1.
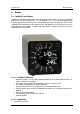
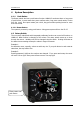
V3 Version 1.0 3 November 2012 Basics 3.1 LXNAV V3 at a Glance LXNAV V3 is standalone digital vario meter with speed to fly function. The unit has standard dimensions to fit into a glider panel - 57 mm diameter (2¼"). The unit has integrated high precision digital pressure sensor, which are sampled more than 100 times per second. Data is indicated with needle driven with stepper motor and displayed on 320*240 pixel, two-inch, high brightness colour display.
V3 Version 1.0 • November 2012 Audio port (Standard 3mm phono jack) 3.1.3 Options 3.1.3.1 External Options External speaker can be connected as option. 3.1.4 • • • • • Technical Data Power input 6-16 V DC Consumption of LXNAV V3 at 12 V: o 95 mA - minimum brightness without audio. o 135 mA - maximum brightness without audio. 57 mm (2¼") standard aircraft cut-out for the LXNAV V3 vario unit; length 50 mm (not including connector).
V3 Version 1.0 4 November 2012 System Description 4.1.1 Push Button The Rotary switch also has a push button function. LXNAV V3 can detect short or long press of push button, in most cases short press confirms action, long press cancels action or exits from the menu Short press means just a click, long press means pushing button for more than one second. 4.1.1.1 Power Button The system is powered up using push button. A long press system will turn the V3 off. 4.
V3 Version 1.0 November 2012 4.3 Switching on the Unit A short press of the button with turn on the V3. The first LXNAV welcome screen will appear with some system information (Device name, Version, Serial number...) When the boot procedure is completed, setup elevation dialogue is shown. By default setting Set Elevation page is disabled. It can be enabled in Setup QNH menu. Push button also has power ON and OFF functions. 4.
V3 Version 1.0 November 2012 Push button will move cursor right. Holding push button and rotationg knob, will move cursor left or right. At last character position, push button will confirm edited value, long press will cancel editing and exit that control. 4.4.2 “Spin” Control “Spin” controls are designed for numeric parameters. Rotate the knob to increase/decrease the selected value. Combination of push button and knob rotation will change the value with a larger step. . 4.4.
V3 Version 1.0 November 2012 4.5 Switching off By pressing the push button for app. 5 seconds, LXNAV V3 will turn off. All settings are saved in the power off procedure. We strongly recommend switching off the unit using push button and not use a separate master switch.. If the system is powered off by a master switch changed data will not be saved. Flight parameters at takeoff like target altitude and position will remain in stored memory so your final glide calculations are not affected.
V3 Version 1.0 5 November 2012 Operating Modes LXNAV V3 has three operating modes. A pilot has access to all of them using rotary knob and push button. The diagram below shows the mode structure of the LXNAV V3. • • • Main screen, all navigation and flight parameters defined by pilot Quick access, MacCready, Ballast, Bugs. Settings, setup of the whole system 5.1 Main screen and needle The man screen has a mechanical needle and a 320x240 color display with user selected data.
V3 Version 1.0 November 2012 5.2 Quick access menu A short press of the push button activates the quick access menus. In the last row of the box is calculated final glide (E) and required speed for that final glide, values depends on MacCready, Bugs and Ballast setting. 5.3 Settings Mode In the setup menu users can configure the LXNAV V3. Turn the knob to select the appropriate setup item. Press the PUSH button to enter a menu. A dialogue or sub-menu will open. 5.3.
V3 Version 1.0 5.3.2 November 2012 QNH Turn the knob to select the required entry field. Press the PUSH button and start editing the value. 5.3.2.1 QNH This feature may be used to offset the altitude datum as the result of pressure changes during the flight. Since changing the QNH influences the indicated altitude. 5.3.2.2 Set elevation If Set Elevation – show on start-up, item is not checked, Set elevation menu, will not be displayed during start up.
V3 Version 1.0 5.3.4 November 2012 Sounds In the Sounds setup menu audio settings for the LXNAV V3 and alarms settings can be modified. 5.3.4.1 Vario Audio mode Vario audio mode has the following options: • Linear positive: sound is interrupted with silence every few milliseconds when the needle is positive; on negative side sound is linear (not interrupted). • Linear negative: inverse function to Linear positive. • Linear: sound is linear and non-interrupted in full scale range.
V3 Version 1.0 5.3.5 November 2012 Units Use this menu to specify units, UTC time offset and type of ballast input. • • • Load, which is entered in kg/m2 or lb/ft2. Weight of water ballast, which is entered in kg or lb . If this option is used the weights of the glider and pilot must be entered. Refer to Chapters 5.3.7 for more details of how to enter glider and pilot weights. Ballast can be displayed as Overload factor or Wing Load or just weight of ballast.
V3 Version 1.0 5.3.6 November 2012 Display The display menu controls screen brightness. • • Use Brightness control to adjust intensity of the LCD backlight. Upper, Middle and Lower Numeric Display: The parameter displayed can be configured. Following parameters can be displayed: average vertical speed, flight time, Altitude, Altitude in ft, Flight level, Battery voltage, absolute pressure. 5.3.7 Polar and Glider Use this dialogue to enter glider polar and other glider properties.
V3 Version 1.0 November 2012 Polars for most modern gliders are already prepared. Use Glider type control, to list between preloaded glider polars. All glider data will be copied from the chosen polar. The check the best glide ratio and minimum sink rate, to see if the polar data matches the glider performance, you may look in MacCready setting menu. You can modify the polar by changing coefficients a, b and c. A polar is defined as a quadratic equation with the parameters a, b, and c.
V3 Version 1.0 5.3.9 November 2012 About In about page is information about firmware versions, hardware versions and serial numbers.
V3 Version 1.0 6 November 2012 Variometer and Altimeter All signals from the pneumatic sensor (altitude) is derived from high quality pressure sensor which mean that no flask is necessary. The vario signal is derived from the altitude signal. Altitude sensor has temperature compensation. Mechanical needle and colour display show the vario information as well as many other parameters. The display is user configurable. The variometer can be configured to show: • Range 5, 10 and 2.
V3 Version 1.0 7 November 2012 Flying with the LXNAV V3 To get the best out of the LXNAV V3 it is important that some preparation is done prior to take-off. Trying to configure the instrument or set a task while flying is very hazardous especially in a competition. At the least, it could spoil your whole day! Pre-flight preparation will ensure that the flight will be both safe and enjoyable. 7.1 On the Ground 7.1.1 Power on Procedure Press the push button. LXNAV V3 welcome screen will appear.
V3 Version 1.0 November 2012 Use the rotary knob to modify the MacCready setting.
V3 Version 1.0 8 November 2012 Installation The LXNAV V3 requires a standard 57 mm cut-out. One pressure connector is fitted to the back of the V3 vario. It’s total energy (TE) pressure connector 8.1 Installing the LXNAV V3 The LXNAV V3 vario should be mounted in a standard 57 mm hole. Remove rotary knob cap with a knife or flat screw driver, then hold knob and unscrew it. Remove remaining three screws. Install V3 into the panel, screw back all screws and knob.
V3 Version 1.0 November 2012 8.3 Cutout of V3 8.4 Ports and Wiring 8.4.1 LXNAV V3 ports Ext.
V3 Version 1.0 8.4.2 November 2012 Main port On main port is connected V3 wiring. 8.4.2.1 123456 Pin numbers Pin number 1 2,3 Description 12V power supply N.C. 4 (input) Receive to LXNAV V3 RS232 5 (output) Transmit from LXNAV V3 RS232 6 Ground In the moment, serial interface is used only for firmware update. 8.4.3 External Audio port Here is connected optional external speaker with standard 3mm mono phono jack. LXNAV V3 has built in internal speaker.
V3 Version 1.0 9 November 2012 Firmware Update Firmware updates of the LXNAV V3 can be easily carried out using PC. Please visit our webpage www.lxnav.com and check for the updates. You can also subscribe to a newsletter to receive news about the LXNAV V3 automatically. 9.1 Updating LXNAV V3 firmware using PC For update we need V3 cable with serial RS232 interface and free serial port on your PC. If your PC has no serial ports, you can use USB to SERIAL converter. 1.
V3 Version 1.0 November 2012 successfull firmware update LXNAV V3 will start again. Update cable is not included with V3.
V3 Version 1.0 November 2012 10 Revision History November 2012 November 2012 Initial release of owner manual Corrected Ch.5.3.3.4, removed Ch.5.3.