Owner´s manual TDAI 2200 RoomPerfect™
Table of Contents Operating Voltage 4 Input Name 24 Unpacking the TDAI 2200 4 Input Sensitivity 24 Serial Number Registration 4 Introduction 5 Accessories 6 Front Panel 7 Rear Panel 8 Display Indicators 9 25 25 25 25 25 26 26 26 26 27 27 28 28 29 29 29 Remote Control 10 Menu System - Navigating the menu system 11 11 Advanced setup - Communication - Comm Address - Comm Speed - Master/Slave - Line Out - Line Out Control - Line Out Level - Routing - Crossover frequency - Filter type -
Operating Voltage The TDAI 2200 is available in two versions: one for 115V mains voltage and another for 230V mains voltage. Check the label on the TDAI 2200 rear panel and verify you have the version with the proper voltage for your area. The 115V version requires a mains voltage of 110V-120V at 50-60Hz with a current rating of 8A. The 230V version requires a mains voltage of 220V-240V at 50-60Hz with a current rating of 4A.
Introduction Congratulations on your investment in the Lyngdorf Audio TDAI 2200 with RoomPerfect™ The TDAI 2200 is more than just a very good high-end amplifier, one that’s exceptionally pure and natural sounding with even the most ‘demanding’ speaker loads. It also happens to be a completely unique Digital Control Centre.
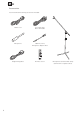
Accessories You should find the following accessories included: Mains cord 8 m (26.25 feet) XLR – XLR cable Microphone 200 mm (7.
Front Panel TDAII 2200 Digital Amplifier Controls The buttons/controls on the front panel of the TDAI 2200 can all be operated either with direct presses or by operating the corresponding keys on the supplied remote control. All the keys on the front panel [except the Mains switch (1)] are duplicated on the remote control as well. 1. Mains switch Powers the TDAI 2200 on/off. Stand-by mode is selected by pressing the mute button (2) for 3 seconds or with the stand-by button on the remote control. 2.
Rear Panel MIC TRIGGER OUT 1. Digital Input 1-3 RCA connectors for SPDIF input 2. Digital Output Selected digital input is sent – full range or filtered via the DSP - to the Digital Output connector for daisychaining more than one TDAI 2200. The sample rate is fixed at 96 kHz. This output is also active when Analog input is selected. 3. Digital input 4 XLR Connector for AES input 4. Optical Digital input 5 Connector for Toslink input 5. Analog output DAC output from DSP Section 6-8.
12. Mic. In (left) / Trigger out (right) DC Trigger out for remote start of SDA 2175 power amplifiers or similar equipment. Mic. in for connection of RoomPerfect™ microphone. 13. RS232 Input/Aux RS232 communication connectors for communication with a PC, remote control from Lyngdorf equipment with broadcast commands or linked control between amplifiers. Input is looped to Aux out for daisy-chaining of amplifiers.
Remote Control The remote control is used to access the menu system and replicate the buttons directly accessible on the front panel. To control the TDAI 2200 the AMP key should be pressed [please note the amplifier’s volume and mute buttons still work when in CD mode]. The functionality of the buttons when AMP is pressed are as follows: 1. Standby The standby button puts the TDAI 2200 in stand-by mode. 1 1 2 3 4 5 6 7 8 9 3 digital 0 info 6 menu 9 2 2.
13. Tuner No function. 14. Channel -/+ Toggles down/up between inputs. 15. Volume Up/down Changes volume in the chosen direction. 16. Up / Down / Left / Right In normal operation mode the Up/Down toggles between bypass and the available Focus and Global filters whereas the Left/Right toggles between neutral and the available voicings. In menu mode they are used for navigation in the menu system. Pressing and holding down a key changes selected values fast. 17.
Menu Tree This is an overview of the entire TDAI 2200 menu in software version 3.0. TDAI 2200 Main Menu RoomPerfect Guided setup Advanced options Measure Focus Pos Measure Room Pos RoomKnowledge RoomCorrection TDAI 2200 Main Menu Display Volume Def. Volume Display Timeout 12 Disp. Brightness Input Name Max. Volume Volume Disp.Timeo.
TDAI 2200 Main Menu Advanced setup Communication Theater Setup Comm Address Comm Speed Master /Slave Line Out Line Out Control Routing Crossover freq .
Introduction to RoomPerfect™ Once the guided set-up has been successfully completed you have the option to listen to music through two listening settings; Focus 1 and Global room correction filters. The RoomPerfect™ filters are stored on the numerical buttons from 1 to 9 on the remote control. To change from one filter to the other you simply press the numerical button corresponding to the desired filter, or toggle between them by pressing the Up/Down buttons on the remote or front panel.
RoomPerfect™ The sub menus accessible in the RoomPerfect™ menu are: RoomPerfect Guided setup Advanced options Advanced options is available when Guided set-up has been performed. Guided Setup When you enter the RoomPerfect™ Main Menu for the first time, only the Guided setup is available. Press Enter to initiate the guided set-up.
Setting the Measurement Volume Level The calibration volume is a recommended maximum volume. It is important that you always judge whether the calibration volume is too loud. The calibration volume should not be so loud that it causes: • uncomfortably loud sounds that are inconvenient to you or your environment, or • damage to your loudspeakers. When the message ‘Connect and place mic. in focus pos.’ appears, connect the microphone to the microphone input found on the back panel.
Focus Measurement When the calibration is OK, press Enter to start the measuring process and ‘Measuring Focus position …’ will be displayed. Each measurement comprises four steps: • A low and a high frequency measuring signal first in the left and then in the right channel. The length of each measurement depends on a combination of the measurement volume, set in the calibration process, and the background noise in your local environment.
When a random measuring position and microphone orientation has been chosen press Enter. The measuring process will start and the display will show ‘Measuring room position 1’. The measurement will stop prematurely if an error occurs during the measuring process. In this case, the error message ‘Retry room measurement – press Enter’ is displayed. Press Enter to continue.
Calculation of Focus 1 and Global Filters When RoomPerfect™ calculates the filters the display shows the following, ‘Calculating filters - Please wait’. The filter calculation process can be expected to take anywhere between 5 seconds and a minute depending on the specific task. When RoomPerfect™ has calculated the room correction filters, they are automatically saved. The Focus filter is saved as setting 1 and Global is saved as setting 9 out of the possible 9 filter settings.
Advanced Options This section describes the options in the advanced menu, which is available after Guided Setup has been completed. Here you can add new listening positions and room measurements, check the RoomKnowledge of your current set-up, and check the RoomCorrection for the different filters. Advanced options Measure Focus Pos Measure Room Pos RoomKnowledge RoomCorrection Measure Focus Pos. As mentioned, it is possible to add 7 different listening/focus positions.
‘Add more room meas.? Yes/No’ will show in the display: • choose Yes to add another room measurement or, • choose No to stop adding more room measurements. If No is chosen the volume is returned to the default or lower. ‘Save room measurement(s)? Yes/No’ will hereafter be shown. • choose Yes to save the performed room measurement, • and No to exit without saving any of the performed measurements. Adding one or more room measurements leads to a re-calculation of all filters (i.e.
Display The sub menus accessible in the Display menu are: Display Display Timeout Disp. Brightness Volume Disp.Timeo. Display Timeout Display timeout set-up is used for enabling/disabling the 10 sec. display ’switch’off’ feature. If enabled the Main Display reading will switch off after 10 sec of inactivity from the remote control or front panel buttons. Disp. Brightness Display brightness is used to control the brightness of the display. The brightness can be set to 25%, 50%, 75% and 100%.
Volume The sub menus accessible in the Volume menu are: Volume Def. Volume Max. Volume Def. Vol. The Default Volume setting controls the default volume at start-up and can be set from 0 to 99 dB. However, a setting over 88 is not recommended as this corresponds to max output with full scale digital input. Max. Vol. The Maximum Volume setting is a safety precaution used for limiting the maximum volume which can be achieved by spinning the wheel or increasing volume via the remote.
Input Name As default, digital inputs are called Digital 1-5 and Analog inputs are called Analog 1-4. To change the name, choose an input and then between the following preset names: • ADC, Analog 1-4, AUX, CD, CD-1, CD-2, DAB, DAT, DBS, DCC, Digital 1-5, DVD, DVD-1, DVD-2, FM, LD, MD, PC, PHONO, RADIO, RIAA, SACD, SAT, TAPE, TUNER, TV, VCR, VDP, VIDEO, VIDEO-1, VIDEO-2.
Advanced setup The sub menus accessible in the Advanced menu are: Advanced setup Communication Menu Routing Delay Firmware Versions Master /Slave Crossover Freq. Remote Control Factory Reset Theater Setup Filter Type Line Out Communication The sub menus accessible in the Communication menu are: Communication Comm Address Comm Speed Comm Address The Communication Address setting identifies the TDAI 2200’s to the PC interface or other Lyngdorf products.
Line Out The sub menus accessible in the ‘Line Out’ menu are: Line Out Line Out Control Line Out Level Line Out Control The Line Out Control sets the output level to be Full Scale (fixed) or regulated. Fixed means there’s a constant full scale output – most often used as ‘tape out’ or when using a Lyngdorf Audio TDAI or SDAI as a ‘slave’ amplifier in a bi-amping set-up. Regulated means that the output level will follow the level of the volume control.
Crossover frequency The crossover frequency can be selected anywhere between 40 – 9999Hz. It is very difficult to give exact guidelines to setting crossover frequency, filter type and order since this depends on the exact drivers and configurations. Therefore, the following recommendations should be seen as a good starting point only. In general, the recommended crossover frequency between (sub)woofers and main speakers is between 200 - 400 Hz.
Delay If you are using a set-up with two main loudspeakers located at an identical distance to the listening position you don’t need to set a delay. However, if the distance isn’t identical and/or you are using a subwoofer, or a Lyngdorf Audio 2+2 system, you need to set a delay in order to ensure that the sound from each loudspeaker reaches the listening position simultaneously. This must be done for main left (ML) and right (MR) and as well as line left (LL) and right (LR).
Remote Control Remote Control set-up makes it possible to activate or de-activate the remote control. This is useful in set-ups with more than one TDAI 2200 amplifier in the room. The master amplifier then becomes the only one receiving signals from the remote, processes them and controls the rest of the TDAI 2200’s over the Lyngdorf RS232 link.
RoomPerfect™ Troubleshooting No microphone connected The error message ‘No microphone connected’ is displayed when no microphone is connected to the TDAI 2200. Solution: • Connect the microphone on the right-hand side of the back panel. No signal 1. The error message ‘Fault – No signal’ is displayed when the incoming signal is classified as pure noise. This happens when the measuring signal is too low compared with the noise from the local environment.
Software upgrading The TDAI 2200 firmware can be upgraded using the ‘Lyngdorf Audio – Serial Load’ software. This is in the PC package available from www.Lyngdorf.com. Follow the upgrade steps shown below to bring the product into upgrade mode.
Connectors Mains Connector Mains voltage to the TDAI 2200 is applied via an IEC320 type connector. The supplied cable with safety ground should be used to connect the TDAI 2200 to a mains outlet. Connect the power input only to the AC source printed on the label. The warranty will not cover any damage caused by connecting to the wrong type of AC mains. Always disconnect the TDAI 2200 from the mains before changing any connections to its inputs or outputs.
Optional AD Converter Board The Optional AD Converter card for the TDAI 2200 has input connectors for both balanced (XLR) and unbalanced (RCA) signals. The input impedance of the inputs are 10 kOhm. Balanced inputs The balanced XLR inputs are wired in accordance with IEC268: Pin 1: Chassis and ground. Pin 2: Hot (+). Pin 3: Cold (-). Shell: Chassis and ground. Unbalanced inputs The unbalanced RCA inputs are wired in accordance with normal practice: Shell: Chassis and ground. Pin: Hot (+).
Technical Specifications Audio Parameter Value Note Balanced input connectors 3 pin XLR, gold-plated. Case=Gnd, Pin1=Gnd, Pin2=Hot(+), Pin3=Cold(-) Balanced input impedance 10kOhm AC-coupled. Unbalanced input connectors RCA (phono) jack, gold-plated. Case=Gnd, Tip=Hot(+) Unbalanced input impedance 10kOhm AC-coupled DAC Out impedance 75 Ohm Gain According to volume control setting. 88 dB = 0 dB with sensitivity normal and rel. volume 0 dB Input sensitivity 4.4V (2.2V with high sens.
Protection Parameter Value Note Grounding Mains earth, chassis and audio ground are connected internally. Output short circuit current ±40A Output DC voltage ±5V @ <0.1Hz Over temperature All heat sinks and mains-trans- Auto resetting thermal fuse in former. mains transformer. Mains Parameter Value Note Mains input connector IEC 320 cold type Mains lead supplied.
Technical Assistance For latest version of control software, newest version of this document and ‘Questions and Answers’, please check the ‘Support’ section on the Lyngdorf Audio website. If you have any problems with or questions regarding your Lyngdorf Audio product, please contact your nearest Lyngdorf Audio representative or: Lyngdorf Audio Vaeselvej 114 DK7800 Skive Denmark E-mail: info@lyngdorf.com Web: http://www.lyngdorf.
Appendix Voicing Curves Music 1 Music 2 Ma gnitude R esponse: Music 2 6 4 4 2 2 Magnitude (dB ) Magnitude (dB ) Ma gnitude R esponse: Music 1 6 0 -2 0 -2 -4 -4 -6 -6 10 Hz 100 Hz 1kHz 10kHz 10 Hz 100 Hz F requency (Hz) Relaxed Ma gnitude R esponse: Open 6 6 4 4 2 2 Magnitude (dB ) Magnitude (dB ) 10kHz Open Ma gnitude R esponse: R ela x ed 0 -2 -4 0 -2 -4 -6 -6 10 Hz 100 Hz 1kHz 10 Hz 10kHz 100 Hz 1kHz 10kHz F requency (Hz) F requency (Hz) Soft Open Air Ma gni
www.lyngdorf.