
Installation Guide


CAUTION: Read this instruction and your hood installation instruction before starting installation. Plan the
complete installation before starting any work. This includes all aspects of the installation
including hood location, ducting, electrical requirements and adequacy of mounting
surfaces.
NOTE: The duct and electrical connection cutouts, when using a canopy extension, are to be per this
instruction and not those described in the hood installation instruction.
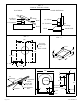
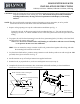
1. Prepare ceiling opening to accept duct and transition installation per Fig - 1.
Locate the 120 volt, 60 Hz power supply in the crosshatched area “A”. You can increase the total
opening by the area, “A” which will allow access to the hood junction box from the space above the
ceiling.
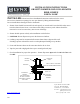
2. To prepare the wall for hood mounting, locate the four (4) mounting holes (7/32 Dia.) in the hood back
and layout the hole pattern on the wall.
Note: Use # 10 screws to fasten hood to wall framing or wall anchors and #10 screws if framing
is not present. Do not screw into wallboard.
HINT: You can mount the canopy extension to the hood, position hood against wall/ceiling, and mark
the mounting hole locations on the wall.
3. Lay hood in its back surface, position canopy extension on the hood top and secure with six (6) #8- SMS
provided, three (3) on each side. See Fig - 2.
4. Install transition to top of hood per instructions supplied with same.
5. Position hood, as prepared above, and secure with (4) #10 screws (see step-2).
6. Complete the electrical connections, duct connections and install ventilator per hood installation
instructions. Turn power on and check all operations.
Wall
Ceiling
6"
C
L
Of Hood
Fig - 1
Fig -2
NOTE: Provide Cutout In Ceiling for
" A "
Extension
Hood
Screw From
Inside Of Hood
Center Of Transition/Ducting
Transition/Ducting
HOOD EXTENSION KITS
INSTALLATION INSTRUCTIONS
LHE636, LHE1236 / LHE648, LHE1248 / LHE660, LHE1260
s