
Installation Guide


Page 3 of 8 P/N 11857.00 Rev A
Hood Width
4"
60"
48"
Wiring Access
5"
20-3/8
14-3/8
10-3/8
Dim "A"
"A"
C
L Top Of Hood
3/4"
FIG - 6
Back Wall
12"
FIG - 5
36"
Bottom View Of Cabinet
HOOD MODELS LOHI
Internal Or Remote Blowers
REAR EXHAUST
C
L Of Hood
14-1/2"
7-1/4"
1-3/4"
10-1/2"
FIG - 7
Rear Exhaust
Center Of Round Duct Using
Transition
A
Cut Hole In Drywall
To Accept Transition # 33895
Top Of Hood
A
Width Of Hood
Rotate
Into
Position
& Secure
With 2 Screws
B
A
LOHI
Add Furring Strips To Provide An Even
Bottom Surface For The Hood Mounting
Transition
To 10" Duct
Or Wall Cap
Route To Outside
Secure Transition To Hood Using #6 x 3/8"
Sheet Metal Screws. Tape All Joints And Seams.
18"
7-1/8"
FIG - 4
4"
5" "A"
C
L
7-1/8"
3/4"
FIG-1
Back Wall
10-1/4"
12"
FIG - 3
Bottom View Of Cabinet -
HOOD MODELS LOHI
Internal Or Remote Blowers
TOP EXHAUST
Air Flow
Remove Knock Out # 1
FIG-2
Secure Transition To Hood Using #6 X 3/8"
Sheet Metal Screws. Tape All Joint & Seams
Wiring Access
Rotate
Into
Position
& Secure
With 2 Screws
LOHI
Transition
To 10" Duct
12"
3"
All Hoods
30"
18"
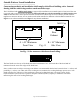
10" Duct to
Discharge W/Roof Cap
Transition # 33895
Vertical Discharge
The 10" Discharge With Transition
Will Be On The Center Line Of Hood Width
And On Center Line of 12" Dimension.
10-3/8
14-3/8
20-3/8
Dim "A"
48"
60"
Hood Width
36"
Bottom Surface For The Hood Mounting
Add Furring Strips To Provide An Even
7-1/8"
Remove Knock Out # 2
W/Wall Cap - LOHC
Use # 33895
Use # 33895