4-Port ADSL Router Lynx L-325 User Manual Version 1.0 Version Date: July 8, 2005 Document #: BD-AU0007-10 Table of Contents GENERAL INFORMATION ...............................................................3 Package Contents..................................................................3 Safety Instructions—Please read. ...........................................3 Front Panel View....................................................................4 Back Panel View ..................................
INSTALLATION DIAGRAM ...............................................................7 CONFIGURING YOUR COMPUTER ..................................................8 Windows 2000........................................................................8 Windows XP...........................................................................9 LOG IN TO THE ROUTER ..............................................................10 DEVICE INFO............................................................................
Restore User Settings ......................................................46 Restore Default.................................................................46 System Log ..........................................................................47 Configure System Log ......................................................48 SNMP...................................................................................48 Internet Times ......................................................................
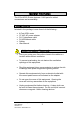
General Information The 4-Port ADSL Router features 4 LAN ports for added convenience and accessibility. Package Contents Included in the package is one of each of the following— • • • • • • 4-Port ADSL router 15 VAC AC power adapter RJ-11 telephone cable RJ-45 Ethernet cable Splitter User Manual Safety Instructions—Please read. • Place your router on a flat surface close to the cables in a location with sufficient ventilation.
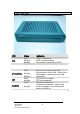
Front Panel View LED Mode Indication DSL Solid No light Blinking ADSL is connected. ADSL is not connected. The router is connected to ADSL. Solid Router is connected to the LAN. No connection to the LAN. Check if the LAN cable is connected to the router. LAN traffic PPP user ID accepted PPP not connected Router is powered on. Router is not powered. Check if the router is plugged in and if the power switch is turned on.
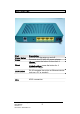
Back Panel View Port Description Power Switch Power Press to turn the router on and off. Connects to a 15 VAC AC power adapter. Restart—press the button for less than 4 seconds. Default settings—press the button for 4 seconds or longer. RJ-45 connects the unit to an Ethernet device such as a PC or a switch. Reset LAN1-LAN4 Line ADSL connection. 4-Port ADSL Router Lynx L-325 User Manual Version 1.
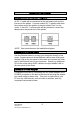
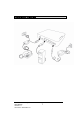
Installing the Router Connect the ADSL Line and Telephone An RJ-11 cable will be connected to the wall phone jack and the line-end of the splitter. Connect another RJ-11 phone cable from the modem-end of the splitter to the port labeled “line” on the router. A third RJ-11 phone cable will be needed to connect the telephone to the phone-end of the splitter. NOTE: See connections on the installation diagram. Connect the PC to the Router Use the Ethernet cable to connect your computer directly to the router.
Installation Diagram 4-Port ADSL Router Lynx L-325 User Manual Version 1.
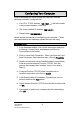
Configuring Your Computer Prior to accessing the router through the LAN port, note the following necessary configurations— • Your PC’s TCP/IP address: 192.168.1.__( the last number is any number between 3 and 254) • The router’s default IP address: 192.168.1.1 • Subnet mask: 255.255.255.0 Below are the procedures for configuring your computer. Follow the instructions for the operating system that you are using. Windows 2000 1.
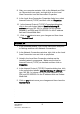
8. After your computer restarts, click on the Network and Dialup Connections icon again, and right click on the Local Area Connection icon and then select Properties. 9. In the Local Area Connection Properties dialog box, select Internet Protocol (TCP/IP) and then click on Properties. 10. In the Internet Protocol (TCP/IP) Properties dialog box, click in the radio button labeled Use the following IP address and type 192.168.1.x (where x is any number between 2 and 254) and 255.255.255.
Log in to the Router This section explains how to log in to your router using the following steps— 1. Launch your web browser. 2. Enter the URL http://192.168.1.1 in the address bar and click on Enter. A login screen like the one below will be displayed after you connect to the user interface. 3. Enter your user name and password, and then click on OK to display the user interface. NOTE: There are two default user name and password combinations.
Device Info This section describes the system information that can be accessed using the menu items under Device Info. Summary Access the general status report from the router by clicking on “Summary” under “Device Info”. It shows information about the router such as software version, bootloader, etc. It also displays the current status of your DSL connection as shown below— WAN Access the WAN status report from the router by clicking on “WAN” under “Device Info”.
Below is how the screen will look once a WAN connection is set up. STATISTICS LAN Statistics Access the LAN statistics from the router by clicking on the “LAN” item under “Statistics”. WAN Statistics Access the WAN statistics from the router by clicking on the “WAN” item under “Statistics”. 4-Port ADSL Router Lynx L-325 User Manual Version 1.
ATM Statistics Access ATM statistics from the router by clicking on the “ATM” item under “Statistics”. ADSL Statistics You can view ADSL statistics by clicking on the “ADSL” item under “Statistics”. Information contained in this screen is useful for troubleshooting and diagnostics of connection problems. 4-Port ADSL Router Lynx L-325 User Manual Version 1.
4-Port ADSL Router Lynx L-325 User Manual Version 1.
ADSL BER Test A Bit Error Rate Test (BER Test) is a test that reflects the ratio of error bits to the total number transmitted. If you click on the ADSL BER Test button at the bottom of the ADSL Statistics page, the following pop-up screen will appear allowing you to set the tested time and to begin the test. Below is an ADSL BER Test result screen displaying information about the test and the error bits and ratio. 4-Port ADSL Router Lynx L-325 User Manual Version 1.
4-Port ADSL Router Lynx L-325 User Manual Version 1.
Route Access the routing status report from the router by clicking on the “Route” item under “Device Info”. ARP Access the ARP status report from the router by clicking on the “ARP” item under “Device Info”. 4-Port ADSL Router Lynx L-325 User Manual Version 1.
Quick Setup This section will explain how to configure the router for the sole purpose of connecting to the Internet. ATM PVC Configuration To enable the DSL auto-connect process, click on the box labeled DSL Auto-connect, a process that will automatically detect the first usable PVC and automatically detect PPPoE, PPPoA, and Bridge Protocol (with DHCP Server available). To continue, click on the Next button. If you uncheck the DSL Auto-connect box, the resulting screen is seen below.
Following is the Connection Type screen where you select the type of network protocol and encapsulation mode over the ATM PVC that your ISP has instructed you to use. The following is a PPPoA example. Click on Next to continue. Enter the PPP username and password as given by your ISP. Then decide if you will be using any features such as dial on demand, PPP IP extension, keep alive and then click on Next. 4-Port ADSL Router Lynx L-325 User Manual Version 1.
The next step is to configure the Network Address Translation (NAT) settings. For the example, NAT will be enabled. Leave the remaining fields at default and click on Next to continue. You can configure the DSL Router IP address and Subnet Mask for the LAN interface to correspond to your LAN’s IP Subnet. If you want the DHCP server to automatically assign IP addresses, then enable the DHCP server and enter the range of IP addresses that the DHCP server can assign to your computers.
If you have a second IP address and subnet mask for the LAN interface, click on the checkbox to configure it. See below example below. After all of the WAN configurations have been made, the WAN Setup Summary screen displays all WAN settings that you have made. Check that the settings are correct before clicking on the Save / Reboot button. Clicking on Save / Reboot will save your settings and restart your router. 4-Port ADSL Router Lynx L-325 User Manual Version 1.
Advanced Setup This section of the setup is an advanced version of the quick setup. If you want to make specific configurations to your router such as firewall, port mapping, quality of service, DNS, etc., consider going through this advanced setup for a more comprehensive configuration. WAN Configure the WAN settings as provided by your ISP. This section is basically the same as the Quick Setup section for configuring a WAN connection.
• VPI: Virtual Path Identifier. The valid range is 0 to 255. • VCI: Virtual Channel Identifier. The valid range is 32 to 65535. • Service Category: Five classes of traffic are listed— o UBR Without PCR (Unspecified Bit Rate without Peak Cell Rate)—UBR service is suitable for applications that can tolerate variable delays and some cell losses.
Connection Type This screen shows the below types of network protocols and encapsulation modes— • • • • • PPP over ATM (PPPoA) PPP over Ethernet (PPPoE) MAC Encapsulation Routing (MER) IP over ATM (IpoA) Bridging Select the mode that your ISP has instructed you to use and click on Next. The example below is a bridge connection type. After you click on Next, the below screen appears allowing you to disable the bridge service if desired. 4-Port ADSL Router Lynx L-325 User Manual Version 1.
When the settings are complete, the next screen shows a WAN Setup – Summary screen displaying the WAN configurations made. After the settings are saved, the below screen will follow, displaying the WAN settings that you made with the option to Add or Remove any of the connections that you have made. When satisfied with the settings click on the Finish button. 4-Port ADSL Router Lynx L-325 User Manual Version 1.
After selecting the Finish button, the below screen will appear. At this point, the router will reboot to save the changes made. LAN Local Area Network (LAN) Setup You can configure the DSL Router IP address and Subnet Mask for the LAN interface to correspond to your LAN’s IP Subnet. If you want the DHCP server to automatically assign IP addresses, then enable the DHCP server and enter the range of IP addresses that the DHCP server can assign to your computers.
NAT If you enable NAT (Network Address Translation), you can configure the Virtual Server, Port Triggering, and DMZ Host. Virtual Servers A virtual server allows you to direct incoming traffic from the WAN side to a specific IP address on the LAN side. Click on the Add button to set up a virtual server. 4-Port ADSL Router Lynx L-325 User Manual Version 1.
In the next screen, select the virtual server from the drop-down list and complete the server IP address, then click on the Save / Apply button. The following screen appears after you save your selection. To add additional virtual servers, click on the Add button. If you need to remove any of the server names, select the check box and click on the Remove button. 4-Port ADSL Router Lynx L-325 User Manual Version 1.
Port Triggering Click on the Add button to add Port Triggering to your Internet application. The below screen appears when you click on Add allowing you to select the application that you want to set the port settings for. After a selection has been made, click on the Save / Apply button. 4-Port ADSL Router Lynx L-325 User Manual Version 1.
The below screen appears after you save your selections showing the name of the application that you have added a port triggering function. You will be able to add or remove selections made, by clicking on the Add and Remove buttons. DMZ Host You can define the IP address of the DMZ Host on this screen. Enter the IP address and click on Save / Apply. 4-Port ADSL Router Lynx L-325 User Manual Version 1.
Firewall IP Filtering—Outgoing The outgoing filter will block LAN traffic from entering the WAN side. Click on the Add button to create filters. The below screen will appear when you click on Add. Input the filter name, source information (from the LAN side), and destination information (from the WAN side). Then click on Save / Apply. 4-Port ADSL Router Lynx L-325 User Manual Version 1.
IP Filtering—Incoming Incoming filter filters the WAN traffic to the LAN side. Click on the Add button to add incoming filter settings. Enter a filter name, information about the source address (from the WAN side), and information about the destination address (to the LAN side). Select the protocol and WAN interface, and then click on Save/Apply to add the setting. 4-Port ADSL Router Lynx L-325 User Manual Version 1.
MAC Filtering MAC filtering can forward or block traffic by MAC address. You can change the policy or add settings to the MAC filtering table using the MAC Filtering Setup screen. If you click on Change Policy, a confirmation dialog appears, allowing you to verify your change. 4-Port ADSL Router Lynx L-325 User Manual Version 1.
If you want to add a setting to the MAC filtering table, enter the Source and Destination MAC address, and select protocol type, frame direction, and WAN interface. Then click on Save / Apply to save it. After you save the settings, a screen showing the settings will appear. On this screen you will be able to view and delete MAC filtering rules.
2. If you need to edit an entry, then click on the Edit button. After clicking the Add button, the below configuration screen appears, allowing you enter the groups and the interfaces they are associated with. 4-Port ADSL Router Lynx L-325 User Manual Version 1.
Quality of Service You can configure the Quality of Service to apply different priorities to traffic on the router. Click on Add to view the Add Network Traffic Class Rule screen. This screen allows you to add a network traffic class rule. Procedures for this setup are as follows— 1. Give a name to this traffic class. 2. Assign a priority level—low, medium, and high—to this traffic class. 3. Select an IP precedence from the range of 0-7. 4.
Routing Default Gateway You can enable automatic assigned default gateway on the Routing – Default Gateway screen. As default, the box is checked for automatic assigned default gateway to be enabled. Click the Save / Apply button to enable or disable this feature. 4-Port ADSL Router Lynx L-325 User Manual Version 1.
If you do not want to enable Automatic Assigned Default Gateway, then uncheck the box as seen below. You will be given the choice to use the default gateway IP address. If you decide to change the automatic assigned default gateway address, you must reboot the router to be assigned a new default gateway IP address. Also, select the WAN interface that you will be using. Click on Save / Apply to save the settings. Static Route Use the Routing – Static Route screen to add a static route to the routing table.
RIP If RIP is enabled, the router operation can be configured as active or passive. DNS DNS Server Use the DNS Server screen to request automatic assignment of a DNS or to specify a primary and secondary DNS. 4-Port ADSL Router Lynx L-325 User Manual Version 1.
If you uncheck the Enable Automatic Assigned DNS checkbox, then there will be two additional fields—primary and secondary DNS server—to enter as seen below. Dynamic DNS Dynamic DNS is a service for allowing an Internet domain name to be assigned to a varying IP address. This makes it possible for other sites on the Internet to establish connections to your without needing to track the IP address themselves. Click on Add to set up a dynamic DNS configuration.
This screen allows you to add a dynamic DNS address from DynDNS.org or TZO. Enter the hostname and the interface that you are using. Also enter the username and password assigned by the DNS service. Click on Save / Apply to save these configurations. ADSL The DSL settings page contains three sections—modulation, phone line, and capability—that should be specified by your ISP. Consult with your ISP to select the correct settings for each.
DSL Advanced Settings The test mode can be selected from the DSL Advanced Settings page. Test modes include—normal, reverb, medley, no retrain, and L3. After you make your selections of the test mode, click on Apply to save these settings first before you go to Tone Selection. 4-Port ADSL Router Lynx L-325 User Manual Version 1.
Tone Settings The frequency band of ADSL is split up into 256 separate tones, each spaced 4.3125 kHz apart. With each tone carrying separate data, the technique operates as if 256 separate modems were running in parallel. The tone range is from 0 to 31 for upstream and from 32 to 255 for downstream. Do not change these settings unless so directed by your ISP. 4-Port ADSL Router Lynx L-325 User Manual Version 1.
Diagnostics The diagnostics screen allows you to run diagnostic tests to check your DSL connection. The results will show test results of three connections— • Connection to your local network • Connection to your DSL service provider • Connection to your Internet service provider There are two buttons at the bottom of the page—Test and Test with OAM F4—which will allow you to retest if necessary. 4-Port ADSL Router Lynx L-325 User Manual Version 1.
Management The Management section gives you access to certain setups for the purpose of maintaining the system, including backing up the configurations, viewing system log, maintaining access control, updating software, etc. Settings Backup Settings To save a copy of the configurations that you have made on your router, click on the Backup Settings button. The below pop-up screen will appear with a prompt to open or save the file to your computer. 4-Port ADSL Router Lynx L-325 User Manual Version 1.
Restore User Settings To restore saved settings, select Management→Settings→Restore User Settings. Select the backup file you want to restore and click on Update Settings. The router will restore settings and reboot to activate the restored settings. Restore Default Restore Default will delete all current settings and restore the router to factory default settings. To restore the router to factory default settings, select Management→Settings→Restore Default. Click on the Restore Default Settings button.
The router will restore the default settings and reboot. System Log The System Log dialog allows you to view the System Log and configure the System Log options. To view the System Log click on the View System Log button to check the log file. Below is a view of the System Log. 4-Port ADSL Router Lynx L-325 User Manual Version 1.
Configure System Log If the log is enabled, the system will log selected events: Emergency, Alert, Critical, Error, Warning, Notice, Informational, and Debugging. All events above or equal to the selected log level will be logged and displayed. If the selected mode is “Remote” or “Both”, events will be sent to the specified IP address and UDP port of a remote system log server. If the selected mode is “Local” or “Both”, events will be recorded in the local memory.
Internet Times The Time Settings page allows you to automatically synchronize your time with a timeserver on the Internet. If you choose to automatically synchronize with Internet time servers, then click on the box and the below fields appear. Select from the list of NTP (Network Time Protocol) time servers. Then select the time zone that you are in and click on Save / Apply to save and complete your time settings. 4-Port ADSL Router Lynx L-325 User Manual Version 1.
4-Port ADSL Router Lynx L-325 User Manual Version 1.
Access Control You can enable or disable some services of your router by LAN or WAN. If no WAN connection is defined, only the LAN side can be configured. Services IP Addresses Web access to the router can be limited when Access Control Mode is enabled. The IP addresses of allowed hosts can be added using Access Control→IP Address. Add the IP address to the IP address list by clicking on the Add button, then select “Enabled” to enable Access Control Mode.
To assign the IP address of the management station that is permitted to access the local management services, enter the IP address in the box and click on the Save / Apply button. Passwords Access the Passwords screen under the Access Control section to change a password. Select an account and enter the current password and the new password and then click on the Save / Apply button. 4-Port ADSL Router Lynx L-325 User Manual Version 1.
Update Software If your ISP releases new software for this router, follow the below steps to perform an upgrade. Reboot Router Select Management→Reboot Router to reboot the router using the web interface. The router will save the current configuration and reboot itself using the new configuration. 4-Port ADSL Router Lynx L-325 User Manual Version 1.