*," -- " Ê , - User Manual / Installation Instructions Outdoor Ice Machine MODEL: L15ICE Lynx Professional Grills 6023-25 Bandini Blvd., Commerce, CA 90040 Service: (888) Buy-Lynx (888-289-5969) Tel: (323) 838-1770 Fax: (323) 838-1778 www.lynxgrills.com As product improvement is an ongoing process at Lynx, we reserve the right to change specifications and design without notice. Part #31966 Rev.
Important Safety Instructions IMPORTANT Only qualified service technicians should attempt to install, service or maintain this icemaker. No installation, service or maintenance should be undertaken until the technician has thoroughly read this Instruction Manual. Likewise, the owner/manager should not proceed to operate the icemaker until the installer has instructed them on its proper operation.
Contents IMPORTANT 1. This booklet is an integral and essential part of the product and should be handed over to the user. Read the warnings contained in this booklet carefully as they give important indications regarding the safety of the installation, use and maintenance. Please preserve this booklet for any further consultation that may be necessary. 2. This icemaker should be destined only to the use for which it has been expressly conceived.
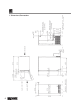
Specifications A.
Specifications B. Nameplate Rating Ice Machine MODEL NUMBER SERIAL NUMBER AC SUPPLY VOLTAGE AMPERES DESIGN PRESSURE REFRIGERANT L15ICE 115-120/60/1 3.4 AMPS HI-240PSI LO-120PSI 134a 4.2 oz. MOTOR-COMPRESSOR THERMALLY PROTECTED APPROVED FOR OUTDOOR USE Lynx Grills,America, Inc. Hoshizaki Inc. Peachtree City, GA Commerce, Ca www.hoshizaki.com www.lynxgrills.com LISTED ICE MAKER 946Z See the nameplate for electrical and refrigeration specifications. This nameplate is located on the rear panel.
C.
II. Installation Instructions A. Checks Before Installation Visually inspect the exterior of the shipping container and report any severe damage to the carrier. WARNING Remove shipping tape(s) and packing as follows. If any are left in the icemaker, it will not work properly. IMPORTANT 1. Remove shipping tape holding the door. 2. Ensure all components, fasteners and thumbscrews are securely in place. • Remove the package containing accessories. Remove shipping tape holding the separator.
2. Built-in Installation Site IMPORTANT 1. Do not let the weight of the counter rest on the icemaker. 2. Do not build in the icemaker in a corner where the door will hit other equipment such as an oven handle or where the icemaker cannot be pulled out for service. INSTALLATION SPACE Height Width 34" (864 mm) minimum 15" (381 mm) minimum Depth 24" (610 mm) minimum Between a Cabinet and an Open Space Min. 34" Min.
C. Setup 1. General 1. Make sure the unit is completely unpacked and that all shipping cartons, tapes and packing are removed BEFORE operating the unit. Be careful not to damage the exterior panels when handling the ice machine 2. Position the ice machine in a selected site. Clean the interior with soap and water and rinse thoroughly. 3. Make water supply and drain connections (See "2. Water Supply and Drain Connections.") 4. Plug in the ice machine. (See "3. Electrical Connections.") 5.
2. Water Supply and Drain Connections WARNING To prevent damage to the freezer mechanism, do not operate this icemaker when the water supply is OFF, or if the pressure is below the recommended minimum water pressure of 10 PSIG (0.7 bar). Stop the icemaker until proper water pressure is resumed. • Water supply inlet is 1/2" FPT and must be connected only to a potable water supply. • A water supply line shut-off valve and drain valve must be installed.
3. Electrical Connections WARNING THIS APPLIANCE MUST BE GROUNDED. This icemaker requires a ground that meets national and local electrical code requirements. To prevent possible severe electrical shock injury to individuals or extensive damage to equipment, install a proper ground wire to this icemaker. Remove the plug from the electrical outlet before any maintenance, repairs or cleaning is undertaken. • This icemaker must be plugged into a separated power receptacle which has enough capacity.
D. Startup Check that shipping tape(s), string and packing are removed before starting the icemaker. 1) Clean inside the storage bin and door. 2) Open the water supply line shut-off valve and plug in the icemaker. 3) Move the control switch to the "ICE" position. The freezing cycle will start automatically. E. Preparing the Icemaker for Long Storage WARNING Drain the icemaker to prevent damage to the water supply line at subfreezing temperatures, using air or carbon dioxide.
III. Cleaning and Maintenance IMPORTANT 1. Ensure all components, fasteners and thumbscrews are securely in place after any maintenance or cleaning is done to the equipment. 2. Wash your hands before removing ice. Use the scoop provided to remove ice. 3. Keep the scoop clean. Clean it by using a neutral cleaner at least once a day, and rinse thoroughly. 4. Close the bin door after removing ice to prevent entrance of dirt, dust or insects into the bin. 5.
2. Cleaning Procedure The cleaning process will remove lime deposits from the water system. 1) Remove all ice from the evaporator and the storage bin. Note: To remove cubes on the evaporator, move the control switch to the "OFF" position and move it back to the "ICE" position after 3 minutes. The defrost cycle starts and the cubes will be removed from the evaporator. 2) Move the control switch to the "OFF" position. Close the water supply line shut-off valve.
12) Move the control switch to the "WASH" position to circulate clean water for about 5 minutes. 13) Move the control switch to the "OFF" position, then remove the water tank, drain it, and replace it as described in 3) through 6). 14) Repeat 12) and 13) three more times to rinse thoroughly. 3. Sanitizing Solution Dilute 0.5 fl. oz. (14.8 ml or 1 tbs) of 5.25% sodium hypochlorite solution (chlorine bleach) with 1 gallon (3.8 l) of warm water.
7) Spread out the tabs on both sides to unlock the water tank, and pull it out toward you. Soak the water tank in the sanitizing solution for 10 minutes. Unlock Unlock Frame Pipe 8) Lift off the ice chute from the front frame pipe and then from the rear frame pipe. Soak the ice chute in the sanitizing solution for 10 minutes. Ice Chute 9) Pull the discharge tube from the spray assembly. Remove the assembly by pulling it toward you. Discharge Tube Spray Assembly 10) Remove the two caps.
13) Position and lock the ice chute onto the front and rear frame pipes by pushing the chute down until it clicks onto both pipes. Bracket 14) Slide in the water tank along the rails at the bottom of the right and left brackets until it clicks into place. Lock Lock Rail Rail 15) Refit the suction tube onto the water tank inlet by pushing the joint to lock it securely in the direction of the arrows. A loose fitting may cause a water leak.
Important Safety Instructions 24) Spread out the tabs on both sides of the water tank to unlock it, then pull it out toward you. Drain the tank. 25) After draining, slide in the water tank along the rails at the bottom of the right and left brackets until it clicks into place. Unlock Unlock Bracket Lock Lock Rail Rail 26) Refit the suction tube onto the water tank inlet by pushing the joint to lock it securely in the direction of the arrows. A loose fitting may cause a water leak.
Ice Machine Warranty I. Limited One -Year Warranty. Ice Machine shall be free from defects in material and workmanship under normal and proper use and maintenance as specified by Lynx and upon proper installation and start up in accordance with the instruction manual supplied with the product when subjected to normal domestic use and service, for a period of one year after original date of purchase.
*," -- " Ê , - The Lynx Story… Lynx began as the vision of a group of people with over a century of collective experience, who for 35 years were manufacturing top-of-the-line stainless steel products for the commercial food service industry. Lynx has taken that same quality, workmanship, service and innovation and incorporated it into the Lynx Professional Grills line of products.