INTRODUCTION Congratulations on your purchase of a Lynx residential refrigeration product. Lynx has taken its expertise and experience into creating the highest quality and most innovative residential products on the market. Lynx’s product offering gives you the opportunity to enjoy the functionality and user friendliness outdoors, or in just about any room of your home. All Lynx products are built with commercial-grade stainless steel – providing you with the beauty and durability for a lifetime of use.
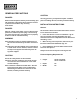
TABLE OF CONTENTS INTRODUCTION…………………………………………………………………………………….…….. 2 PLEASE RECORD YOUR MODEL’S INFORMATION…………………………………….…….…… 2 WARRANTY REGISTRATION CARD…………………………………………………………………... 2 TABLE OF CONTENTS……………………………………………………………………………….….. 3 GENERAL PRECAUTIONS…………………………………………………………………...…….…… 4 INSTALLATION INSTRUCTIONS………………………………………………………………………. 4 FIGURE 1 SPECIFICATION DRAWING………………………………………………..……………… 5 PREPARING THE SPACE………………………………………………………………..……………...
GENERAL PRECAUTIONS CAUTION: DANGER: Risk of child entrapment, before you throw away your old refrigerator, take off the doors and leave shelves in place so that children may not easily climb inside. Use only genuine Lynx replacement parts. Imitation parts can damage the unit, and may void the warranty.
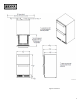
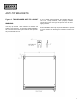
Figure 1 Dimensions 5
PREPARING THE SPACE Make sure that the opening where the unit is to be installed is properly prepared. Refer to Figure 1 to ensure the space dimensions and electrical service are correct for the models to be installed. CAUTION: Where a two-prong wall receptacle is encountered or a longer power cord is required, contact a qualified electrician to have it replaced in accordance with applicable electrical codes.
ANTI-TIP BRACKETS Figure 2. TWO-DRAWER ANTI-TIP LAYOUT WARNING: Unit may tip forward when drawers are loaded and pulled to open position. To provide a stable installation, the unit must be secured in place with the anti-tip brackets provided with the unit. A set of metal anti-tip brackets are supplied with the unit. The anti-tip brackets, when properly installed should secure the rear legs and prevent the unit from tipping forward.
INSTALLING IMPORTANT NOTE: If installing on a concrete floor, concrete fasteners are required and not included with the anti-tip kit. CAUTION: Any finished flooring should be protected with appropriate material to avoid damage from moving the unit. If unit has been laid on its back or sides, place unit upright and allow minimum of 24 hours before connecting power. 1. Plug the unit into the 15 amp grounded GFI outlet located in the installation opening.
TOE PLATE INSTALLATION When the unit is secured in place, install the louvered toe plate. Secure louvered toe plate by snapping the latch into the latch catch on the unit. CAUTION: The louvered toe plate must be removable for servicing. The floor cannot interfere with removal. The louvered sections of the toe plate must not be covered or obstructRefer to Figure 3 TOE-PLATE INSTALLATION ILLUSed so as to prevent proper air circulation. TRATION Figure 3. TOE PLATE INSTALLATION.
Drawers with all products. Move each extender separately. Hold the middle of one extender, pull the front up then move extender ½-inch to the inside of unit. Pull up then pull out. Place extender at desired height, place rear standoff screw into rear pilaster, slide back. Place front standoff screw into front pilaster, slide down. To return drawer, first push both extenders completely in then line up the shelf grooves and slide easily into the unit.
OPERATION Temperature Control Panel The Lynx L24DWR comes equipped with a state of the art refrigeration system. The compressor is of a variable speed variety, which automatically changes speeds based on system conditions and load. The cabinet is equipped with an adjustable digital temperature controller and LED display. The controller is located inside of the unit. The display will read OFF when unit off and will show temperature when unit is on.
TEMPERATURE CONTROLLER 12
IMPORTANT NOTE: Dependent on the model and configuration, the controllers have been programmed to only allow a temperature adjustment within a specified range CHART 1. PRODUCT TEMPERATURE SET POINTS AND RANGES.
CHECKING PRODUCT TEMPERATURE MAINTENANCE To accurately check the temperature of the product stored in a refrigerated compartment, insert an accurate thermometer into a plastic (non-breakable) bottle, partially filled with water. Tighten the bottle cap securely. Place the bottle in the desired area for 24 hours. Refrain from opening the unit during the testing period. After 24 hours, check the temperature of the water. Adjust the control settings if necessary and re-test.
TROUBLESHOOTING Is the interior light ON? BEFORE CALLING FOR SERVICE Controller display is flashing “LA” If the unit appears to be malfunctioning, read through NORMAL OPERATION first. If the problem persists, check the TROUBLESHOOTING GUIDE. Locate the problem in the guide and refer to the cause and its remedy before calling for service. The problem could be some thing, which can be solved without a service call.
The refrigerated compartment is warmer than usual Is your control set properly? Is the light staying on? Is your condenser area clean and free of obstructions? Has the door been open for a long time or more frequent door openings occurred? Are the internal louvers and fan guard openings obstructed? Has warm product just been placed in the cabinet? You need product information Contact Lynx Grills Inquire via the WEB at www.Lynxgrills.
WARRANTY One Year Parts and Labor Warranty: For one year from the date of original purchase, within the United States and Canada, when used and maintained according to instructions, Lynx Grills warranty covers all parts and labor to repair or replace any part of the product, which proves to be defective in material and workmanship.
5895 Rickenbacker Road ● Commerce, CA 90040 ● 888-289-5969 ● Fax 323-838-1778 ● www.lynxgrills.