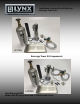
Installation, Care and Use of Your Lynx Beverage Tower Kits MOM FRIENDLY. DAD READY.
Introduction: Your Lynx Beverage Kits comes with all of the components necessary to install a keg tap and tray to an outdoor island or to the Lynx model L24BF or LM24BF outdoor refrigerators. The Lynx model L24BF and LM24BF outdoor refrigerators have been designed specifically to work with the Beverage Kits. The L24BF refrigerator cavity is designed to accommodate two 1/6 kegs, or all single standard keg sizes except a ½ keg or larger (not provided), the CO2 tank and required connections.
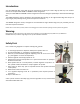
WARNING CO2 GAS CAN BE DANGEROUS CO2 Regulator Co2 cylinders contain high pressure gas which can be hazardous if not handled properly. Make sure you READ and UNDERSTAND the following procedures for CO2 cylinders BEFORE installation. 1. ALWAYS connect the CO2 cylinder to a regulator. Failure to do so could result in an explosion with possible death or injury when the cylinder valve is opened. 2. NEVER connect the CO2 cylinder directly to the product container.
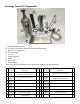
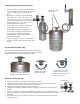
Beverage Tower Kit Components F A H I B G C D E A. Single or Double Keg Tower B. Low Profile Keg Coupler (D System for North American Beers) C. Regulator, Dual Gauge CO2 D. CO2 Gas Cylinder E. Spill Tray F. Insulating Sleeve G. Gasket H. Tap Handle I. Faucet Wrench (Kit contains all hoses and fittings, sleeve connectors, bushing and insulator sleeves) 1 Part No. Description Qty 32413 33845 Tower Assembly Single Tap, or Tower Assembly Double Tap 1 Beverage Center Deck Assembly Part No.
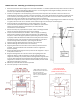
L24TWS Tower Kit - Mounting your kit directly to an island. 1. 2. 3. 4. 5. 6. 7. 8. 9. 10. 11. 12. 13. Determine the location of the refrigerator in the island installation. It should be positioned nearly flush to the face surface of the island for easy access and alignment with the tower. For the refrigerator cavity height and depth, please refer to the cutout for your individual model (L24BF/LM24BF). Position the refrigerator in the island opening at the exact position.
Connecting the Keg to the Beverage Tower. 1. 2. 3. 4. Attach the clear hose from the beverage tower to the barbed fitting with the hose clamp provided. Insert the rubber washer provided into the fitting. An elbow is included to provide additional space above the keg coupler. Secure the elbow to the top outlet of the keg coupler with a washer between. Attach the clear hose fitting, with washer, to the elbow. Use a wrench to tighten the connections.
When not in use: We recommend that the CO2 canister be shutoff and the ball valve closed if the Beverage kit will not be used for an extended period of time. Keep the CO2 tank inside the refrigerator and all connections intact. The CO2 tank should be replaced or refilled when the CO2 Tank level indicator falls into the red indicator zone (below 300 PSI). Check with your beverage provider for local sources of CO2.
The best outdoor kitchen products come from: Lynx Grills, Inc. 7300 Flores Street Downey, CA 90242 For more information, please call: 1-888-289-5969 or visit www.lynxgrills.com Email us at service@lynxgrills.com As product improvement is an ongoing process at Lynx, we reserve the right to change specifications and design without notice. Part #33913, Rev.