
Owner's Manual


ALL-SEAR CARE & USE/INSTALLATION
|
3
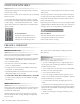
1. Before each use, complete the checklist below.
2. Make sure all burner control knobs are in the “OFF” position.
3. Push and hold the control knob in for 2 – 5 seconds, allowing the igniter to heat up.
4. Turn the knob to the “LITE” position.
5. After ignition set the knob to the desired setting.
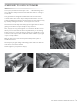
HoW to LiGHt YouR RotiSSERiE BuRnER
HoW to LiGHt YouR GRiLL
PART NO. 33526 REV. B 03/2013
•Do you smell gas? If yes, shut off everything and call the
gas company or a qualified plumber to check for leaks, if
not please continue.
•Are you prepared to stay with the grill during the entire
cooking process? If not, gather what you need before
starting the lighting process. If yes, please continue.
•Is your cooking area free and clear of any combustibles,
besides your food, that might ignite? If no, clear the area
before starting the lighting process, If yes, please con-
tinue.
•Do all control knobs turn freely? If not, call for service, if
yes, please continue.
•If you are using a portable propane cylinder, is it connect-
ed and leak tested? If not, check the connection before
continuing. If yes please continue.
•Do you know where your grill’s main gas supply shut off
valve is located? If not, locate it before continuing. If yes,
please continue.
•Are all burners properly seated in the grill? If not, seat the
burners properly before continuing. If yes please con-
tinue.
•Is the wind blowing just lightly and not blowing on the
back of the grill? If not, wait until the wind subsides or
turn your free standing grill so the wind goes into the
front of the grill. If yes, please continue with the lighting
process.
cHEcKLiSt BEFoRE EAcH uSE (FoR YouR SAFEtY)
Note: The rotisserie burner features a thermocouple sensor with a safety valve that automatically shuts off the
flow of gas if the burner goes out for any reason.
1. Before each use, complete the checklist below.
2. Make sure all burner control knobs are in the “OFF” position.
3. Push and hold the control knob for 2 – 5 seconds.
4. Turn the knob to the “LITE” position and continue to hold the knob in for an additional 30 – 60 seconds to allow
the thermocouple to heat up and keep the safety valve open.