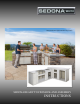
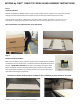
Island shown with optional finishes and products SEDONA READY TO FINISH ISLAND ASSEMBLY INSTRUCTIONS
SEDONA by LYNX™ READY TO FINISH ISLAND ASSEMBLY INSTRUCTIONS IMPORTANT SAFEGUARDS WARNING Two to three people are needed to set up the island. Failure to do so may result in injury. WARNING Do not store or use gasoline or other flammable liquids in the vicinity of this or any other appliance. Do not store an extra LP bottle in the interior of the island. CAUTION Never attempt to lift the island by the counter top as serious damage may occur. Plan your island location prior to beginning any set up.
SEDONA by LYNX™ READY TO FINISH ISLAND ASSEMBLY INSTRUCTIONS Congratulations on your purchase of the SEDONA by LYNX™ Ready to Finish Island. The prefabricated unfinished island can be assembled in no time at all. No tools are necessary for island assembly, but a Philips head screwdriver and a reciprocating saw are required for adjustments. The island comes ready for you to add your own personal touch in components, finishes and countertops.
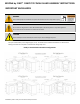
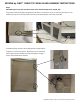
SEDONA by LYNX™ READY TO FINISH ISLAND ASSEMBLY INSTRUCTIONS Ready to Finish Island Components 4 SEDONA by LYNX™ Ready to Finish Island Assembly Instructions
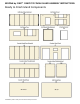
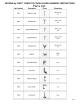
SEDONA by LYNX™ READY TO FINISH ISLAND ASSEMBLY INSTRUCTIONS Parts List 5 SEDONA by LYNX™ Ready to Finish Island Assembly Instructions
SEDONA by LYNX™ READY TO FINISH ISLAND ASSEMBLY INSTRUCTIONS Step 1 Unpacking the Box Remove the staples and binding straps from the outside of the box. From inside the box, remove the foam and packing materials. Separate the island components from the box by Grill Island and Counter Island. Counter Island: 2 end panels, 1 back panel, 1 base panel, and 1 counter top panel (see component list on pg.4) Grill Island: 1 end panels, 1 back panel, 1 base panel, and 1 counter top panel (see component list on pg.
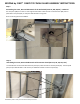
SEDONA by LYNX™ READY TO FINISH ISLAND ASSEMBLY INSTRUCTIONS Step 3 Assembling the Front, Rear and Side Panels of the Grill Island (Parts GF, GR, GB, GS) The grill island base panel (GB) is equipped with tabs which correspond to cut slits on the front panel (GF). Line up the 3 slit openings on the front panel (GF) with the 3 corresponding tabs on the base panel (GB). Slit Tab Assemble side (GS) and front panels (GF) together using 4 medium wing bolts to secure to the panels .
SEDONA by LYNX™ READY TO FINISH ISLAND ASSEMBLY INSTRUCTIONS Step 3 Assembling the Front, Rear and Side Panels of the Grill Island (Parts GF, GR, GB, GS) - continued The rear panel (GR) has a notch on each edge and also slides under the tabs on the floor base (GB). Once in place attach rear panel (GR) to side panel with 4 medium wing bolts. Floor size of the grill island is 29x89 ½.
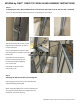
SEDONA by LYNX™ READY TO FINISH ISLAND ASSEMBLY INSTRUCTIONS Step 4 Assembling the Front, Rear and Side Panels of the Counter Island (Parts CF, CR, CB, CS1, CS2) - Continued Secure the side panel (CS1) and front panel (CF) using 2 wing nuts on the bolts. Tab The rear panel (CR) has a notch on each edge and also slides under the tabs on the floor base (CB). Notch Once in place attach to rear panel (CR) with 2 wing nuts on the bolts of the side panel (CS1).
SEDONA by LYNX™ READY TO FINISH ISLAND ASSEMBLY INSTRUCTIONS Step 5 Attaching the Grill and Counter Islands Together - continued Connect the bracket to the front panel using 2 large “C” brackets with large wing bolts. To secure the bracket to the rear panel use 2 medium “C” brackets with Large wing bolts. Large “C” Bracket (top) Large “C” Bracket (bottom) Step 6 Attaching the Grill Island Top To secure top panel to the front panel (GT) use 3 step brackets with small wing nuts.
SEDONA by LYNX™ READY TO FINISH ISLAND ASSEMBLY INSTRUCTIONS Step 5 Attaching the Counter Island Top Attach the top counter (CT) to the front panel (CF) and rear panel (CR) using 8 small angle brackets with medium wing bolts.
SEDONA by LYNX™ READY TO FINISH ISLAND ASSEMBLY INSTRUCTIONS Sedona by LynxTM Ready to Finish Island Grill and Accessory Package L500 L600 L700 L16TWL LSB502 Shown cut for a L700 grill and LSA742 cabinet.
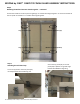
SEDONA by LYNX™ READY TO FINISH ISLAND ASSEMBLY INSTRUCTIONS Converting the Counter Island Top Depending on your grill and cabinet size configuration, you may need to have panels and support bars removed for installation.
SEDONA by LYNX™ READY TO FINISH ISLAND ASSEMBLY INSTRUCTIONS Front and Grill top panel prior to cutting. These front bars will always need to be cut regardless of grill size. Dependent on the size of grill, some bars will need to be cut. *Power outlets shown in pictures, not included. Front left Use of a reciprocating saw is recommended. *Power outlets shown in pictures, not included. Front right The front panel will need cuts due to accessory choice as well. Again, removing panels as needed.
SEDONA by LYNX™ READY TO FINISH ISLAND ASSEMBLY INSTRUCTIONS SEDONA by LYNXTM Ready to Finish Island Limited Warranty I. Limited Warranty – Grill, Side-Burner, Doors, Drawers, and Refrigerator For the warranty on the individual stainless steel island components, please see the warranties in their product Care & Use Manuals. IV. What is not covered: Lynx shall not be responsible for and shall not pay for the following: 1.
The best outdoor kitchen products come from: Lynx Grills, Inc 7300 Flores Street Downey, CA 90242 Service: (888)-289-5969 Fax: (562)-299-6789 www.lynxgrills.