MAKE THE MOST OF YOUR SIDE BURNER ACCESSORY CARE & USE/INSTALLATION
WARNINGS WARNING • Never use dented, rusty or damaged propane cylinders. Never store additional or empty propane cylinders in the cabinet or in the vicinity of this or any other appliance. Do not store propane cylinders indoors or on their sides. • Children should never be left alone or unattended in an area where an accessory is located. Place your accessory well away from areas where children play.
WARNINGS WARNING READ THIS MANUAL CAREFULLY and completely before using your accessory to reduce the risk of: 1. 2. 3. 4. Fire Burn hazard, personal injury or property damage Ruined steaks or other unpleasant cooking experiences Unapproved installation or servicing. THIS PRODUCT IS DESIGNED FOR OUTDOOR USE ONLY. Improper installation, adjustment, alteration, service or maintenance can cause property damage, injury or death.
WARNINGS WARNING 1. The outdoor cooking gas appliance and its individual shutoff valve must be disconnected from the gas supply piping system during any pressure testing of that system at test pressures in excess of 0.5 psi (3.5 kPa). 2. The outdoor cooking gas appliance must be isolated from the gas supply piping system by closing its individual manual shutoff valve during any pressure testing of the gas supply piping system at test pressures equal to or less than 1/2 psi (3.5 kPa).
TABLE OF CONTENTS USING YOUR LYNX ACCESSORY Accessories Covered in this Manual BEFORE YOU START If Shipment Arrives Damaged Visible Loss or Damage Concealed Loss or Damage Important Notes Where’s the Wind? How Long is Your Run? Are You “On-the-Level”? Built-in Installations Clearance to Combustible Materials 6 6 7 7 7 7 8 8 8 8 8 8 SPECIFICATIONS & INSTALLATION GAS & ELECTRIC CONNECTIONS Gas Plumbing Natural Gas LP Gas LP Connections Gas Conversion Kits Propane Hook Up Natural Gas Hook Up Maximum Runs for
USING YOUR LYNX ACCESSORY This manual covers several Lynx accessory appliances and optional accessories for those appliances. Except where noted, the assembly, installation and use of these Lynx accessories is identical. ACCESSORIES COVERED IN THIS MANUAL POWER BURNER MODEL LBP The Lynx Power Burner is a dual-ring commercial style burner with a range of 3,000 to 47,000 BTU’s.
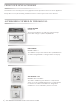
HOW TO LIGHT YOUR GRILL ACCESSORY 1. Before each use, complete the checklist below. 2. Make sure all burner control knobs are in the “OFF” position. 3. Push and hold the control knob for 2-5 seconds, allowing the igniter to heat up. 4. Turn the knob to the “LITE” position. 5. After ignition set the knob to the desired setting. BEFORE YOU START WARNING • Never install this product into a combustible enclosure. Doing so could result in fire, property damage and personal injury.
BEFORE YOU START...continued IMPORTANT NOTES WHERE’S THE WIND? When selecting a suitable location, consider important factors such as exposure to the wind and foot-traffic patterns. If you have a side burner attached to a freestanding grill, position it so the prevailing wind blows into the front control panel (at your back when grilling), supporting the proper front-to-rear airflow. Built-in accessories located in areas with prevailing winds should be protected by a wind barrier.
SPECIFICATIONS & INSTALLATION The guides, measurements and dimensions detailed below are designated to assist you with planning your outdoor kitchen. NOTE: Due to continuing product innovation, specifications are subject to change without notice. IMPORTANT: Please reference the Care & Use / Installation manual for details on gas plumbing requirements, electrical specifications and the proper installation of your Lynx outdoor kitchen equipment. This manual can be downloaded from the Lynx website at www.
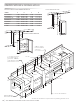
SPECIFICATIONS & INSTALLATION OUTDOOR ICE AND REFRIGERATION MODEL A LM15REFL/R OUTDOOR REFRIGERATORS 15.00 LM24REFL/R 24.00 L15ICE/LMWINE/LM15REF B C 34.00-35.00 26.00 34.00-35.00 26.00 33.75-34.75 ICE MACHINE 33.75-34.75 D LM24REFCL/CR 24.00 34.00-35.00 26.00 33.75-34.75 LM24BFL/R 24.00 34.00-35.00 26.00 33.75-34.75 24.25 34.00-35.00 26.00 33.75-34.75 34.00-35.00 26.00 33.75-34.75 34.00-35.00 24.00 33.50 a LM24DWR LMWINE L15ICE c 15.00 b 15.00 d e min. f max.
GAS & ELECTRIC CONNECTIONS GAS PLUMBING WARNING Never connect a gas line directly to the accessory. A pressure regulator must be installed on all gas equipment. All local codes require it and Lynx supplies the correct regulator with your accessory. Removing or failing to install the pressure regulator can result in fire and serious personal injury and will void the warranty. The accessory is factory set to use either propane (LP) or natural gas (NAT).
GAS & ELECTRIC CONNECTIONS ...continued LP GAS Never use a cylinder with a damaged valve. Accessories set up for LP gas come equipped with an LP hose/ regulator assembly for connection to a standard 20 lb. LP cylinder. (Type 1). A dented or rusty LP cylinder may be hazardous and should be avoided. If in doubt, have it checked by your LP supplier. All fittings necessary to attach the assembly to the accessory are included. Always check for leaks after every LP cylinder change.
GAS & ELECTRIC CONNECTIONS ...
ELECTRICAL CONNECTIONS OPTIONAL ELECTRICAL KITS Each accessory includes 6 feet of wiring (coiled inside the back of the accessory) to connect the accessory to a Lynx grill. Additionally, Lynx manufactures 2 specialized electrical kits that you may purchase for your accessory, depending upon how it will be installed. Each electrical kit ships with an instructional sheet for assembly. Assembly instructions and schematics/drawings can also be found on our website at www.lynxgrills.com.
TESTING THE INSTALLATION Before turning the gas supply on, check for proper installation using the following test: 1. Plug the transformer back into the receptacle. 2. Push in the gas control knob on your accessory and watch the igniter. It should glow bright and steady. 3. Turn on the light switch on the grill. Both the grill and the grill accessory lights should operate together. This indicates a proper assembly. Turn the gas on to all appliances. 4.
CHECKLIST BEFORE EACH USE (FOR YOUR SAFETY) • Do you smell gas? If yes, shut off everything and call the gas company or a qualified plumber to check for leaks, if not please continue. • If you are using a portable propane cylinder, is it connected and leak tested? If not, check the connection before continuing. If yes please continue. • Are you prepared to stay with the side burner during the entire cooking process? If not, gather what you need before starting the lighting process.
IMPORTANT SAFETY PRECAUTIONS PLEASE REVIEW THESE IMPORTANT SAFETY PRECAUTIONS BEFORE YOU USE YOUR GRILL ACCESSORY. 1. NEVER LEAVE THE GRILL ACCESSORY UNATTENDED WHILE COOKING. 10. Never use charcoal or any other solid fuel in the grill accessory. 2. Ensure all tie-down wires have been removed from the burners, and any burner caps have been removed from the box inside the accessory. 11. Cooking excessively fatty meats and oils will cause flare ups.
USING THE LYNX POWER BURNER (LPB) The Lynx Power Burner incorporates a cast brass, dualring, burner. SMELL OF GAS WHILE COOKING WARNING! IF YOU SMELL GAS WHILE THE GRILL ACCESSORY IS OPERATING, IMMEDIATELY TURN OFF ALL BURNERS AND SHUT OFF THE MAIN FUEL SUPPLY. Each ring can be independently operated for maximum heat control. Used together they can generate up to 47,000 BTU’s. • Perform a leak test (See INDEX: “Leak Testing” for further details.) • Check for blockages.
LIGHTING INSTRUCTIONS FOR ALL ACCESSORIES SAFETY PRACTICES AND PRECAUTIONS PURGING THE GAS LINES You should purge the gas line of air before attempting to light the grill accessory. WARNING Read the ‘User Manual/Installation Instructions carefully and completely before using your grill or grill accessory to reduce the risk of fire, burn hazard or other injury. Ensure that burner ties and all packing materials are removed before lighting any new accessory. 1.
LIGHTING INSTRUCTIONS FOR ALL ACCESSORIES ...continued LOW HEAT FLAME ADJUSTMENT The burners on your Lynx accessory feature an adjustable low setting. Fluctuations in gas pressure, gas conversion and even in the quality of the gas itself may affect burner performance at the “LOW” setting. It could be either too high or too low. To adjust the burner for low setting: 1. Make sure the grill accessory is cool. 2. Remove the grates so that you can see the flame while adjusting the burner. 3.
CONTACTING LYNX CUSTOMER CARE Before calling Lynx Customer Care, please make sure you have the following information: • Model number • Date of purchase • Proof of purchase by the original owner • Serial number The serial number can be located on the rating plate sticker. You may have a sticker on the back page of this manual. If not, you will find one located either on the underside of the drip tray (if you have one), on the heat shield behind the front panel, or on the inside left panel wall.
SCHEMATICS WHITE Connector Identification: 4 Position Molex Connector 22 | SIDE BURNER ACCESSORY CARE & USE/INSTALLATION 4 Position Molex Receptacle
LYNX LIMITED WARRANTY I. Limited Lifetime Warranty The stainless steel body, and cooking grates are warranted to be free from defects in material and workmanship when subjected to normal domestic use and maintenance for the lifetime of the original purchaser. This warranty excludes surface corrosion, scratches, and discoloration which may occur during normal use. This warranty is limited to the replacement of the defective parts, with the owner paying a processing fee and all other costs including labor.
LYNX COMMON AREA LIMITED WARRANTY The Lynx Limited Warranty covers residential installations only and is non-transferable to any other party. This ‘non-residential’ warranty applies when the product is installed in common areas where more than a single party has rightful access to its use or in locations considered beyond normal residential use such as B&B’s, and private clubs.
SIDE BURNER EXPLODED PARTS VIEW MODEL-SPECIFIC BTU OUTPUTS MODEL LPB INNER BURNER OUTER BURNER 13,000 34,000 OPEN TOP BURNER TOTAL INPUT 47,000 BTU/Hr LSB2PC 2 @ 15,000 30,000 BTU/Hr LSB1-3 1 @ 15,000 15,000 BTU/Hr LSB2-2 2 @ 15,000 30,000 BTU/Hr SIDE BURNER ACCESSORY CARE & USE/INSTALLATION | 25
INDEX A O Adjusting: Low Heat Adjustment..................................................... 20 Power Burner Air Shutter................................................ 18 Obtaining Service........................................................... 21 Optional Electrical Kits................................................... 14 C Cold Weather Use........................................................... 13 Connections: Electrical........................................................................
Lynx Professional Grills 7300 Flores Street Downey, CA 90242 Service: (888) Buy-Lynx (888-289-5969) Fax: (562) 299-6978 www.lynxgrills.com PN #33487 Rev.