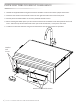
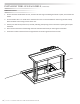
MAKE THE MOST OF YOUR LCS30 shown with pass shelf (LCSPS) which is available separately from Lynx Grills.
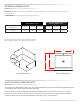
EXTERIOR DIMENSIONS INSTALLER: Read these instructions carefully before starting installation. Please leave these instructions with the homeowner. HOMEOWNER: Please retain these instructions for future use Cutout Dimensions Exterior Dimensions Cut-out Dimension Specifications Width A Height B Depth C Width D Depth E Depth F LCS30 29 10½ 22 31 251/8 221/8 Counter top notch detail: a 1/2” width is required with a depth equal to the counter top overhang.
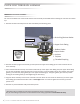
INSTALLING THE DRAIN ASSEMBLY INSTALLING THE DRAIN ASSEMBLY For ease of installation we recommend that the drain assembly be installed before installing the sink into the counter top. 1. Remove the drain assembly from the box and identify the following parts: a. Drain Plug/Strainer Basket Sink Bottom Sink Opening b. Upper Drain Fitting c. Rubber Gasket d. Paper Gasket e. Locknut f. Tailpiece g. Threaded Coupling 2.
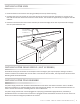
INSTALLING THE SINK 1. Install the faucet or the stainless steel plug (included) into the top faucet opening. 2. Carefully lower the sink into the cut out on the counter top. Push the sink back until there are no gaps in the back and the bullnose contacts the front face of the cabinet. The sink will be supported by its weight on the side and back. 3. If desired a small bead of silicone sealant could be put around the edges of the sink to prevent water seepage into the spaces below the sink.
INSTALLING THE LCS30 FRONT COMPONENTS 1. Located the supplied hardware bag with 3 stainless shoulder screws and 2 stainless philips head screws. 2. Install the two stainless steel shoulder screws into the right hand side inserts of the front panel. 3. Carefully lower the bottle holder on the newly attached shoulder screws. 4. When installing the bottle opener you will need to Install the third shoulder screw directly below the far left insert.
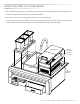
INSTALLING THE LCS30 COMPONENTS 1. Set the bottle cup holder into the sink opening. The sink has a recessed opening in which the support rests. 2. Lower the bottle wells into each opening of the well support. 3. Insert the ice sink into the sink opening, resting on the recessed opening. 4. In this order, drop in the slide support, the strainer basket and the slide cover into the sink opening. You will need to hook the back fold of the slide cover onto the flared back end of the slide support.
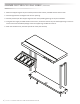
ASSEMBLING THE LCS30 PASS SHELF (OPTIONAL) 1. Attach the support legs to the pass shelf top with the four shorter provided stainless steel screws. 2. Feed the light harness through the far left rear opening. 3. Carefully match up all four support legs with their corresponding openings in the pass shelf base. 4. Using the four longer provided stainless steel screws, secure the base to the pass shelf support legs. There are metal inserts with threaded openings within the support legs to affix the screw to. 5.
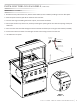
INSTALLING THE LCS30 PASS SHELF (OPTIONAL) FREESTANDING ASSEMBLY 1. Remove the rear panel of the cart, and the two brackets (shown in detail F) holding in the rear filler plate. 2. With the panel removed, pull off the stainless steel rear filler. 3. Unscrew the large nut holding the faucet in place, and remove the faucet. 4. Set the pass shelf on top of the sink, carefully matching the opening of the sink with the opening of the pass shelf base. 5.
INSTALLING THE LCS30 PASS SHELF (OPTIONAL) BUILT IN ASSEMBLY 1. Access the faucet underneath the sink, and unscrew the large nut holding the faucet in place, and remove the faucet. 2. You will need to drill a 1” round hole in the back left corner to accommodate for the wiring harness to drop down to attach to the wiring harness of the sink 3. Set the pass shelf on top of the sink, carefully matching the opening of the sink with the opening of the pass shelf base. 4.
CONTACTING LYNX CUSTOMER CARE Before calling Lynx Customer Care, please make sure you have the following information: • Model number • Date of purchase • Proof of purchase by the original owner • Serial number The serial number can be located on the rating plate which is located on interior of the front panel. Your satisfaction is of the utmost importance to us.
LCS30 CARE STAINLESS STEEL Lynx products are known for their attractive appearance. We achieve this by selecting only the finest grades of stainless steel and applying exacting workmanship. In order to maintain this attractive appearance over the life of the grill it is important to take the following steps: • Use a commercially available Stainless Steel cleaner* to clean and polish the exterior surfaces. Doing these things on a regular basis minimizes the amount of effort required.
EXPLODED VIEW/PARTS 10 4 3 2 1 17 14 7 9 12 8 13 6 11 5 15 8 COVER IS PART OF ITEM #1 AND ISTALLS ON TOP OF THE ASSEMBLY ITEM PART NO.
EXPLODED VIEW/PARTS Optional Pass Shelf 2 4 5 4X 6 3X 9 4X 3 2X 7 3X 8 1 14 ITEM PARTNO. 1 70552 PASS SHELF BASE 1 2 70553 PASS SHELF TOP WELDMENT 1 3 70550 SUPPORT LEG P. SHELF WELDMENT 2 4 36094 TRAY, CONDIMENT 1 5 11114 TRAY, CONDIMENT CS30 4 6 35139 RETAINER, 1/4-20 THREADED 3 7 14043 SCREW, 1/4-20 X 1, FHP, SS 3 8 80353 LIGHT ASSY CSPS 2008 1 9 14014 SCREW, #8-32 X 3/8, THP, SS 4 | LCS30 COCKTAIL STATION CARE & USE/INSTALLATION DESCRIPTION QTY.
SCHEMATICS LCS30 Light Switch LCS30 COCKTAIL STATION CARE & USE/INSTALLATION | 15
PRODUCT DIMENSIONS/CUT OUT DIMENSIONS (IN BLUE) 16 | LCS30 COCKTAIL STATION CARE & USE/INSTALLATION
LYNX LIMITED WARRANTY I. Limited Lifetime Warranty The stainless steel housing is warranted to be free from defects in material and workmanship when subjected to normal domestic use and service for the lifetime of the original purchaser. This warranty excludes surface corrosion, scratches, and discoloration which may occur during regular use. This warranty is limited to the replacement of the defective parts, with the owner paying all other cost including labor. II.
The best outdoor kitchen products come from: Lynx Grills, Inc. 62201 Hwy 82 West Greenwood, MS 38930 Service: (888)-289-5969 www.lynxgrills.com P/N 36110 Rev.