MAKE THE MOST OF YOUR SEDONA TM BY CARE & USE/FIRE PIT installation Warning: Improper installation, adjustment, alteration. Service or maintenance can cause severe injury or death, and may result in property damage. Read these installation, operating and maintenance instructions thoroughly before installing or servicing this appliance. INSTALLER: THIS MANUAL MUST BE LEFT WITH THE APPLIANCE. CONSUMER: KEEP THIS MANUAL FOR FUTURE USE.
WARNINGS SEDONA WARNING Read this manual carefully and completely before using your grill to reduce the risk of: 1. 2. 3. 4. Fire Burn hazard, personal injury or property damage Ruined steaks or other unpleasant cooking experiences Unapproved installation or servicing. This product is designed for outdoor use only. Improper installation, adjustment, alteration, service or maintenance can cause property damage, injury or death.
WARNINGS WARNING • Never use dented, rusty or damaged propane cylinders. Never store additional or empty propane cylinders in the grill cabinet or in the vicinity of this or any other appliance. Do not store propane cylinders indoors or on their sides. • Children should never be left alone or unattended in an area where a grill is located. Place your grill well away from areas where children play.
WARNINGS SEDONA WARNING 1. This outdoor appliance and its individual shutoff valve must be disconnected from the gas supply piping system during any pressure testing of that system at test pressures in excess of 1/2 psi (3.5 kPa). 2. This outdoor appliance must be isolated from the gas supply piping system by closing its individual manual shutoff valve during any pressure testing of the gas supply piping system at test pressures equal to or less than 1/2 psi (3.5 kPa). STATE OF MASSACHUSETTS 1.
IMPORTANT SAFETY PRECAUTIONS PLEASE REVIEW THESE IMPORTANT SAFETY PRECAUTIONS BEFORE YOU USE YOUR FIRE PIT. 1. NEVER LEAVE THE FIRE PIT UNATTENDED WHILE IN USE. 2. Follow the instructions in this manual carefully to reduce the risk or personal injury, death or property loss. 3. Ensure all tie-down wires have been removed from the burners. 4. Always use caution when operating the appliance in a windy area. 5. Avoid wearing loose-fitting garments or long sleeves while adjusting fire pit media.
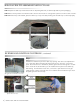
SEDONA Fire Pit Assembly Instructions STEP1: Unpack the table top and the base. Remove all packing materials, tie down straps and any other packaging. STEP2: Place the fire pit base on a flat firm surface. The Fire Pit must be on solid ground or pavers so it will not sink over time. STEP3: With the help of an assistant, place the table top on top of the base, making sure the table top is centered properly. Burner and Ignition Controls ...
Burner and Ignition Controls ...continued Step 2 Press the ignition button and verify a spark is present at the spark electrode at the burner assembly. If you do not see or hear a spark, please refer to the trouble shooting section of this manual. If the ignition spark is present, proceed to the nest step, addition of burner media Media Installation Your Fire Pit needs burner media in order to create realistic, natural looking flame effects.
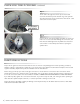
Installing the LP Cylinder...continued Step 1 The LP tank is brought into the fire pit enclosure and secured to the base by at the bottom ring of the cylinder. The tank retention bolts are screwed into the bottom collar of the tank to hold it in place. Step 2 Connect the LP hose and regulator assemble to the LP Cylinder. Do not use tools when making this connection, the knob must be hand tightened only. Make sure the burner control valve is in the OFF position before opening the cylinder valve.
Lighting instructions STEP1: Make sure the gas valve on the LP Tank is in the open position STEP2: Start the spark igniter by pressing the ignition button. The starter will stay on until the button is pressed again. STEP3: Using the Gas Valve Key, open the gas control valve through the opening in the control panel. Turn the key to the left (counterclockwise) until it is full open. The burner should light immediately.
REFRESHMENT BOWL CONVERSION 1. Remove gravel pan from top 2. Place refreshment bowl into top 3. Refreshment bowl FEATURES Model No. LFPC-S & LFPC-G. LFPS-S & LFPS-G 44" round top on round pedestal with unique nautilus burner. nautilus burner. 44" square top on round pedestal with unique Tumbled volcanic variegated stone. Access door provides easy accessibility to LP Tank and battery compartment. PERFORMANCE 65,000 BTU max. TECHNICAL Fuel Type: LP Standard / NG Kit available.
Lynx Grills 7300 Flores Street Downey, CA 90242 Service: (888) Buy-Lynx (888-289-5969) Fax: (562) 299-6789 www.lynxgrills.