MAKE THE MOST OF YOUR LN15ICER OUTDOOR CLEAR ICE MACHINE CARE & USE/INSTALLATION
CONTENTS Contents: Warranty registration ..........................................................2 Safety information ...............................................................3 Unpacking your appliance ..................................................3 Installing your appliance ......................................................4 Leveling the appliance ....................................................4 Cabinet clearances .........................................................
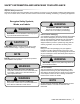
SAFETY INFORMATION AND UNPACKING YOUR APPLIANCE Important Safety Instructions Warnings and safety instructions appearing in this guide are not meant to cover all possible conditions and situations that may occur. Common sense, caution, and care must be exercised when installing, maintaining, or operating this appliance. Recognize Safety Symbols, Words, and Labels. ! WARNING WARNING - You can be killed or seriously injured if you do not follow these instructions.
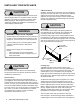
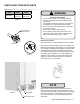
INSTALLING YOUR APPLIANCE ! CAUTION If the appliance was shipped, handled, or stored in other than an upright position for any period of time, allow the appliance to sit upright for a period of at least 24 hours before plugging in. This will assure oil returns to the compressor. Plugging the appliance in immediately may cause damage to internal parts. ! WARNING WARNING - Help Prevent Tragedies Child entrapment and suffocation are not problems of the past.
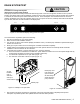
INSTALLING YOUR APPLIANCE Model LN15ICER Minimum Height Maximum Height 33 ⁄4" (85.7 cm) 34 ⁄4" (88.3 cm) 3 3 Table A Do not remove ground prong ! WARNING Electrical Shock Hazard • Do not use an extension cord with this appliance. They can be hazardous and can degrade product performance. • This appliance should not, under any circumstances, be installed to an un-grounded electrical supply. • Do not remove the grounding prong from the power cord. (See Figure 3). • Do not use an adapter.
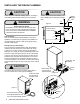
INSTALLING THE DRAIN PLUMBING ! CAUTION ! Failure to use an adequate drainage system, will result in surrounding water damage and/or poor ice production. ! WARNING Electrical Shock Hazard Reasonable care and safe methods should be practiced. Do NOT work with energized electrical equipment in a wet area. Read and follow the installation instructions listed in this manual. Drain Plumbing Your ice machine requires drain plumbing.
INSTALLING THE DRAIN PLUMBING Optional Drain Pump. An optional drain pump is available if you have purchased an ice machine without one and do not have access to a gravity drain. Installation instructions are provided with the optional drain pump. Contact Lynx Grills Customer Service at 888.289.5969 or your dealer for ordering. ! Drain line coiled and secured to the back of the cabinet. Uncoil, route to an appropriate drain and cut to length.
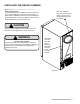
INSTALLING THE WATER SUPPLY Water Supply ! CAUTION Observe and follow all local building codes when installing this appliance. This ice machine must be connected to a potable cold water supply line. delivering water pressure between a minimum of 20 psi and a maximum of 120 psi. Use 1⁄4" copper tubing for your water supply which is available at any local hardware or plumbing supply store. Route the 1 ⁄4" copper tubing to suit your installation being sure not to kink the tubing.
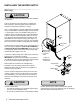
DRAIN SYSTEM TEST ! CAUTION Procedure for Testing Drain System (both gravity and drain pump models) Drain pump models have a safety feature that will interrupt power to the unit if a high-limit condition occurs to prevent flooding. This safety feature can be initiated by a restriction in the drain system and will continue until high-limit condition is corrected, at which time power will be restored to the unit.
OPERATION OF THE ICE MACHINE The Ice Making Process Your ice machine is unique in how it forms ice with fractional freezing to form a slab of ice that is clear and has less dissolved solids than the water it is produced from. This is accomplished by running water over the cold evaporator plate (see Figure 16) which gradually freezes the water to produce the ice slab. Pure water freezes first, leaving the dissolved solids in the residual reservoir water to provide clear ice.
OPERATION OF ICE MACHINE The ice machine will keep producing ice until the ice machine’s bin is full and will restart automatically when ice needs to be replenished in the bin. The ice bin is not refrigerated, and some melting will occur by design to preserve the ice quality and clarity. Allow your ice machine to run for 24-48 hours to accumulate ice in the ice machine’s bin. Ice Production In normal mode the ice machine will produce up to 39 pounds (17.
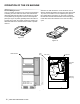
PRODUCT DIMENSIONS ROUGH-IN OPENING DIMENSIONS CABINET DIMENSIONS MODEL "A" "B" "C" "D" "E" "F" "G" "H" "J" LN15ICER 15" (38.1 cm) **34" to 35" (86.4 to 88.9 cm) 24" (61 cm) 147⁄8" (37.8 cm) 333⁄4" to 343⁄4" (85.7 to 88.3 cm) 235⁄8" (60 cm) 259⁄16" (64.9 cm) 3713⁄32" (95 cm) 1611⁄16" (42.
PRODUCT DIMENSIONS ** Minimum rough-in opening required is to be larger than the adjusted height of the cabinet. PRODUCT DATA MODEL ELECTRICAL REQUIREMENTS # PRODUCT WEIGHT LN15ICER 115V/60Hz/15A 105 lbs (47.7 kg) # A grounded 15 amp dedicated circuit is required. Follow all local building codes when installing electrical and appliance. "J" "H" "G" "D" "F" CL Water inlet "E" 11⁄4" (3.2 cm) 47⁄8" (12.4 cm) Figure 22 (S) solid door shown 211⁄2" (54.6cm) 615⁄16" (17.
USING YOUR ELECTRONIC CONTROL On/off Menu Display area ICE Delay timer Lock DOOR 1468 CLEAN ECO hours days OFF Figure 23 User interface display Display icons: "ON/OFF" icon : used for turning the appliance on and off. "MENU" icon : used to access optional functions in the user interface. "Clock" icon : used to enter the Delay start/ vacation mode. "LOCK" icon : used to lock out functions in the user interface. Display area text: ICE Signifies the appliance is on and producing ice.
USING YOUR ELECTRONIC CONTROL Turning your ice machine On and Off: If your appliance is on, "ICE" will be displayed. To turn the appliance off, push and hold the "ON/ OFF" icon for 3-seconds. The display will show "OFF" . NOTE ICE OFF When turned off, the ice machine will complete its current ice production cycle then shut off. ICE The drain pump (if equipped) and the interior light will still be functioning during the OFF mode.
USING YOUR ELECTRONIC CONTROL Error codes: The ice machine is monitored continuously. Any OPEN or SHORTED circuit condition with a temperature sensor or miscommunications between the control and user interface will initiate an ERROR CODE as listed below: Error Codes Error Displayed Code Error Description Action to Take Bin Sensor error "OFF" will flash continuously in 1 second intervals in the display. No audible alarm will sound. Failed temperature sensor.
CLEANING YOUR ICE MACHINE Clean reminder: A "CLEAN" reminder will occur every 6 months CLEAN to remind you that it may be time to clean your appliance. Over time mineral build up on the cold evaporator plate can occur which can adversely affect the quality of your ice. This build-up is dependent on your water source and usage. Normal ice production will continue while the "CLEAN" reminder is displayed. You may clear the "CLEAN" reminder at any time by momentarily pressing the "ON/OFF" icon.
CLEANING YOUR ICE MACHINE Refer to your cleaning solution instructions to determine the proper amount of cleaning solution to add based on 2 quarts (1.9 liters) of water. Lift fascia door up to access evaporator plate (See Figure 29). Pour the cleaning solution slowly on the evaporator plate so it flows down into the fresh water reservoir. (See Figure 30). Splash shield brackets Figure 26 Splash shield Lift fascia door up to access evaporator plate Figure 29 Replace the splash shield if removed.
CARE AND CLEANING AND ENERGY SAVING TIPS OBTAINING SERVICE Front Grille Be sure that nothing obstructs the required air flow openings in front of the cabinet. At least once or twice a year, brush or vacuum lint and dirt from the front grille area (see page 4). ! CAUTION SHOCK HAZARD: Disconnect electrical power from the appliance before cleaning with soap and water. Cabinet The painted cabinet can be washed with either a mild soap and water and thoroughly rinsed with clear water.
TROUBLESHOOTING THE ICE MACHINE Before You Call for Service If the appliance appears to be malfunctioning, read through this manual first. If the problem persists, check the troubleshooting guide below. Locate the problem in the guide and refer to the cause and its remedy before calling for service. The problem may be something very simple that can be solved without a service call. However, it may be required to contact your dealer or a qualified service technician.
TROUBLESHOOTING THE ICE MACHINE Ice Quality Odor, grey color, or off taste in the ice Is there mineral scale build up on the evaporator plate? The ice machine needs cleaning. See “Cleaning the Ice Machine”. Is there a high mineral content in the water? The water may need to be filtered. Are food items being stored in the ice bin? Remove food from the ice bin. Unpleasant Odors may require the use of a charcoal filter on the water supply line.
PREPARING THE ICE MACHINE FOR STORAGE If the ice machine is moved, not used for an extended period of time, or will be in an area that will be near freezing temperatures, it is necessary to remove any remaining water in the ice-making system. ! CAUTION This ice machine must have all water drained and removed to prevent ice machine damage as well as possible water damage to the surrounding area in freezing conditions. These damages are not covered under warranty.
PREPARING THE ICE MACHINE FOR STORAGE 7. Disconnect the water valve’s outlet water line to the reservoir and drain the remaining water left in the water line trap area. (See Figure 33 and 33a). 8. Reconnect the water valve outlet water line. (See Figure 33 and 33a). 9. Reinstall the ice machine’s access cover. 10. Clean and dry the ice machine’s storage bin. 11. Prop the door open for air circulation to prevent mold and mildew. 12.
PREPARING THE ICE MACHINE FOR STORAGE 14. Remove the top clamp from the vent tube, for easier access for the air hose. 15. Apply air pressure (approximately 10 psi) to the end of the vent tube which will purge the remainder of the water from the drain pump and the drain line. (See Figure 35). 16. Reinstall the vent tube and clamp to the back of the ice machine and remove the winterization plug from the ice bin and save it for future use.
DRAIN PUMP REMOVAL INSTRUCTIONS Front panel Front panel Figure 37 Toe grille Front of ice machine Figure 37a Toe grille Remove the hex nut on front drain pump bracket with the 3⁄8" socket then remove the bracket. Figure 38 #10-24 hex nut Front drain pump bracket ine r ea R of ice ch ma Figure 39 carriage bolt Figure 38a #10-24 hex nut Rear drain pump bracket carriage bolt Remove the hex nut on rear drain pump bracket with the 3⁄8" socket then remove the bracket.
DRAIN PUMP REMOVAL INSTRUCTIONS 6. Rotate the drain pump and remove from the ice machine, (See Figure 40). It may be necessary to disconnect the ground wire connection in the back flange of the cabinet. (See Figure 36). 7. Disconnect the ice machine power cord from the drain pump (See Figure 41). 8. Drain the water in the drain pump’s reservoir by turning the pump upside down and allowing water to drain through the pump’s inlet and vent tube fittings. 9.
HOUSEHOLD PRODUCT WARRANTY UNDERCOUNTER ICE MACHINE TWO YEAR FULL WARRANTY Undercounter ice machines and all of their component parts, except as detailed below*†, are warranted to be free from defective materials or workmanship in normal residential use for a period of two (2) years from the date of original retail purchase. Lynx, warrantor, agrees to repair or replace, at its option, any part which fails or is found to be defective during the warranty period.
The best outdoor kitchen products come from: Lynx Grills +LJKZD\ :HVW *UHHQZRRG 06 Service: (888)-289-5969 www.lynxgrills.com 41014991 Rev B 6/21/21 All specifications and product designs subject to change without notice. Such revisions do not entitle the buyer to corresponding changes, improvements, additions, replacements or compensation for previously purchased products.