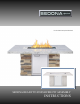
Fire Pit shown with optional finishes SEDONA READY TO FINISH FIRE PIT ASSEMBLY INSTRUCTIONS
SEDONA by LYNX™ READY TO FINISH FIRE PIT ASSEMBLY INSTRUCTIONS IMPORTANT SAFEGUARDS WARNING Two to three people are needed to set up the fire pit. Failure to do so may result in injury. WARNING Do not store or use gasoline or other flammable liquids in the vicinity of this or any other appliance. Do not store an extra LP bottle near the fire pit. CAUTION Never attempt to lift the fire pit by the counter top as serious damage may occur. Plan your fire pit location prior to beginning any set up.
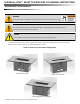
SEDONA by LYNX™ READY TO FINISH FIRE PIT ASSEMBLY INSTRUCTIONS Congratulations on your purchase of the SEDONA by LYNX™ Ready to Finish Fire pit. The prefabricated unfinished fire pit can be assembled in no time at all. Minimal tools are necessary for assembly. The fire pit comes ready for you to add your own personal touch in components, finishes and countertops. Before you begin the fire pit installation you will need to plan ahead.
SEDONA by LYNX™ READY TO FINISH FIRE PIT ASSEMBLY INSTRUCTIONS Fire Pit Body Components Each Ready to Finish Fire Pit includes a 15 lbs. bag of lava rock approximately 1/2” -1/4” in size. Black/Grey in color.
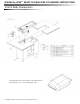
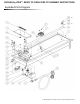
SEDONA by LYNX™ READY TO FINISH FIRE PIT ASSEMBLY INSTRUCTIONS Exploded Parts Diagram 5 SEDONA by LYNX™ Ready to Finish Fire pit Assembly Instructions
SEDONA by LYNX™ READY TO FINISH FIRE PIT ASSEMBLY INSTRUCTIONS Fire Pit Parts List NO. P/N DESCRIPTION QTY.
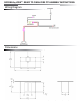
SEDONA by LYNX™ READY TO FINISH FIRE PIT ASSEMBLY INSTRUCTIONS Wiring Diagram Dimensions 7 SEDONA by LYNX™ Ready to Finish Fire pit Assembly Instructions
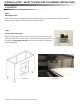
SEDONA by LYNX™ READY TO FINISH FIRE PIT ASSEMBLY INSTRUCTIONS Installation Step 1 Unpacking the Box Remove the staples and binding straps from the outside of the box. From inside the box, remove the foam and packing materials. Separate the fire pit components from the box. Step 2 Position and Level the Base Place the fire pit base on a level surface in its final location and proceed to verify the fire pit base is level it in all directions. The bottom panel has adjustable feet for this purpose.
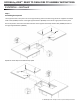
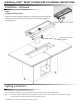
SEDONA by LYNX™ READY TO FINISH FIRE PIT ASSEMBLY INSTRUCTIONS Installation...continued Step 3 Assembling the Top Panel The top panel comes in two parts. Secure the right hand top panel to the base using two of the supplied four Philips head screws (#32595) and two of the eight supplied washers (#14044) on the two far right positions of the panel. Secure the panel to the center of the base with two of the supplied four Philips head screws (#14030) and two of the eight supplied washers (#14044).
SEDONA by LYNX™ READY TO FINISH FIRE PIT ASSEMBLY INSTRUCTIONS Installation...continued Step 4 Installing the Control Panel The fire pit control panel drops right into the opening of the base once the two top panels have been secured. You will need to connect the gas regulator to portable gas tank. Liquid Propane portable tank regulator Lighting Instructions Step 1: Make sure the gas valve on the tank is open.
SEDONA by LYNX™ READY TO FINISH FIRE PIT ASSEMBLY INSTRUCTIONS SEDONA by LYNXTM Ready to Finish Fire pit Limited Warranty I. Limited Lifetime Warranty – Fire pit Frame Panels The base, sides and counter-top of the fire pit are warranted to be free from defects in material and workmanship, when subjected to normal domestic use and service, for a Lifetime. This warranty is limited to the repair or replacement of the defective parts. II. Limitations & Exclusions 1.
The best outdoor kitchen products come from: Lynx Grills, Inc. 7300 Flores Street Downey, CA 90242 For more information please call, 1-888-289-5969 or visit www.lynxgrills.