
Biped Brat Assembly Guide


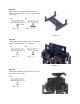


Figure 7. (Left Leg)
Step 7.
Attach a multi-purpose bracket
to the "C" bracket as shown.
See figure 7-1 for detailed
information.
Figure 7-1.
Figure 7. (Right Leg)
Figure 8. (Left Leg)
Step 8.
Attach the leg assembly from
step 7 to the 3" U-Channel as
shown, using three 2-56 x
.250" screws and 2-56 nuts on
each side.
6 x
6 x
Figure 8. (Right Leg)
Step 9.
Your assembly should look like the image so
far. Note, in the image the robot is face down.
Note that since we now have a single object to
work with, we will be proceeding with a single
image from here on.