
Installation Guide
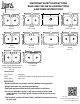

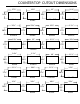

FIGURE 1. Place the sink in the hole at an angle.
FIGURE 2. Push down on the front of the sink.
FIGURE 3. Apply Silicone.
LYONS INDUSTRIES, INC.
30000 M-62 West, Dowagiac, MI 49047
phone (800) 458-9036 fax (269) 782-5159
lyonsindustries.com
e-mail lyonsind@lyonsindustries.com
05/05/14
INSTALLATION INSTRUCTIONS
REPLACING YOUR OLD SINK:
Cutting of your existing countertop may not be necessary. Refer to cutout dimensions on next
page. Place the sink in the hole and make sure the rim of your new sink rests on your counter
top. If you need to adjust the hole size, use a saber saw or keyhole saw then continue with the
instructions below.
IMPORTANT - Refer to the counter top manufacturer to determine the appropriate
cutting method for your counter top.
IMPORTANT - The clip system on this sink is designed to hold it in place while the
silicone dries. If the sink opening is too large the sink can be weighed down to hold it in
place while the silicone dries. Take care not to scratch the sink if using a weight.
IMPORTANT - Leave protective lm on during installation.
MOUNTING SINK IN A NEW COUNTER TOP:
+ Place the sink upside down on the counter top in the desired location. Please allow
adequate room from the back of the counter top for manufacturing tolerances +/- 1/8”.
+ With a pencil, trace a line around the outside edge of the sink onto the counter top.
+ Remove sink from the counter top.
+ Refer to cutout dimensions on next page, locate your sink style and then center
the cutout dimension within the traced outline of the sink on the counter top.
+ Cut the counter top on this new line.
+ Install faucet and drains to sink per manufacturers instructions.
+ Peel back protective lm around drain hole before installing drains.
+ When installing drain to sink make sure to use a high grade silicone caulk.
Warning: Do not use plumber’s putty. It will cause product failure and void
warranty. Use a high grade silicone caulk for all necessary locations.
+ Place the sink in the hole at an angle. (Fig 1)
+ Push down on the front and sides of the sink while holding the faucet side against the
counter top. Push down rmly to make sure the sink sits ush on the countertop. (Fig 2)
+ Shift sink side to side and front to back to make sure the clips “seat properly”.
+ If sink needs removed for any reason push in on clips from underneath and then push up
gently on sink until free.
+ Peel back protective lm around edge of sink before applying silicone. Apply a high
grade of color-matched silicone caulk. (Fig 3)
+ Connect all plumbing.
Warning: Do not use plumber’s putty. It will cause product failure and void
warranty. Use a high grade silicone caulk for all necessary locations.
CARE AND CLEANING INSTRUCTIONS
+ Clean surface with nonabrasive liquid detergent and warm water. Use cleaning
products such as Soft Scrub Gel®, Comet Gel®, Gel Gloss® or other similar products.
+ DO NOT USE ABRASIVE CLEANERS, "steel wool" or wire brushes on surface. Caustic drain
cleaners may cause surface damage. Open ames (cigarettes, candles, etc.) may damage
surface.
+ Surface damage-light scratches, dulled areas, and small cuts and are restored by rst
scrubbing with automotive-type white body cleaning compound, such as Meguire's #9
Swirl®Remover, followed by an application of Gel Gloss®. See next page for detailed
Scratch Repair Instructions.
+ Remember to always use a cutting board or sink protector when using knives or sharp
objects in your sink.
+ Recommendation: When pouring boiling water or placing hot pots or pans into the sink,
run some cold water simultaneously.
WARNING: Some cleaning products are not suitable for use. Read all labels carefully.
DO NOT USE if they say “not suitable for use with ABS, acrylic or polystyrene”.