
Installation Instructions
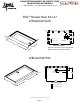


Page 2
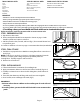
FIGURE 2. Check to assure base is level.
FIGURE 5. If needed, shim between nail ange and stud(s)
for tight t. Screw ange to all studs.
FIGURE 3. Apply construction adhesive to all feet.
FIGURE 4. If needed, place shims under feet into adhesive to
level base.
IMPORTANT
• Allow base to reach room temperature before installation
• Before you begin determine appropriate product reference (Page 1)
• Read installation instructions carefully before starting project
• Keep instructions for warranty information
• Do not use plumber's putty. May result in product failure. Use a high grade silicone caulk for all necessary locations
• Do not use sulfuric acid to unclog drain. Will cause product failure and void warranty.Use plunger or snake to clear obstruction.
• If installing a door, you must build wall ush with base to accommodate jambs
Before installation, peel away protective lm to ensure correct color.
A
Adhesive and Shims
TOOLS YOU WILL NEED:
Level
Square
Jig saw
Tape measure
Pencil
Power Drill
Safety Glasses
Caulk Gun
SUPPLIES YOU WILL NEED:
1-5/8" Stainless Steel Screws
Shims
Construction Adhesive
Mortar compound (optional)
Drain assembly
100% Silicone for Drain
STEP 1. PREPARING ALCOVE
a. Strip alcove to bare studs.
b. Shower stud pocket should be constructed as shown on page 1. Studs
should be plumb and square to sub-oor.
c. Sub oor must be clean, smooth, and level (Fig 1). Do not install shower base
on open oor joists.
d. Cut hole in sub oor as shown on page 1 to accommodate drain (not included).
STEP 2. TRIAL FIT BASE
a. Trial t base in prepared alcove. With base sitting at on oor ensure base is
level (Fig 2).
NOTE: If sub-oor is not level, use shims or a leveling compound (smooth
mortar) or a similar quick-setting compound specically made for
leveling oors. This fully supports and levels base.
b. Remove base from alcove.
STEP 3. INSTALLING BASE
a. Follow manufacturer's instructions for installing drain.
b. Apply construction adhesive to all feet (and shims if needed) (Fig 3 & 4).
c. Carefully set shower base in alcove. Avoid sliding base, which will smear
adhesive.
d. If needed, shim between nail ange and stud(s) to create a tight t.
e. Once leveled, screw nail ange to all studs (Fig 5).
IMPORTANT
• Failure to adhere feet to suboor and screw ange to all studs will void
warranty
• If installing a door, you must build wall ush with base to accommodate
jambs
COMPLIANCE CERTIFICATIONS:
ANSI Z124.1 AND CAN/CSAB45
CAN/ULC S102.2 FLAME75
SMOKE DEVELOPED485 CODE
FIGURE 1. Check that studs are plumb with sub-oor/base.