AUDIOPHILE 192 Quick Start Guide This guide is intended to help get you started quickly. In order to achieve optimal usage of your new Audiophile 192, we recommend that you carefully study the enclosed product manual, either after completing the process described in this guide or before.
Table of Contents English . . . . . . . . . . . . . . . . . . . . . . . . . . . . . . . . . . . . . . . . . . . . . . . . . . . . . . . . . . . . . . . . . . . . . . . . 5 Introduction . . . . . . . . . . . . . . . . . . . . . . . . . . . . . . . . . . . . . . . . . . . . . . . . . . . . . . . . . . . . . . . . . . 5 Minimum System Requirements . . . . . . . . . . . . . . . . . . . . . . . . . . . . . . . . . . . . . . . . . . . . . . . 5 Installation procedures . . . . . . . . . . . . . . . . . . . . . . .
Italiano . . . . . . . . . . . . . . . . . . . . . . . . . . . . . . . . . . . . . . . . . . . . . . . . . . . . . . . . . . . . . . . . . . . . . . . 29 Introduzione . . . . . . . . . . . . . . . . . . . . . . . . . . . . . . . . . . . . . . . . . . . . . . . . . . . . . . . . . . . . . . . . 29 Requisiti minimi del sistema . . . . . . . . . . . . . . . . . . . . . . . . . . . . . . . . . . . . . . . . . . . . . . . . . . 29 Procedure di installazione . . . . . . . . . . . . . . . . . . . . . . . . . . . .
English Introduction Thank you for choosing the M-Audio Audiophile 192 PCI interface, your professional solution for audio and MIDI performance with your computer and Digital Audio Workstation software. This Quick Start Guide is designed to give you a basic overview of the Audiophile 192, to get you up and running quickly. Even if you are an experienced computer user and digital recording enthusiast, we suggest you take the time to read the accompanying Users’ Manual .PDF file, included on the AP192 CD.
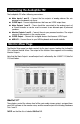
Connecting the Audiophile 192 The Audiophile 192 offers following connections: < Main Inputs 1 and 2 – Connect the line outputs of analog devices like mic preamps or keyboards into these. < S/PDIF Input – Connect digital devices that have an S/PDIF output here. < Main Outputs 1 and 2 – These should be connected to the analog inputs of a 2-track recorder or can be used to connect to an alternate pair of powered speakers. < Monitor Outputs 1 and 2 – Connect these to your powered monitors.
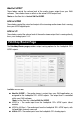
WavOut S/PDIF* These faders control the volume level of the audio stream output from your DAW software. These faders have no effect on the actual S/PDIF output level. *Note: on the Mac this is labeled SW Out S/PDIF. H/W in S/PDIF These faders control the mixer level output of the incoming audio stream that is coming from your S/PDIF digital Inputs. H/W in 1/2 These faders control the volume level of the audio stream output that is coming directly from your Analog Inputs 1 & 2.
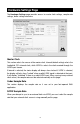
Hardware Settings Page The Hardware Settings page provides access to master clock settings, sample rate settings, buffer settings and more. Master Clock This section selects the source of the master clock. Internal (default setting) selects the Audiophile 192’s internal clock, while S/PDIF In selects the clock received through the S/PDIF input stream. If Internal is selected, the status display will always show Locked.
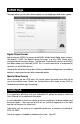
S/PDIF Page This page allows you to select various options for the digital input and output signals. Digital Output Format Selects between S/PDIF (Consumer) and AES/EBU (Professional) digital output streams. The default is S/PDIF. The default setting,”Consumer,” is a true S/PDIF format and is recognized by all consumer devices. The alternate “Professional” setting is an AES/EBU type data stream, but electrically S/PDIF. This is a work-around that is recognized by some but not all AES/EBU devices.
Français Introduction Merci d’avoir choisi l’interface Audiophile 192 PCI de M-Audio, une solution professionnelle qui vous permettra d’obtenir des performances audio et MIDI à partir de votre ordinateur et de vos logiciels musicaux. Ce guide de démarrage rapide a été conçu pour vous donner un aperçu de l’utilisation de l’Audiophile 192, l’objectif étant que vous puissiez commencer sans délai à vous en servir.
Connexion de l’Audiophile 192 L’Audiophile 192 est équipée des connecteurs suivants : < Main Inputs 1 and 2 (entrées 1 et 2 principales) - Connectez-y les sorties de ligne d’appareils analogiques telles que des préamplis micro ou des claviers. < S/PDIF Input (entrée S/PDIF) – Connectez-y des appareils numériques munis d’une sortie S/PDIF.
WavOut S/PDIF* Ces faders contrôlent le niveau de volume de la sortie de flux audio de votre station audionumérique logicielle. Ils n’ont aucune incidence sur le niveau de sortie S/PDIF. *Remarque : sous Mac, ils sont repérés SW Out S/PDIF. H/W in S/PDIF Ces faders contrôlent la sortie de niveau du mélangeur pour le flux audio entrant issu de vos entrées numériques S/PDIF. H/W in 1/2 Ces faders contrôlent le niveau de volume pour la sortie du flux audio issu directement de vos entrées 1 et 2 analogiques.
Onglet Hardware Settings L’onglet Hardware Settings donne accès aux réglages de l’horloge maîtresse, de la fréquence d’échantillonnage, de la mémoire tampon, etc. Master Clock (horloge maîtresse) Cette section permet de sélectionner la source d’horloge maîtresse. Le réglage par défaut “Internal” suppose la sélection de l’horloge interne de l’Audiophile 192 tandis que S/PDIF In suppose la sélection de l’horloge provenant du flux d’entrée S/PDIF.
Onglet S/PDIF : Cet onglet vous permet de sélectionner diverses options relatives aux signaux d’entrée et de sortie audionumériques. Digital Output Format (Format numérique en sortie) Offre le choix entre les flux de sortie numérique S/PDIF (Consumer) et AES/EBU (Professional). Le réglage par défaut est S/PDIF. Avec la valeur par défaut «Consumer» c’est un véritable signal S/PDIF qui est transmis et reconnu par tous les appareils grand public.
Nous contacter Si vous rencontrez des problèmes avec votre Audiophile 192, veuillez d’abord vous reporter au Manuel de l’utilisateur afin d’y consulter des informations supplémentaires. Nous vous conseillons également de vous rendre sur notre site Web, à l’adresse http://www.m-audio.fr/http://www.m-audio.fr. Vous y trouverez des mises à jour de pilote et une assistance technique.
Deutsch Einführung Vielen Dank, dass Sie sich für das M-Audio Audiophile 192 PCI Interface entschieden haben, dem professionellen Audio- und MIDI-Interface für Ihren Computer und Digital Audio Workstation Software. In dieser Quick-Start-Anleitung werden die wichtigsten Eigenschaften und Funktionen des Geräts beschrieben. Darüber hinaus gibt die Anleitung eine Hilfestellung für die Inbetriebnahme des Geräts.
Anschluss der Audiophile 192-Karte Audiophile 192 verfügt über folgende Anschlüsse: < Haupteingänge 1 und 2 – Schließen Sie hier die Line-Ausgänge analoger Geräte (Mikrophon-Vorverstärker, Keyboard, usw.) an. < S/PDIF Eingang – Schließen Sie digitale Geräte mit S/PDIF-Ausgang hier an. < Hauptausgänge 1 und 2 – Anschlüsse für die analogen Eingänge eines 2-TrackAufnahmegeräts oder Aktivlautsprecher. < Monitorausgänge 1 und 2 – Schließen Sie hier Ihre Aktivlautsprecher an.
WavOut S/PDIF* Mit diesen Schiebereglern stellen Sie den Pegel des ausgehenden Audiostreams Ihrer Digital Audio Workstation ein. Diese Regler haben keinen Einfluss auf den tatsächlichen S/PDIF-Ausgabepegel. *Hinweis: bei Macs lautet die Bezeichnung SW Out S/PDIF. H/W in S/PDIF Mit diesen Schiebereglern stellen Sie den Mixer-Pegel-Output des über die digitalen S/PDIF-Eingänge eingehenden Audiostreams ein.
Hardware-Settings-Seite Auf der Hardware Settings-Seite werden u.a die Einstellungen des Master Clocks, der Samplefrequenz, der Größe des Zwischenspeichers, u.a. vorgenommen. Master Clock Wählen Sie hier die Quelle für den Master Clock. Über die Standardeinstellung Internal wählen Sie den internen Taktgeber von Audiophile 192; über S/PDIF wählen Sie den über den S/PDIF-Eingang empfangenen Taktgeber aus. Wenn Internal ausgewählt ist, erscheint auf dem Display stets Status Locked.
S/PDIF-Seite Auf dieser Seite können Sie diverse Einstellungen für die digitalen Eingangs- und Ausgangssignale vornehmen. Digitales Ausgangsformat Schaltet zwischen digitalen S/PDIF- (Verbraucher) und AES/EBU- (Professional) Ausgangsstreams um. Standarmäßig ist S/PDIF eingestellt. Die Standardeinstellung “Verbraucher” ist im S/PDIF-Format und wird von allen Verbraucher-Endgeräten erkannt. Die zweite Einstellung, “Professional”, ist ein Datenfluss vom Typ AES/EBU, elektrisch allerdings S/PDIF.
Kontaktieren Sie uns! Falls wider Erwarten Probleme mit Ihrer Audiophile 192 auftreten, lesen Sie bitte zunächst das Benutzerhandbuch. Besuchen Sie auch unsere Website für Treiber-Updates und technische Unterstützung: www.m-audio.com Sollten Sie weitere Fragen haben, können Sie dort auch das Hilfeformular ausfüllen und an uns senden. Sie können uns auch eine Email schicken: support@m-audio.
Español Introducción Gracias por haber elegido Audiophile 192 PCI de M-Audio, una interfaz de audio y MIDI profesional para su computadora y programa de audio digital. El objetivo de esta Guía de inicio rápido consiste en proporcionarle la información básica que necesitará para empezar a utilizar su nueva interfaz inmediatamente.
Conexión de la Audiophile 192 La Audiophile 192 dispone de las siguientes conexiones: < Entradas principales 1 y 2 – Conecte aquí las salidas de línea de dispositivos analógicos como los preamplificadores de micro o los teclados. < Entrada S/PDIF – Conecte aquí los dispositivos digitales que dispongan de una salida S/PDIF. < Salidas principales 1 y 2 – Conéctelas a las entradas analógicas de una grabadora de dos pistas o a un par de altavoces activos.
WavOut S/PDIF* Estos faders controlan el volumen de salida de la señal de audio de su aplicación de audio, y no afectan al nivel de salida S/PDIF. *Nota: en Mac, reciben el nombre de SW Out S/PDIF. H/W in S/PDIF Estos faders controlan el nivel de la salida de audio del mezclador conectada directamente a las entradas digitales S/PDIF. H/W in 1/2 Estos faders controlan el nivel de salida de la señal de audio conectada directamente a las entradas analógicas 1 & 2.
Página de Configuración del hardware La página de Configuración del hardware proporciona acceso a la configuración del reloj maestro, de la frecuencia de muestreo, del búfer, etc. Master Clock (Reloj Maestro) Esta sección muestra la fuente del reloj maestro. La opción Internal (interno, configuración por defecto) selecciona el reloj interno de la Audiophile 192, mientras que S/PDIF In selecciona el reloj recibido a través de la entrada S/PDIF.
Pagina S/PDIF Esta página ofrece varias opciones para las entradas y salidas digitales. Formato de salida digital Selecciona entre los formatos de salida digital S/PDIF (Consumer, o doméstico) y AES/EBU (Profesional). El valor predeterminado es S/PDIF. El valor predeterminado, “Consumer” (Doméstico), es un formato S/PDIF estándar utilizado por todos los dispositivos “domésticos”.
Contactos En el caso de que surja algún problema con la Audiophile 192, no dude en consultar el manual para más información. También puede visitar nuestro sitio web en www.m-audio.com, para comprobar si existen actualizaciones de los controladores y recibir asistencia técnica. Desde ahí puede rellenar el formulario de asistencia técnica y hacernos llegar sus preguntas o dudas. Alternativamente, puede enviarnos un mensaje de correo electrónico a la dirección support@m-audio.
Italiano Introduzione Grazie per aver acquistato l’interfaccia M-Audio Audiophile 192 PCI, la soluzione professionala per esecuzioni audio e MIDI con il computer e il software Digital Audio Workstation. La presente Guida rapida è stata progettata per offrire una panoramica di base della Audiophile 192 e consentire un rapido utilizzo. Anche se si ha esperienza nel campo della registrazione digitale, si suggerisce di dedicare tempo per leggere il Manuale dell’utente.
Collegamento di Audiophile 192 L’Audiophile 192 offre i seguenti collegamenti: < Ingressi principali 1 e 2 – Collegare qui le uscite di linea delle periferiche analogiche, quali preamp microfonici o tastiere. < Ingresso S/PDIF – Collegare qui le periferiche digitali che dispongono di uscita S/PDIF. < Uscite principali 1 e 2 – Queste devono essere collegate agli ingressi analogici di un registratore a 2 tracce oppure utilizzate per collegarsi a una coppia alternativa di altoparlanti alimentati.
WavOut S/PDIF* Questi fader controllano il livello del volume dell’uscita del flusso audio dal software DAW. Questi fader non hanno alcun effetto sul reale livello di uscita S/PDIF. *Nota: sul Mac questo presenta la dicitura SW Out S/PDIF. H/W in S/PDIF Questi fader controllano l’uscita del livello del mixer del flusso audio in arrivo, proveniente dagli ingressi digitali S/PDIF.
Pagina ‘Hardware Settings’ (Impostazioni hardware) La pagina Hardware Settings fornisce l’accesso alle impostazioni del clock master,della frequenza di campionamento, del buffer e altro ancora. Clock master Questa sezione seleziona la sorgente del clock master. Internal (impostazione predefinita) seleziona il clock interno dell’Audiophile 192, mentre S/PDIF In seleziona il clock ricevuto attraverso il flusso di ingresso S/PDIF.
Pagina S/PDIF Questa pagina consente di selezionare varie opzioni per l’ingresso digitale e i segnali in uscita. Formato di uscita digitale Seleziona tra i flussi di uscita digitale S/PDIF (Consumer) e AES/EBU (Professional). Il valore predefinito è S/PDIF. Il valore predefinito, “Consumer”, è un formato S/PDIF standard riconosciuto da tutti i dispositivi audio domestici. L’altra opzione “Professional” fornisce un flusso di dati del tipo AES/EBU, sebbene dal punto di vista elettrico è S/ PDIF.
Contatti Se si sperimentano difficoltà con l’Audiophile 192, accertarsi di controllare prima il manuale dell’utente per informazioni aggiuntive. Si consiglia inoltre di consultare il sito web all’indirizzo www.m-audio.com, per gli aggiornamenti driver e assistenza tecnica. All’interno del sito è possibile compilare il modulo di richiesta di assistenza tecnica se si hanno domande o dubbi da sottoporre. In alternativa è possibile inviare un’email all’indirizzo support@m-audio.
日本語 はじめに M-Audio Audiophile 192をお買い上げ頂きまして誠に有難うございます。Audiophile 192は、 コンピュータやデジタルオーディオワークステーション用のPCIインターフェイスで、オー ディオ/MIDIパフォーマンスのためのプロフェッショナルなソリューションです。 このクイックスタートガイドにはAudiophile 192をご使用になる上で、インストールの方法 や基本的な操作方法を記載してあります。Audiophile 192の優れた性能についてよりご理解 を深め使いこなすためにユーザーズマニュアルと併せてお読みになることをお勧めします。 動作環境 Audiophile 192をインストールする前に、お使いのコンピュータが必要動作環境に適合する ことをお確かめ下さい。 Windows < < < < < Pentium III – 700 MHz以上、256 MB以上のRAM(192kHzと96kHz使用時) Pentium III – 500 MHz以上、128 MB以上のRAM(48kHz使用時) DirectX 9.
Audiophile 192の接続 Audiophile 192に装備されている接続端子: < メイン入力端子1と2 ‒ マイクプリアンプやキーボードなどのラインレベル機器の 出力端子とを接続します。 < S/PDIF入力端子 ‒S/PDIFデジタル機器の出力端子とを接続します。 < メイン出力端子1と2 ‒ 2トラックのレコーダーやパワードスピーカー等のアナロ グ機器の入力端子とを接続します。 < モニター出力端子1と2 ‒ パワードモニターに接続します。これらの出力端子の出 力音源はモニターミキサーです。 < S/PDIF出力端子 ‒ S/PDIFデジタル機器の入力端子とを接続します。 < MIDI入出力端子 ‒ MIDIキーボードや音源モジュールなどに接続します。 Monitor Mixer(モニターミキサー)ページ モニターミキサーのページには、Audiophile 192ソフトウェアモニターミキサーに信号を送る 入力信号をコントロールするフェーダーが装備されています。モニターミキサーの出力は、 アナログモニター出力に送信されます。 メイン出力の全体の出力レベルは、S/W R
WavOut S/PDIF* これらのフェーダーは、モニターミキサーでS/PDIFデジタル出力に割当てられたDAWアプ リケーションからのオーディオ出力信号のレベルを調整します。これらのフェーダーは、 S/PDIF出力レベルには関係しません。 *注意: Macでの表示はSW Out S/PDIFです。 H/W in S/PDIF これらのフェーダーはS/PDIFデジタル入力に直接接続するオーディオ出力信号のミキサーレ ベルをコントロールします。 H/W in 1/2 これらのフェーダーは、アナログ入力に直接接続したオーディオ出力信号をコントロールし ます。 Patchbay/Router(パッチベイ/ルーター)ページ Patchbay/Router(パッチベイ/ルーター)ページでは、Audiophile 192のS/PDIF出力端子 へのルーティングを設定します。 有効な音源: < WavOut S/PDIF* ‒ オーディオ信号は、Audiophile 192のS/PDIF出力に割当てら れたDAWアプリケーションから出力されます。出力レベルはDAWアプリケーション で調整します。 *注意: M
Hardware Settings(ハードウェア設定)ページ Hardware Settings(ハードウェア設定)ページでは、マスタークロック設定、サンプリン グレート設定、バッファサイズ設定などにアクセスできます。 Master Clock(マスタークロック) このセクションでは、マスタークロックの発信源を選択します。Internal(デフォルト設定) を選択するとAudiophile 192の内部クロックに設定され、S/PDIF Inを選択するとS/PDIF入力 から受信するクロックに設定されます。 Internalを選択すると、その下のステータス部分に常時「Locked」と表示されます。S/PDIFを 選択すると、有効なS/PDIF信号が入力で検知された時のみ「Locked」と表示されます。有効 なS/PDIF信号を受信していない時や、入力信号が不正な場合は「Unlocked」と表示されま す。外部クロックにシンク(同期)している時、適切に同期化させるよう外部クロックのサン プリングレートをこのページで手動設定する必要があります。 Codec Sample Rate(Codecサンプリングレー
S/PDIFページ このページでは、デジタル入出力信号に関して様々な選択ができます。 Digital Output Format(デジタル出力フォーマット) デジタル出力フォーマットがS/PDIFなら「Consumer」を、AES/EBUなら「Professional」を 選択します。デフォルト設定はS/PDIFです。デフォルトの「Consumer」は正確なS/PDIFフォー マットでコンシューマー機器全てに普及しています。一方、「Professional」はAES/EBUタイ プのデータ信号で電気的にはS/PDIFです。AES/EBU機器の中には、S/PDIFで認識される場合も あります。 「Advanced Settings」のボックスにチェックを入れると、エンハンスド、コピープロテク ションや追加オプションなど応用機能にアクセスするダイアログボックスが表示されます。 Monitor Mixer Source(モニターミキサーソース) S/PDIF入力を使って録音する時にモニターミキサーに送信されるオーディオの発信源を選択 します。Software Return(DAWアプリケーション出力)、Hard
AP192_QS_ML1 www.m-audio.