High-Definition 4-in/4-out Audio Card with Digital I/O and MIDI user guide
Table of Contents English . . . . . . . . . . . . . . . . . . . . . . . . . . . . . . . . . . . . . . . . . . . . . . . . . . . . . . . . . . . . . . . . . . . . . . . . . . . . . . . . . . . . . . . . . . . . . . . . . . . . . . . . . . . . . . . . 3 Introduction . . . . . . . . . . . . . . . . . . . . . . . . . . . . . . . . . . . . . . . . . . . . . . . . . . . . . . . . . . . . . . . . . . . . . . . . . . . . . . . . . . . . . . . . . . . . . . . . . . . . . . . . . . 3 Overview . . . . . . . . . . . .
Italiano . . . . . . . . . . . . . . . . . . . . . . . . . . . . . . . . . . . . . . . . . . . . . . . . . . . . . . . . . . . . . . . . . . . . . . . . . . . . . . . . . . . . . . . . . . . . . . . . . . . . . . . . . . . . . . . 59 Introduzione . . . . . . . . . . . . . . . . . . . . . . . . . . . . . . . . . . . . . . . . . . . . . . . . . . . . . . . . . . . . . . . . . . . . . . . . . . . . . . . . . . . . . . . . . . . . . . . . . . . . . . . . . 59 Informazioni generali . . . . . . . . . . . . . . .
English Introduction Thank you for choosing the M-Audio Audiophile 192 PCI interface, your professional solution for audio and MIDI performance with your computer and Digital Audio Workstation software. The Audiophile 192 provides your computer with a high-resolution four-input, four-output audio interface, as well as sixteen channels of MIDI in and out.
Macintosh < < < < Macintosh G4 733 MHz or higher 512MB RAM Mac OS X Jaguar (10.2.8 or later) or Panther (10.3.4) Available PCI slot Copyrights, etc Windows, Windows XP, and Windows 2000 are trademarks of Microsoft Corporation. Macintosh, Mac OS, Mac OS X and CoreAudio are trademarks of Apple Computer. All other trademarks are property of their respective holders.
When the installer has completed copying the files, you will be prompted to power your computer off and install the hardware. Select the middle option, “Yes, Power off my computer to install hardware.” • Hardware Installation Turn OFF the power to your computer system and disconnect the power cords. Touch a metal plate on your computer system chassis to ground yourself and discharge any static electricity.
During the installation, you will be prompted with a message warning that the driver software has not passed Windows Logo testing. Select “Continue Anyway” and proceed with the installation. NOTE: In Windows 2000, this message will refer instead to the drivers not passing Windows Logo testing. Again, it is safe to select Continue Anyway and proceed with the installation. The Wizard will then report that Windows has finished installing the software. Click “Finish.
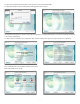
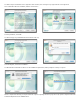
You will need your Administrator Password for the next step. Enter your password and click “OK.” You will be greeted with the Welcome dialog of the installer application. Click “Continue.” The Read Me box will appear next. This box contains important information on changes that may have occurred since the writing of this manual, so be certain to read through it. You will then be presented with the License Agreement. Click “Continue,” and then click “Agree” if you agree with the License Agreement.
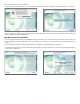
On the following box, click “Continue Installation.” Your M-Audio drivers will install. You will then see the Installation Completed box, and be prompted to click “Restart” and reboot your computer. After the computer has rebooted, you may shut down the computer completely, disconnect your power cords, open the computer chassis and install the Audiophile 192 into an available PCI slot. Mac OS X version 10.3.
You will then be presented with the License Agreement. Click “Continue,” then click “Agree” if you agree with the License Agreement. Select a destination disk for the installation, and then click “Continue.” In the Easy Install box, click ’Install.” You will need to type in your Administrator Password for the next step. In the following box, click “Continue Installation.” Your M-Audio drivers will install. You will then see the Installation Completed box, and be prompted to restart your computer.
• Hardware Installation Turn OFF the power to your computer system and disconnect the power cords. Touch a metal plate on your computer system chassis to ground yourself and discharge any static electricity. (This is not dangerous if the system is unplugged!) Remove the cover from your computer chassis and select an empty PCI slot in your computer. You should refer to your computer system documentation for any special instructions on installing expansion cards and peripheral equipment.
Using the Control Panel The Audiophile 192’s driver software provides a simple yet powerful interface with your computer and Digital Audio Workstation software. The control panel allows you to mix any of the Audiophile192’s inputs to the Monitor Outputs for zero-latency monitoring of your audio sources while recording. The Monitor Outputs receive their signal from the output of the software mixer, while the S/PDIF Outputs are assigned via the Patchbay/ Routing page.
Patchbay/Router Page The Patchbay/Router page provides output routing options for the Audiophile 192’s S/PDIF outputs. If additional Audiophile 192 cards are installed, their outputs can also be addressed on this page by choosing the card number under ‘H/W Installed’ to display that card’s settings. The default setting for the S/PDIF Output is the S/PDIF SW Return (WavOut S/PDIF in Windows, SW Out S/PDIF on Mac). This is usually the signal assigned to the S/PDIF Output in your DAW application.
• Codec Sample Rate This section allows you to select a sample rate for recording a new file. (When set to internal clock, the file’s sample rate will automatically be selected here.) Note that it is possible to manually set the playback sample rate when playback is idle, otherwise the sample rate selected in your DAW software will be mirrored here. Note that changing sample rate in your DAW application will override this panel’s selections.
• Monitor Mixer Source When recording via the S/PDIF input, this selects the audio source sent to the monitor mixer. Options are Software Return (the output of your DAW) or Hardware Input (direct input monitoring). About Page This page contains information on your hardware and current driver software versions. This information may be helpful, should you ever have the occasion to call for technical support.
Specifications Sampling Rates: 8, 9.6, 11.025, 12, 16, 22.050, 24, 32, 44.1, 48, 88.2, 96, 176.4, 192 kHz Main Inputs: Max Input +14.2dBu (+4 Vrms) Balanced +14.2dBu (+4 Vrms) Unbalanced Signal to Noise (a-weighted) –113dB @ 48kHz Dynamic Range (a-weighted) 113dB @ 48kHz THD+N 0.0006%, 1kHz, -1dBFS @48kHz Frequency Response ±0.1 dB, 20Hz to 20kHz @ 48kHz ±0.1 dB, 20Hz to 40kHz @ 96kHz ±0.
16
Français Introduction Merci d’avoir choisi l’interface PCI Audiophile 192 de M-Audio, carte Audio et MIDI professionnelle destinée à un usage informatique avec votre logiciel audionumérique. L’Audiophile 192 fournit à votre ordinateur une interface audio haute résolution à 4 entrées et 4 sorties, ainsi que 16 canaux d’entrée et de sortie MIDI. L’Audiophile 192 est la toute dernière de la gamme d’interfaces d’enregistrement numérique de renommée mondiale M-Audio Delta.
Configuration minimale requise Windows < < < < < Pentium 3 – 700 MHz ou supérieur, 256 Mo RAM (fonctionnement à 192 kHz et 96 kHz). Pentium 3 – 500 MHz ou supérieur, 128 Mo RAM (fonctionnement à 48 kHz). DirectX 9.0b ou supérieur Windows XP (Service Pack 1) ou Windows 2000 (Service Pack 4) Port PCI disponible Macintosh < < < < Macintosh G4 à 733 MHz ou supérieur 512 Mo de RAM Mac OS X Jaguar (10.2.8 ou supérieur) ou Panther (10.3.4) Port PCI disponible Copyrights, etc.
Une fois les fichiers copiés par le programme d’installation, vous êtes invité à éteindre votre ordinateur et à installer le matériel. Choisissez l’option du milieu : “Yes, Power off my computer to install hardware”. • Installation matérielle Éteignez votre ordinateur, et débranchez les câbles d’alimentation. Touchez une plaque métallique du châssis de votre ordinateur pour vous mettre à la terre et vous déchargez de toute électricité statique.
Au cours de l’installation, un message vous indique que les pilotes n’ont pas passé le test du logo Windows. Cliquez sur Continuer afin de poursuivre l’installation. REMARQUE : Dans Windows 2000, ce message se rapportera au contraire au fait que les pilotes ne passent pas le test du logo Windows. À nouveau, il est sans risque de choisir Continuer et de poursuivre l’installation. L’Assistant indiquera alors que Windows a fini d’installer le logiciel. Cliquez sur Terminer.
A la prochaine étape, vous devrez fournir votre mot de passe d’administrateur. Saisissez votre mot de passe et cliquez sur OK. Vous obtiendrez l’écran d’accueil de l’application d’installation. Cliquez sur Continuer. Le dialogue Read Me apparaîtra ensuite. Ce dialogue contient des informations importantes concernant des changements qui peuvent s’être produits depuis l’écriture de ce manuel ; prenez donc soin de les lire. L’accord de licence vous sera ensuite présenté.
Dans le dialogue suivant, cliquez sur «Continue Installation». Vos pilotes M-Audio seront installés. Vous verrez alors le dialogue «Installation Completed», et il vous sera proposé de cliquer sur «Restart» pour redémarrer votre ordinateur. Une fois que l’ordinateur a redémarré, vous pouvez éteindre l’ordinateur complètement, débrancher vos câbles d’alimentation, ouvrir le boîtier de l’ordinateur et installer l’Audiophile 192 dans un emplacement PCI disponible. Mac OS X version 10.3.
L’accord de licence vous sera ensuite présenté. Cliquez sur «Continue», puis cliquez sur «Agree» si vous êtes d’accord avec l’accord de licence. Choisissez un disque de destination pour l’installation, puis cliquez sur «Continue». Dans le dialogue Easy Install, cliquez sur «Install». A la prochaine étape, vous devrez fournir votre mot de passe d’administrateur. Dans le dialogue suivant, cliquez sur «Continue Installation». Vos pilotes M-Audio seront installés.
• Installation matérielle Éteignez votre ordinateur, et débranchez les câbles d’alimentation. Touchez une plaque métallique du châssis de votre ordinateur pour vous mettre à la terre et vous déchargez de toute électricité statique. (Cette opération ne présente pas de risque si votre système est débranché !) Retirez le couvercle du boîtier de votre ordinateur et choisissez un emplacement PCI vide.
Utilisation du Panneau de configuration Le logiciel pilote de l’Audiophile 192 fournit une interface simple mais puissante avec votre ordinateur et le logiciel Digital Audio Workstation. Le panneau de contrôle vous permet de mixer n’importe quelle entrée de l’Audiophile 192 vers les sorties de monitoring pour un monitoring sans latence de vos sources audio pendant l’enregistrement.
• H/W in S/PDIF Ces curseurs contrôlent le niveau de mélangeur de la sortie de flux audio connectée directement aux entrées numériques S/PDIF, permettant le monitoring matériel à latence zéro. Remarquez que les entrées S/PDIF et les sorties S/PDIF ne peuvent pas être monitorisées en même temps. La sélection doit être faite dans la page S/PDIF du panneau de configuration. Une fois la sélection opérée, les autres choix seront inaccessibles dans le mélangeur de monitoring.
Onglet Hardware Settings La page Hardware Settings donne accès aux réglages de signal d’horloge maîtresse, de fréquence d’échantillonnage, de mémoire tampon, et à d’autres réglages. • Master Clock (Horloge maîtresse) : Cette section permet de sélectionner la source d’horloge maîtresse de la carte. Internal (réglage par défaut) sélectionne l’horloge interne de la 192, tandis que S/PDIF In sélectionne le signal d’horloge reçu par le flux d’entrée S/PDIF.
• ASIO Options En cochant cette case, vous éviterez que les pilotes ASIO de votre application utilisent le mélangeur de monitoring et le routeur, ce qui vous permettra d’utiliser le routing interne de votre logiciel. • Input Channel Phase Cochez une de ces cases inversera la phase du canal d’entrée associé. Cela est utile pour vérifier le phasage de sources d’entrée stéréo. Onglet S/PDIF : Cette page vous permet de choisir différentes options pour les signaux d’entrée et de sortie numériques.
Nous contacter Si vous avez besoin d’aide, une assistance technique est disponible sur notre site web à l’adresse www.m-audio.fr, où vous pouvez remplir notre formulaire d’assistance technique. Vous pouvez également nous joindre par e-mail à l’adresse support@m-audio.fr, Ou nous contacter par téléphone au numéro : 0820 000 731 (PC) ou 0820 391 191 (MAC) L’assistance technique est proposée par téléphone du lundi au vendredi de 14h à 17h M-AUDIO U.S. 5795 Martin Road, Irwindale, CA 91706-6211, U.S.A.
Spécifications Fréquences d’échantillonnage (kHz) 8, 9.6, 11.025, 12, 16, 22.05, 24, 32, 44.1, 48, 88.2, 96, 176.4, 192 Entrées principales : Entrée maximale +14.2dBu (+4 Vrms) symétrique +14.2dBu (+4 Vrms) asymétrique Rapport signal-bruit (pondéré a) –113dB à 48kHz Plage dynamique (pondéré a) 113dB à 48kHz THD+N 0.0006 %, 1kHz, -1dBFS à 48kHz Bande passante +/- 0,1 dB, 20Hz à 20 kHz à 48kHz ±0.1 dB, 20Hz à 40kHz à 96kHz ±0.
Deutsch Einführung Vielen Dank, dass Sie sich für M-Audio Audiophile 192 PCI entschieden haben, dem professionellen Audio- und MIDI-Interface für Ihren Computer und Digital Audio Workstation Software. Audiophile 192 ist ein hochauflösendes Audio-Interface mit vier Eingängen, vier Ausgängen sowie 16 MIDI-Kanälen (In/Out) für Ihren Computer.
Mindestsystemanforderungen Windows < < < < < Pentium 3 – 700 MHz oder schneller, 256 MB RAM (192 und 96kHz-Betrieb) Pentium 3 - 500 MHz oder schneller, 128 MB RAM (48kHz-Betrieb) DirectX 9.0b oder höher Windows XP (SP1) oder Windows 2000 (SP4) 1 freier Steckplatz für PCI-Karte Macintosh < Macintosh G4 733 MHz oder höher < 512 MB RAM < Mac OS X Jaguar (10.2.8 oder höher) oder Panther (10.3.4) < 1 freier Steckplatz für PCI-Karte Copyright, usw.
Nach Beenden des Kopiervorgangs werden Sie aufgefordert Ihren Computer auszuschalten und die Hardware einzubauen. Wählen Sie die Option “Ja, Computer herunterfahren.” • Hardware-Installation Schalten Sie ihren Computer aus und ziehen Sie den Netzstecker. Berühren Sie Metall des Computergehäuses, um sich zu erden und evtl. statische Elektrizität abzuleiten.
Es erscheint eine Meldung, dass die Treibersoftware noch nicht für Windows zertifiziert wurde. Klicken Sie auf “Installation fortsetzen” und folgen Sie der Bildschirmführung. HINWEIS: Unter Windows 2000 erscheint die Meldung, dass die Treiber nicht für Windows zertifiziert wurden. Klicken Sie widerum auf “Ignorieren” / “Fortfahren” und setzen Sie die Installation fort. Der Hardware-Assistent meldet, dass die Installation abgeschlossen wurde. Klicken Sie auf “Fertigstellen”.
Für den folgenden Schritt benötigen Sie Ihr Administrator-Passwort. Geben Sie Ihr Passwort ein und bestätigen Sie mit “OK”. Es erscheint das Willkommensfenster des Installers. Klicken Sie auf “Weiter”. Es erscheint ein Lies-Mich-Text. Dieser Text enthält wichtige Informationen über Änderungen, die im Handbuch nicht mehr berücksichtigt werden konnten. Anschließend erscheint die Lizenzvereinbarung. Klicken Sie auf “Weiter”, dann auf “Ich akzeptiere”, wenn Sie den Bedingungen des Lizenzvertrages zustimmen.
Im nächsten Fenster klicken Sie auf “Installation fortsetzen”. Die M-Audio-Treiber werden nun installiert. Sobald die Installation abgeschlossen ist werden Sie aufgefordert, Ihren Rechner neu zu starten. Klicken Sie auf “Neustart”. Nach erfolgtem Neustart können Sie den Computer ausschalten, das Netzkabel ziehen und das Gehäuse öffnen. Installieren Sie Audiophile 192 in einen freien PCI-Steckplatz. Mac OS X v. 10.3.
Anschließend erscheint die Lizenzvereinbarung. Klicken Sie auf “Weiter”, dann auf “Ich akzeptiere”, wenn Sie den Bedingungen des Lizenzvertrages zustimmen. Wählen Sie den Zielordner für die Installation und klicken Sie auf “Weiter”. Es erscheint das Easy Install-Fenster, klicken Sie auf “Installieren”. Für den folgenden Schritt benötigen Sie Ihr Administrator-Passwort. Im nächsten Fenster klicken Sie auf “Installation fortsetzen”. Die M-Audio-Treiber werden nun installiert.
• Hardware-Installation Schalten Sie ihren Computer aus und ziehen Sie den Netzstecker. Berühren Sie Metall des Computergehäuses, um sich zu erden und evtl. statische Elektrizität abzuleiten. (Es besteht keine Gefahr, sofern das Gerät nicht an das Netz angeschlossen ist!)Entfernen Sie das Gehäuse des Computers und wählen Sie einen freien PCI-Steckplatz. Lesen Sie die Bedienungsanleitung Ihres Computers für Hinweise zum Einbau von Erweiterungskarten und Peripheriegeräten.
Das Control Panel Mit der Audiophile 192 Treibersoftware verfügen Sie über eine unkomplizierte und dennoch leistungsstarke Schnittstelle zwischen Computer und Ihrer DAW-Anwendung. Über das Control Panel können Sie jeden Eingang der Audiophile 192 zu den Monitorausgängen mischen, für latenzfreies Abhören während der Aufnahme. Die Monitorausgänge erhalten das Signal über den Software Mixer, während die S/PDIF-Ausgänge über die Patchbay/Routingseite zugewiesen werden.
• H/W in S/PDIF Mit diesen Schiebereglern stellen Sie den Mixer-Pegel des ausgehenden Audiostreams ein, der unmittelbar an die digitalen S/PDIF-Eingänge angeschlossen ist, für latenzfreies Hardware-Monitoring. Beachten Sie bitte, dass die S/PDIF-Eingänge und die S/PDIF-Ausgänge nicht gleichzeitig abgehört werden können. Wählen Sie Ein- oder Ausgang auf der S/PDIF-Seite des Control Panels aus. Nicht zutreffende Optionen im Monitor Mixer können nun nicht mehr ausgewählt werden.
• Master Clock Wählen Sie hier die Quelle für den Master Clock. Über die Standardeinstellung Internal wählen Sie den internen Taktgeber von Audiophile 192; über S/PDIF wählen Sie den über den S/PDIF-Eingang empfangenen Taktgeber aus. Wenn Internal ausgewählt ist, erscheint auf dem Display stets Status Locked. Wenn S/PDIF ausgewählt ist, erscheint Locked nur, wenn ein gültiges S/PDIF-Signal am Eingang empfangen wird. Wird kein Signal erkannt oder das Eingangssignal ist ungültig, erscheint Unlocked.
S/PDIF-Seite Auf dieser Seite können Sie diverse Einstellungen für die digitalen Eingangs- und Ausgangssignale vornehmen. • Digitales Ausgangsformat Schaltet zwischen digitalen S/PDIF- (Verbraucher) und AES/EBU- (Professional) Ausgangsstreams um. Standardmäßig ist S/PDIF eingestellt. Diese Standardeinstellung “Verbraucher” ist im S/PDIF-Format und wird von allen Verbraucher-Endgeräten erkannt. Die zweite Einstellung, “Professional”, ist ein Datenfluss vom Typ AES/EBU, elektrisch allerdings S/PDIF.
Kontaktieren Sie uns! Weiterführende Information, Hilfe und technische Unterstützung finden Sie auf unserer Website www.m-audio.de Von dort können Sie uns auch direkt anschreiben. Sie können uns auch eine Email schicken: support@m-audio.de, oder rufen Sie uns an: 07941 / 9870030 Die technische Hotline ist für Sie da von Mo-Do. 15:00 - 17:00 (CET)) M-AUDIO U.S. 5795 Martin Road, Irwindale, CA 91706-6211, U.S.A. Sales Information: 626-633-9050 Sales Information (email): info@m-audio.
Technische Daten Sampling Rates 8, 9.6, 11.025, 12, 16, 22.050, 24, 32, 44.1, 48, 88.2, 96, 176.4, 192 kHz Haupteingänge: Max Input +14,2dBu (+4 Vrms) Symmetrisch +14,2dBu (+4 Vrms) Unsymmetrisch Rauschabstand S/N (a-weighted) –113dB @ 48kHz Dynamikbereich (a-weighted) 113dB @ 48kHz THD+N 0,0006%, 1kHz, -1dBFS @48kHz Frequenzgang ±0.1 dB, 20Hz to 20kHz @ 48kHz ±0.1 dB, 20Hz to 40kHz @ 96kHz ±0.
Español Introducción Gracias por haber elegido Audiophile 192 PCI de M-Audio, la solución profesional para la grabación de audio y MIDI con su computadora y programa de audio digital. La Audiophile 192 agrega a su computadora 4 entradas y 4 salidas de alta resolución, así como 16 canales de entrada/salida MIDI La Audiophile 192 es el último modelo de la aclamada serie Delta de M-Audio.
Requisitos mínimos del sistema Windows < < < < < Pentium 3 – 700 MHz o superior, 256 MB RAM (para operación a 192 y 96kHz) Pentium 3 – 500 MHz o superior, 128 MB RAM (para operación a 48kHz) DirectX 9.0b o superior Windows XP (SP1) o Windows 2000 (SP4) Ranura PCI disponible Macintosh < < < < Macintosh G4 733 MHz o superior 512 MB de memoria RAM Mac OS X Jaguar (10.2.8 o superior) o Panther (10.3.
Tras ello, el programa le pedirá que desconecte su equipo e instale el hardware. Seleccione la opción central, “Yes, Power off my computer to install hardware”. (Sí, apagar la computadora para instalar el hardware). • Instalación del hardware Apague su computadora y desconecte los cables de alimentación. Toque una placa metálica del chasis de la computadora para descargar la electricidad estática que su cuerpo pudiera acumular.
Durante la instalación, aparecerá un mensaje advirtiendo que el software no ha superado la prueba del logotipo de Windows. Seleccione “Continuar” para proseguir con la instalación. NOTA: En Windows 2000, este mensaje le advertirá de que los controladores no han pasado la prueba del logotipo de Windows. Seleccione “Continuar” para proseguir con la instalación. El Asistente le indicará que el proceso de instalación del software ha finalizado. Pulse “Finalizar”.
Necesitará su contraseña de administrador para el siguiente paso. Introduzca la contraseña y pulse “OK”. La aplicación de instalación mostrará un diálogo de bienvenida. Pulse “Continuar”. Aparecerá una ventana Read Me (Léame). Esta ventana contiene información importante relativa a los cambios de última hora efectuados con posterioridad a la redacción de este manual, por lo que le recomendamos que lea este documento. A continuación aparecerá el Contrato de licencia.
En la caja siguiente, pulse “Continuar instalación”. Se instalarán los controladores M-Audio. Acto seguido, aparecerá la caja de Instalación finalizada, y el sistema le pedirá que pulse “Reiniciar”. Después de haber reiniciado la computadora, apáguela por completo, desconecte los cables de alimentación, abra el chasis de la computadora e instale la Audiophile 192 en una ranura PCI libre. Mac OS X versión 10.3.
A continuación aparecerá el Contrato de licencia. Pulse “Continuar” y “Aceptar” si acepta las condiciones del contrato de licencia. Seleccione un disco de destino para la instalación y luego pulse “Continuar”. En la caja Instalación simple, pulse “Instalar”. Necesitará su contraseña de administrador para el siguiente paso. En la siguiente pantalla, pulse “Continuar instalación”. Se instalarán los controladores M-Audio.
• Instalación del hardware Apague su computadora y desconecte los cables de alimentación. Toque una placa metálica del chasis de la computadora para descargar la electricidad estática que su cuerpo pudiera acumular. (¡Si el sistema está desenchufado no correrá ningún peligro!) Retire la tapa del chasis de su computadora y seleccione una ranura PCI libre. Consulte la documentación de su computadora para instrucciones especiales acerca de la instalación de tarjetas de expansión y equipos periféricos.
Uso del Panel de control El controlador de la Audiophile 192 interactúa con su computadora y programa de audio digital de manera sencilla y potente. El panel de control permite mezclar cualquier entrada de la Audiophile192 hacia las salidas de monitor y obtener una monitorización sin latencia de las fuentes de audio que está grabando. Las salidas de monitor reciben sus señales de la salida del mezclador por software, mientras que la salida S/PDIF se asigna en la página Patchbay/Routing del panel de control.
• H/W in 1/2 Estos faders controlan el nivel de la salida de audio conectada directamente a las entradas analógicas, proporcionando una monitorización por hardware sin latencia. Página del Patchbay / Router La página Patchbay/Router proporciona opciones de routing para las salidas S/PDIF de la Audiophile 192. Si dispone de tarjetas Audiophile 192 adicionales instaladas, en esta página también podrá acceder a sus salidas seleccionando el número de tarjeta en la pestaña “H/W Installed”.
Si selecciona Internal, el indicador de estado siempre mostrará Locked (Sincronizado). Si selecciona S/PDIF, el indicador solo mostrará Locked si detecta una señal S/PDIF válida en la entrada. Si la señal detectada en la entrada S/PDIF está corrupta o no es válida, aparecerá el mensaje “Unlocked” (No sincronizado). Si sincroniza a un reloj externo, debe ajustar manualmente la frecuencia de muestreo del reloj externo en esta página para permitir una sincronización correcta.
Pagina S/PDIF Esta página ofrece diversas opciones para las entradas y salidas digitales. • Formato de salida digital Selecciona entre los formatos de salida digital S/PDIF (Consumer, o doméstico) y AES/EBU (Profesional). El valor predeterminado es S/PDIF. El valor predeterminado, “Consumer” (Doméstico), es un formato S/PDIF estándar utilizado por todos los dispositivos “domésticos”.
Contactos Si desea ayuda, consulte la sección de soporte técnico de nuestra página web www.m-audio.com y rellene el formulario de asistencia técnica. Alternativamente, puede enviarnos un mensaje de correo electrónico a la dirección support@m-audio.com, También puede contactar con nosotros por teléfono llamando al (626) 633-9055 El servicio técnico telefónico está disponible de 7am - 7pm PST M-AUDIO U.S. 5795 Martin Road, Irwindale, CA 91706-6211, U.S.A.
Especificaciones Frecuencias de muestreo 8; 9,6; 11,025; 12; 16; 22,050; 24; 32; 44,1; 48; 88,2; 96; 176,4; 192 kHz Entradas principales: Entrada Máx +14,2dBu (+4 Vrms) Balanceada +14,2dBu (+4 Vrms) No balanceada Relación señal / ruido: (ponderado A) –113dB @ 48kHz Rango dinámico (ponderado A) 113dB @ 48kHz THD+N 0,0006%, 1kHz, -1dBFS @48kHz Respuesta en frecuencia ±0,1 dB; 20Hz a 20kHz @ 48kHz ±0,1 dB; 20Hz a 40kHz @ 96kHz ±0,5 dB; 20Hz a 80kHz @ 192kHz Diafonía –130dB, 1kHz, canal-a-canal Imp
Italiano Introduzione Grazie per aver scelto l’interfaccia Audiophile 192 PCI di M-Audio, la soluzione professionale per l’esecuzione di audio e MIDI con il computer e il software Digital Audio Workstation. Audiophile 192 aggiunge al computer un’interfaccia audio ad alta risoluzione a 4 ingressi e 4 uscite, oltre a 16 canali di ingressi e uscite MIDI.
Requisiti minimi del sistema Windows < < < < < Pentium 3 – 700 MHz o superiore, 256 MB RAM (funzionamento a 192 e 96kHz) Pentium 3 – 500 MHz o superiore, 128 MB RAM (funzionamento a 48kHz) DirectX 9.0b o superiore Windows XP (SP1) o Windows 2000 (SP4) Slot per scheda PCI disponibile Macintosh < Macintosh G4 733 MHz o superiore < 512 MB RAM < Mac OSX Jaguar (10.2.8 o successivo) o Panther (10.3.4) < Slot per scheda PCI disponibile Informazioni di copyright, ecc.
Una volta completata la copia dei file, verrà chiesto di spegnere il computer e di installare l’hardware. Selezionare l’opzione, “Sì, spegnere il computer per installare l’hardware.” • Installazione dell’hardware Spegnere il sistema e scollegare i cavi di alimentazione. Toccare il case metallico del computer per scaricare l’eventuale elettricità statica.
Durante l’installazione verrà visualizzata una finestra con l’avviso che il driver non ha superato il test di Windows Logo. Selezionare “Continuare” per procedere con l’installazione. NOTA: in Windows 2000 il messaggio indica che i driver non hanno superato il test Windows Logo. Anche in questo caso, premere “Continuare” per procedere con l’installazione. L’installazione guidata indicherà che l’installazione del software è terminata. Fare clic su “Fine”.
Per il passaggio successivo avrete bisogno della Password dell’amministratore. Inserite la password e fate clic su “OK”. Viene visualizzata la finestra di benvenuto dell’applicazione di installazione. Fate clic su “Continua”. Successivamente viene visualizzata la finestra Read Me. Questa finestra contiene informazioni importanti sulle eventuali modifiche apportate dopo la stampa del presente manuale, pertanto si consiglia di leggerla attentamente. Viene quindi visualizzato l’Accordo di licenza.
Nella finestra successiva, fare clic su “Continua l’installazione”. Vengono installati i driver M-Audio. Al termine viene visualizzata la finestra di installazione completata e verrà richiesto di “Riavviare” il computer. Una volta riavviato il computer, è necessario spegnerlo completamente e disconnetterne i cavi di alimentazione, quindi aprirlo e installare la scheda Audiophile 192 in uno slot PCI libero. Mac OS X versione 10.1.3.
Viene quindi visualizzato l’Accordo di licenza. Fare clic su “Continua”, quindi su “Accetto” se si accettano le condizioni dell’Accordo di licenza. Selezionare un disco di destinazione per l’installazione, quindi fare clic su “Continua”. Nella finestra Easy Install, fare clic su ’Installa”. Per il passaggio successivo, occorre disporre della Password di amministratore. Nella finestra seguente, fare clic su “Continua l’installazione”. Vengono installati i driver M-Audio.
• Installazione dell’hardware Spegnere il sistema e scollegare i cavi di alimentazione. Toccare il case metallico del computer per scaricare l’eventuale elettricità statica. (Non è un’operazione pericolosa quando il sistema è scollegato dall’alimentazione elettrica). Aprire il computer e installare la scheda in uno slot PCI libero. Consultare la documentazione del computer per le istruzioni relative all’installazione di schede di espansione e periferiche. Rimuovere la copertura dello slot PCI selezionato.
Utilizzo del Pannello di controllo Il driver di Audiophile 192 offre un’interfaccia semplice e potente con il computer e il software di registrazione audio. Il pannello di controllo consente di mixare qualsiasi ingresso di Audiophile192 alle uscite Monitor per il monitoraggio a latenza zero delle sorgenti audio durante la registrazione. Le uscite Monitor ricevono il segnale dall’uscita del mixer software, mentre le uscite S/PDIF vengono assegnate tramite la pagina Patchbay/Routing.
• H/W in 1/2 Questi fader controllano il livello dell’uscita del flusso audio connesso direttamente agli ingressi analogici, fornendo il monitoraggio hardware a latenza zero nel mixer monitor. Pagina Patchbay / Router La pagina Patchbay/Router fornisce opzioni di routing delle uscite per le uscite S/PDIF di Audiophile 192.
• Master Clock Questa sezione illustra la selezione del master clock. Internal (impostazione predefinita) seleziona il clock interno di Audiophile 192, mentre S/PDIF In seleziona il clock ricevuto attraverso il flusso in ingresso S/PDIF. Se si seleziona Internal, il display di stato visualizzerà sempre la dicitura “Locked” (sincronizzato). Se si seleziona S/PDIF, il display visualizzerà la dicitura Locked solo quando viene rilevato in ingresso un segnale S/PDIF valido.
Pagina S/PDIF Questa pagina consente di selezionare varie opzioni per l’ingresso digitale e i segnali di uscita. • Digital Output Format (formato di uscita digitale) Selezione tra i flussi di uscita digitale S/PDIF (Consumer) e AES/EBU (Professional). Il valore predefinito è S/PDIF. Il valore predefinito “Consumer” è un formato S/PDIF standard riconosciuto da tutti i dispositivi domestici.
Contatti Per ulteriore assistenza, è disponibile il supporto tecnico presso il nostro sito all’indirizzo www.m-audio.com, in cui è possibile compilare un apposito modulo di richiesta di assistenza tecnica. In alternativa, è possibile inviare un messaggio e-mail all’indirizzo support@m-audio.com, Oppure contattare M-Audio telefonicamente al numero: +1-626-633-9055 Il supporto tecnico è disponibile tramite telefono dalle 7:00 alle 19:00 PST M-AUDIO U.S. 5795 Martin Road, Irwindale, CA 91706-6211, U.S.A.
Specifiche tecniche Frequenze di campionamento 8, 9,6, 11,025, 12, 16, 22,050, 24, 32, 44,1, 48, 88,2, 96, 176,4, 192 kHz Ingressi principali: Ingresso max +14,2dBu (+4 Vrms) Bilanciato +14,2dBu (+4 Vrms) Sbilanciato Rapporto segnale/rumore (pesato A) –113dB a 48kHz Range dinamico (pesato A) 113dB a 48kHz THD+N 0,0006%, 1kHz, -1dBFS a 48kHz Risposta in frequenza ±0,1 dB, da 20Hz a 20kHz a 48kHz ±0,1 dB, da 20Hz a 40kHz a 96kHz ±0,5 dB, da 20Hz a 80kHz a 192kHz Crosstalk (diafonia) –130dB, 1kHz,
日本語 はじめに M-Audio Audiophile 192をお買い上げ頂きまして誠に有難うございます。Audiophile 192は、コンピュータやデジタルオーディオワークステーション用 のPCIインターフェイスで、オーディオ/MIDIパフォーマンスのためのプロフェッショナルなソリューションです。Audiophile 192は、コンピュータに高 解像度な入出力4系統、MIDI入出力16系統のインターフェイスを提供します。Audiophile 192は、人気の高いM-Audioのデジタルレコーディングインター フェイスであるDeltaシリーズの新製品で、頑強で信頼性の高いハードウェア設計と革命的なソフトウェアドライバのテクノロジーが凝縮されています。 お使いになる前に、本マニュアルをよくお読み下さい。Audiophile 192のインストールの方法や詳しい使い方について解説してあります。Audiophile 192の優れた性能についてよりご理解を深め使いこなすために本マニュアルをお役立て下さい。 Audiophile 192について Audiophile 192は、プロフェッショナルなクオリティのオーデ
Macintosh < < < < Macintosh G4 733 MHz以上 512MB以上のRAM Mac OS X Jaguar (10.2.8以降)またはPanther (10.3.
インストーラがファイルのコピーを完了したら、真中の「Yes, Power off my computer to install hardware」を選択して「Finish」をクリックします。 インストールが終了したら、コンピュータの電源をOFFにした後、ハードウェア(Audiophile 192)をインストールします。 ハードウェアのインストール方法 コンピュータシステムの電源をOFFにし電源ケーブルの接続を外します。 コンピュータシステムの本体の金属部分にさわり、静電気の発生を防止します。(電源ケーブルが外されている時は危険ではありません) コンピュータのカバーを外し、使用していないPCIスロットを選びます。 お使いのコンピュータシステムの取扱説明書より、拡張カードや周辺機器に関する注意事項をご参照下さい。 使用していないPCIスロットのネジを外し、スロットカバーを外します。 Audiophile 192 PCIカードをPCIスロットに装着して、スロットにしっかり収まるまで差し込みます。 Audiophile 192 PCIカードの金具をスクリューなどでスロットに固定します コンピュータのカバーを戻し、
インストール中に「ロゴテストに合格していません」というメッセージが表示されますが「続行」をクリックしてインストールを進めて下さい。 注意: Windows 2000では、このメッセージはドライバがWindowsのロゴテストに合格していないというものですが、続行してインストールを進め ても問題ありません。 Windowsでソフトウェアのインストールが終了した画面が表示されます。「完了」をクリックします。 インストーラがファイルをコピーし終わったら、コンピュータを再起動します。コンピュータが再び起動したら、M-Audioのミキサーアイコンがシス テムトレーに表示されます。 (ウィザードの最後に再起動を求められない場合がありますが、ファイルが全て正しくコピーされていることを確認するためにもコンピュータを再起 動することをお勧めします) 以上で、Audiophile 192は使用可能な状態になりました。 Mac OS X 10.2.
管理者の名前とパスワードを入力し、「OK」をクリックします。 インストーラで「ようこそM-Audio…」の画面が表示されます。「続ける」をクリックします。 「大切な情報」が表示されます。本マニュアルが作成されてから変更/改善点などが記載されています。必ずお読み下さい。 「使用許諾契約」が表示されます。「続ける」をクリックして使用許諾契約に同意する場合は「同意する」をクリックして下さい(使用許諾に同意で きなければインストールは行えません)。 インストール先を選択し「続ける」をクリックします。 簡易インストールの画面で「インストール」をクリックします。 77
次のボックスで「インストールを続ける」をクリックします。 M-Audioドライバがインストールされ次にインストールの終了画面が表示されます。「再起動」をクリックします。 コンピュータを完全に終了させ電源コードの接続を外します。コンピュータのカバーを外しAudiophile 192を使用していないPCIスロットに装着します。 Mac OS X 10.3.x(Panther) Audiophile 192ドライバCD-ROMをコンピュータのCD-ROMドライブに挿入し、CDの内容を確認します。M-Audio Audiophile 192インストーラ の.
「使用許諾契約」が表示されます。「続ける」をクリックして使用許諾契約に同意する場合は「同意する」をクリックして下さい(使用許諾に同意で きなければインストールは行えません)。 インストール先を選択し「続ける」をクリックします。 簡易インストールの画面で「インストール」をクリックします。 管理者の名前とパスワードを入力します。 「インストールを続ける」をクリックします。 M-Audioドライバがインストールされ次にインストールの終了画面が表示されます。「再起動」をクリックします。 コンピュータを完全に終了させ電源コードの接続を外します。コンピュータのカバーを外しAudiophile 192を使用していないPCIスロットに装着します。 79
ハードウェアのインストール方法 コンピュータシステムの電源をOFFにし電源ケーブルの接続を外します。 コンピュータシステムの本体の金属部分にさわり、静電気の発生を防止します。(電源ケーブルが外されている時は危険ではありません) コンピュータのカバーを外し、使用していないPCIスロットを選びます。 お使いのコンピュータシステムの取扱説明書より、拡張カードや周辺機器に関する注意事項をご参照下さい。 使用していないPCIスロットのネジを外し、スロットカバーを外します。 Audiophile 192 PCIカードをPCIスロットに装着して、スロットにしっかり収まるまで差し込みます。 Audiophile 192 PCIカードの金具をスクリューなどでスロットに固定します コンピュータのカバーを戻し、電源ケーブルをコンセントに差し込みます。 オーディオケーブルをAudiophile 192 PCIに接続します。詳しくは「Audiophile 192の接続」の項をご参照下さい。 アップルメニューから「システム環境設定」を選択します。「サウンド」のパネルを開いて「出力」タブをクリックします。出力デバイスにAudiophil
コントロールパネル・ソフトウェアを使用する Audiophile 192のコントロールパネル・ソフトウェアにより、コンピュータとDAW(デジタルオーディオワークステーション)アプリケーションの 簡単でパワフルなインターフェイスとなります。コントロールパネル・ソフトウェアでAudiophile 192の入力のどれでもモニター出力にミックスし 録音しながらオーディオ音源をゼロレイテンシーでモニターすることができます。モニター出力は、ソフトウェアミキサーの出力から信号を受信し、 S/PDIF出力端子は、パッチベイ/ルーティングページで割当てが可能です。 Audiophile 192のコントロールパネルは、ドライバのインストールが終了すると同時にコンピュータのシステムにインストールされます。コントロー ルパネル・ソフトウェアの起動方法: Windows – 画面右下のシステムトレーにある小さな「M」の形のアイコンをダブルクリックするとコントロールパネル・ソフトウェアが起動します。 Mac – システム環境設定の中にAudiophile 192コントロールパネルがあります。 注意:コントロールパネル・ソフトウェアは、A
Patchbay/Router(パッチベイ/ルーター)ページ Patchbay/Router(パッチベイ/ルーター)ページでは、Audiophile 192のS/PDIF出力端子へのルーティングを設定します。Audiophile 192のPCIカー ドが2枚以上インストールされている場合、それぞれの出力はこのページに表示され、HW Installedのセクションでカードの番号を選択すると選択し たカードの設定状況が表示されます。 S/PDIF出力のデフォルト設定は、S/PDIF SW Return(WindowsではWavOut S/PDIF、MacではSW Out S/PDIF)です。これは通常DAWアプリケー ションのS/PDIF出力に割当てられています。ここで別の選択をすると、DAWアプリケーションに割当てられた出力信号は無効になります。H/W In 1/2では、アナログ入力をデジタルに変換し、この信号をS/PDIF出力を経由して別のデジタル機器へルーティングします。 有効な音源: < WavOut S/PDIF* – オーディオ信号は、Audiophile 192のS/PDIF出力に割当てられたD
Codec Sample Rate(Codecサンプリングレート) このセクションでは、新しいファイルを録音するためのサンプリングレートを選択します( Internal の内部クロックに設定されている時は、その ファイルのサンプリングレートは自動的に選択されています)。再生サンプリングレートは、再生中以外に手動で設定することも可能です。再生中は DAWアプリケーションで選択されたサンプリングレートが反映されます。DAWアプリケーションでサンプリングレートを変更すると、このパネルで 選択したサンプリングレートがそれに合わせて変更されます。 DAWアプリケーション側でサンプリングレートをコントロールできないようにするには、Rate Lockedのボックスにチェックを入れて、選択したサン プリングレートが受信するサンプリングレートに左右されないよう固定します。Reset Rate When Idleをチェックすると、録音中に受信するサンプ リングレートが変化しても選択したサンプリングレートはそのままの状態です。 S/PDIF Sample Rate: S/PDIFからの外部クロックに同期させたい時は、このページ
Monitor Mixer Source(モニターミキサーソース) S/PDIF入力を使って録音する時にモニターミキサーに送信されるオーディオの発信源を選択します。Software Return(DAWアプリケーション出力)、 Hardware Input(ダイレクト入力モニタリング)から選択します。 Aboutページ このページには、ハードウェアと現在のドライバソフトウエアのバージョン情報が書かれています。テクニカルサポートに連絡を取る場合、必ずこの情 報をお知らせ下さい。右下のCopyrightはM-Audioのウェブサイトにリンクされています。インターネットをお使いの場合、クリックするとM-Audioの ウェブサイトにアクセスできます。 お問い合わせ先 テクニカルサポートへのご質問は、M-Audioのウェブサイト www.m-audio.comからテクニカルサポートのフォームにご記入になりオンラインでお 送り下さい。 M-AUDIO U.S. 5795 Martin Road, Irwindale, CA 91706-6211, U.S.A.
技術仕様 サンプリングレート 8, 9.6, 11.025, 12, 16, 22.050, 24, 32, 44.1, 48, 88.2, 96, 176.4, 192kHz メイン入力: 最大入力 +14.2dBu(+4 Vrms)バランス +14.2dBu(+4 Vrms)アンバランス S/N比 (a-weighted) –113dB @ 48kHz ダイナミックレンジ(a-weighted) –113dB @ 48kHz 歪み率 0.0006%, 1kHz, -1dBFS @ 48kHz 周波数特性 0.1 dB, 20Hz to 20kHz @ 48kHz 0.1 dB, 20Hz to 40kHz @ 96kHz 0.5 dB, 20Hz to 80kHz @ 192kHz クロストーク –130dB, 1kHz, channel-to-channel インピーダンス 20kΩ(バランス) 10kΩ(アンバランス) メイン出力: 最大出力 +14dBu(+3.9 Vrms)バランス +8dBu(+1.
ユーザー登録について ユーザー登録を行わなければ製品保証や技術的なサポートを受けることができません。ユーザー登録を行うには、次の3つの方法があります。環境に 合わせた方法でユーザー登録を行って下さい。 1.)コンピュータで(一般的なWebブラウザ)エムオーディオジャパンWebサイトへアクセスできる方: エムオーディオジャパン オンラインユーザー登録ページhttp://www.m-audio.co.jp/register/index.htmlにて、必要事項を入力して送信して頂けれ ば弊社製品のユーザーとして御登録致します。尚、ユーザー登録完了の御案内は行っておりませんのでご了承下さい。 2.)携帯電話でエムオーディオジャパンWebサイトへアクセスできる方: エムオーディオジャパン モバイルサイトのオンラインユーザー登録ページhttp://www.m-audio.co.jp/mobile/にて、必要事項を入力して 送信して頂ければ弊社製品のユーザーとして御登録致します。尚、ユーザー登録完了の御案内は行っておりませんのでご了承下さい。 3.
www.m-audio.