Audiophile USB Owner’s Manual version: AP-012403 Table of Contents Introduction . . . . . . . . . . . . . . . . . . . . . . . . . . . . . . . . . . . . . . . . . . . . .2 What’s in the Box? . . . . . . . . . . . . . . . . . . . . . . . . . . . . . . . . . . . . . . .2 About the Audiophile USB . . . . . . . . . . . . . . . . . . . . . . . . . . . . . . . . . .2 Features & Specifications . . . . . . . . . . . . . . . . . . . . . . . . . . . . . . .3 Minimum System Requirements . . . . . . . . . . . . . . . .
Introduction Congratulations on your purchase of the Audiophile USB by M-Audio. The Audiophile USB is your audio and MIDI upgrade for any PC or Macintosh computer*, utilizing the convenience of your computer’s USB port—no tools or computer disassembly is required.The Audiophile brings you true 24-bit 96kHz audio and the highest-quality stereo, and digital multi-channel surround sound available today. Even if you are experienced in digital recording, please take the time to read this manual.
jacks. Alternatively, you can connect the record outputs of your stereo receiver into the Audiophile’s RCA jacks located on the back panel. Record a digital audio signal from your DAT, MiniDisc, CD, or external A/D converter via the Audiophile’s coaxial S/PDIF input. Control all hardware settings with the Audiophile USB Control Panel software. The Audiophile USB also includes MIDI I/O connectors.
Front Panel Features 1. Headphone Out:This is a stereo headphone output on a 1/4” TRS jack. Connect only a stereo plug to this jack. 2. Headphone Level: This knob controls the level of the stereo output signal sent to the headphone jack. 3. Output Level: This knob controls the level of the stereo output signal sent to the RCA analog output jacks. 4. MIDI In: This 5-pin DIN accepts MIDI data from any external MIDI device via a standard MIDI cable, supporting up to 16-channels of MIDI data on a single cable.
2. Left Input and Right Input (RCA Analog Inputs): These jacks input analog audio from a variety of external sources. Each jack is female RCA, compatible with common male RCA cables. When plugs are inserted into the 1/4” jacks, these RCA inputs are defeated. 3. Left Output and Right Output (RCA Analog Outputs): These jacks output analog audio to a variety of external destinations. Each jack is female RCA, compatible with common male RCA cables. 4.
Hardware Installation Find a convenient spot near your computer for the Audiophile USB.With the Audiophile’s power switched “Off,” plug the included power supply into your wall socket, and plug its 2.5mm plug into the Audiophile’s 9V AC 1000 mA Power Jack.Then, simply connect the USB cable to your computer and to the Audiophile USB. Please follow the Driver and Software installation carefully.Apply power to the Audiophile USB, switching the unit “On” ONLY when prompted.
4. The Wizard reports that Windows has finished installing the software. Click “Finish”.Your Audiophile USB is ready for action. After completion of the driver installation, Windows may require you to restart Windows. If it does request a restart, remove the Drivers CD from the CD drive and respond by clicking “Yes”. The system will restart and your Audiophile USB is ready for play. Macintosh OS 9 Installation NOTE: To use the Audiophile USB on Mac OS 9, you must also install Opcode’s OMS.
(this is recommended, although OMS will sense that it is on and prompt you to turn it off). If you are configuring OMS for the first time, follow these instructions to configure OMS. 1. In the Opcode folder, which you will find on your hard drive, locate the OMS Applications folder,“then OMS Setup.” Double-click on OMS Setup. 2. OMS will inform you that it has not yet been configured. Click OK. 3. The “Create a New Studio Setup” dialog box now appears. Click OK. 4.
13. Go to "System Preferences" in the Apple Menu. Select the "Sound" preference panel, and click the "Output" tab. Select "M-Audio Sonica Theater" to choose the Sonica Theater as your default output device. Mac OS X Installation is now complete. Proceed to the next section, “Hardware Installation”. Verifying Windows Driver Installation Windows displays the Audiophile USB driver status in the Device Manager page of the System Properties dialog box.
On Macintosh: During the driver installation, a dialog box will ask you if you wish to place a shortcut to the control panel on your desktop. Clicking this checkbox will, upon completion of the driver software installation, place a shortcut to the Audiophile USB Control Panel on your computer’s desktop.The control panel program itself will install to your system’s hard drive.
sampling clock. Continue reading this section for more information on making selections in the Audiophile USB Control Panel. Active Channels & Sample Depth: Activation of the Analog and S/PDIF inputs and outputs is done with a set of four check boxes.Two radio buttons allow selection between sample bit depths of 16-bit or 24-bit. These settings will interact with each other, either expanding or limiting your Active Ports, Sample Depth, and/or Maximum Sample Rate settings.
If you activate both sets of input and output channels, you will notice that the 24-bit setting in the Sample Depth column is grayed out and the “Maximum sample rate” is shown as 48000 Hz. NOTE: Whenever S/PDIF Input is selected as an Active Port, the Audiophile is expecting a digital signal at that port and to lock to the sample rate of that signal.
Windows Sound System and the Audiophile USB Windows may be set up to use the Audiophile as its default audio device, allowing system sounds to be played through the Audiophile. This also enables you to use the Audiophile with the sound applets included with Windows.To set this up, go to Control Panel | Sounds and Audio Devices (or, “Multimedia” in Windows 98). In the Audio Properties page, set the Playback and Recording devices to the Audiophile USB input and output devices of your choice.
microphone is not recommended. Instead, pass the microphone signal through a microphone pre-amp (such as the M-Audio TAMPA™, DMP3™, or Audio Buddy™), and then connect the pre-amp output to the input of the Audiophile USB. Some additional cable and/or cable adaptors may also be needed to ensure proper connectivity. The Audiophile USB also has digital inputs and outputs in S/PDIF format. These are available on RCA connectors, as stereo pairs.
low latency monitoring through the application (check your application’s documentation for information regarding input monitoring). If your Windows or Macintosh program is ASIO compliant, like Steinberg’s “Cubase” or Emagic’s “Logic,” then the program’s audio device driver setup page will allow you to select the USB Audiophile ASIO driver.This selection is advised, and described more fully later in this section.
ASIO Input and Output Devices: If your music program is ASIO compliant, you may use the “USB Audiophile ASIO” driver with your Audiophile USB. Open your music program and go to the audio setup page. The “USB Audiophile ASIO” driver will show up in the program’s ASIO Driver list, allowing you to select it at this time if it is not already selected by default. If you are using an ASIO compliant music program, we suggest that you enable and use the Audiophile’s ASIO drivers.
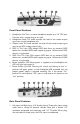
Audiophile USB MIDI Setup The Audiophile’s MIDI input and output ports may be connected to external MIDI devices.The following diagram shows connection to a MIDI keyboard instrument, which is also being used as a sound module.The MIDI output of the Audiophile USB may be used with just a sound module, while the MIDI input may alternately be used to receive MIDI time code for synchronization purposes. 1.
Troubleshooting Problem: No sound output. Possible Cause 1:The Audiophile USB hardware or software device drivers are not properly installed.See the installation sections of this manual for further information. Possible Cause 2:There is a resource conflict between your computer’s USB controller and another device in your computer (PC only). Check the Device Manager for your USB controller’s IRQ against those of the other installed devices.
Problem: Repetitious Sound. Possible Cause: An IRQ resource conflict with the USB controller and another device (PC only). Often this will result in a small segment of sound (0.5 to 1 second) repeating itself over and over, sometimes completely locking up the computer. See the general troubleshooting suggestions at the beginning of this section. • Problem: I’m getting some pops and clicks in my audio recording. • Possible Cause 1: Input levels are too “hot,” causing clipping or input distortion.
Problem: I am playing AC-3 or surround sound data from a software application on my computer, sending the data from Audiophile USB S/PDIF Out to my home theater’s AC-3 decoder. However, the decoder does not recognize the signal and therefore refuses to put out any audio. Possible Cause: There is a bit within the S/PDIF digital audio stream that defines the S/PDIF content as audio or non-audio. Most AC-3 surround sound decoders expect this setting to be non-audio and will otherwise reject the information.
Audiophile USB Warranty M-Audio warrants that this product is free of defects in materials and workmanship under normal use for a period of One (1) year, so long as the product is: owned by the original purchaser; the original purchaser has proof of purchase from an authorized M-Audio dealer; and the purchaser has registered his/her ownership of the product by sending in the completed warranty card.
Appendix A - Technical Specifications Analog Audio: Peak Signal, Analog Input: +2dBV Peak Signal, Analog Output: Dynamic Range, Inputs: 109dB (A-weighted) Dynamic Range, Outputs: THD (at 0dBFS): +2dBV 107dB (A-weighted) -92dB (typical) Frequency Response: 22Hz - 22kHz, -0.4,-0.
Appendix B - Driver/Software Install, Step by Step Windows XP: 1. During this installation, the Audiophile USB must be powered off. Begin the installation process by inserting the Drivers CD ROM in your computer. 2. A Setup window will appear. Click “Next,” to continue. 3. A Software Installation window will come up regarding Windows Logo testing. As this is a relatively new product, it has not gone through Windows Logo testing or certification yet.
5. A third Software Installation window will appear. Click “Continue Anyway.” 6. An M-Audio USB Audiophile Setup window will appear next. Make sure both the Enable Digital CD and Enable DMA Transfer Mode boxes are checked, then click “Next.” 7. Another M-Audio USB Audiophile Setup window will appear next. Click “Next,” to successfully install the USB Audiophile. 8. Windows will prompt you to restart the computer.
9. When you are completely restarted and at the desktop, power up the USB Audiophile. 10. The New Hardware Wizard will appear. Please select “Install the software automatically (Recommended),” then click “Next.” 11. A Hardware Installation window will come up. Click “Continue Anyway.” 12. A “Completing the Found New Hardware Wizard” window will appear next. Click “Finish,” to complete this portion of the installation.
13 Another Windows Logo testing window will come up. Once again, click “Continue Anyway.” 14. The New Hardware Wizard will appear again. Select “Install the software automatically (Recommended),” by clicking on the radio button and then clicking “Next.” 15. Another Hardware Installation window will appear regarding Logo Testing. Click “Continue Anyway.” 16. The final “Completing the Found New Hardware Wizard” window will appear. Click “Finish,” to complete the installation of your Audiophile USB.
17. Open the Windows Control Panel and click on the Audiophile USB Control Panel. Select "Place Audiophile Icon in the task bar.” The Audiophile USB will have a small black “M” in the system tray for easy access to the control panel. Windows 2000: NOTE: Please make sure the Service Pack 3 is installed. To get this update, please visit the download section of Microsoft at www.microsoft.com Windows 2000 comes installed with DirectX version 7. You must have DirectX version 8.
3. Click "Yes,” to confirm that you wish to continue with the installation. 4. Verify that you have read the license agreement and agree to the terms. Click "Yes," to continue. 5. Windows will need to restart your machine to complete the DirectX 8.1 installation. Click "OK," to restart your system. 6. This is the first setup window for installing the Audiophile USB drivers after the installer has confirmed that you have DirectX version 8.1 (or higher) installed on your system.
7. A Digital Signature Not Found window will appear.As this is a relatively new product, it has does not have an official Windows Digital Signature yet. Rest assured, our USB drivers are of the highest quality and will not cause problems in your system. Click “Yes.” 8. An M-Audio Setup window will appear next. Make sure both Enable Digital CD and Enable DMA Transfer Mode boxes are checked, then click “Next.” 9. An M-Audio Setup window will come up confirming a successful setup.
10. Windows will prompt you to restart the computer. Make sure that “Yes, restart my computer now,” is checked and then click “Finish,” to restart. 11. When you are completely restarted and at the desktop, power up the USB Audiophile. 12. A Digital Signature Not Found window will appear next Click “Yes.” 13. A second Digital Signature Not Found Box will appear. Click “Yes,” again.
14.The driver is now installed in your computer. Next, open the Windows Control Panel and click on the Audiophile USB Control Panel. Select "Place Audiophile Icon in the task bar.” A button which contains a small black “M” and represents the Audiophile USB control panel will now appear in the system tray, for easy control panel access. Windows ME: NOTE: Please make sure the Service Pack 3 is installed. To get this update, please visit the download section of Microsoft at www.microsoft.
3. Verify that you wish to continue installing DirectX 8.1 by clicking "Yes.” 4. Verify that you have read the license agreement and agree to the terms. Click "Yes," to continue. 5. Windows will need to restart your machine to complete the DirectX 8.1 installation. Click "OK," to restart your system. 6. This is the first setup window for installing the Audiophile USB drivers after the installer has confirmed that you have DirectX version 8.1 (or higher) installed on your system.
7. An M-Audio Setup window will appear next. Make sure both Enable Digital CD and Enable DMA Transfer Mode boxes are checked, then click “Next.” 8. An M-Audio Setup window will come up confirming a successful setup. Click “Next,” to successfully install the USB Audiophile. 9. Windows will prompt you to restart the computer. Make sure that “Yes, restart my computer now,” is checked and then click “Finish,” to restart.
10. When you are completely restarted and at the desktop, power up the USB Audiophile. 11. Open the Windows Control Panel and click on the Audiophile USB Control Panel. Select "Place Audiophile Icon in the task bar.” The Audiophile USB will have a small black “M” in the system tray for easy access to the control panel.
Limited One Year Warranty M-Audio warrants that this product is free of defects in materials and workmanship under normal use for a period of one year, so long as the product is: owned by the original purchaser; the original purchaser has proof of purchase from an authorized M-Audio dealer; and the purchaser has registered his/her ownership of the product by sending in the completed warranty card.