
Specifications

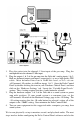


1. Plug the guitar into the channel-1 Line input of the pre-amp. Plug the
microphone into the channel-2 Mic input.
2. Plug the outputs 1 & 2 of the pre-amp into the Delta 66’s analog inputs 1 & 2.
Both are balanced outputs and inputs (respectively), so use a high quality TRS
cable. Most balanced lines run at +4dB line level, so let’s set our
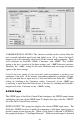
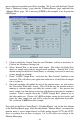
+4/Consumer/-10 switches to +4dB on inputs 1 & 2. Open the Delta Control
Panel by double clicking the icon in your Windows Control Panel, and then
click on the ‘Hardware Settings’ tab. Locate the ‘Variable Signal Levels’
section. The +4 setting requires that the +4 radio button be selected.
3. Plug the hardware outputs 1 & 2 of the Delta 66 to a sound system or power
amp with speakers. If your sound system is a consumer type, set the
+4/Consumer/-10 switch in the Hardware Settings page to the –10 setting. The
–10 setting requires that the -10 radio button be selected, setting all of the
outputs to the –10dBV setting. Now minimize the Delta Control Panel.
4. Turn on your equipment in this suggested order: computer, pre-amp, then
sound system.
We’re now physically set up to monitor, record, and play back audio. The next
steps involve further configuring the Delta Control Panel software and also the
27