Delta DiO-2496 Manual version: D2496-102799 Table of Contents Introduction . . . . . . . . . . . . . . . . . . . . . . . . . . . . . . . . . . . . . . . . . . . . . . . . 2 What’s in the Box? . . . . . . . . . . . . . . . . . . . . . . . . . . . . . . . . . . . . . . . . . . . 2 About the Delta DiO 2496 . . . . . . . . . . . . . . . . . . . . . . . . . . . . . . . . . . . . . 2 Product Features & Specifications . . . . . . . . . . . . . . . . . . . . . . . . . . . . . . . 3 Minimum System Requirements ..
Introduction Congratulations on your purchase of the Delta DiO 2496 digital audio interface card, designed and built by M AudioTM. Even if you are experienced in digital recording, please take the time to read this manual. It will give you valuable information on installing your new card and the supporting software, plus help you to fully understand the function and usability of the Delta DiO 2496.
Product Features & Specifications • 2-in, 4-out 24-bit/96kHz full-duplex audio interface on a half-size PCI card. • S/PDIF inputs and outputs on Coaxial (gold-plated RCA) and Optical (TOSlink) jacks. • High-quality stereo analog output on gold-plated RCA jacks, individually configurable for +4dB or -10dB signal levels. • Built-in digital mixer allows the D/A converter to monitor digital inputs, act as its own independent stereo output, or as a mixture of both.
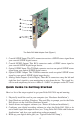
➊ ➋ ➌ ➍ ➎ The Delta DiO 2496 Adapter Card (Figure 1.) 1. Coaxial S/PDIF Input: This RCA connector receives a S/PDIF stereo signal from your coaxial S/PDIF digital source. 2. Coaxial S/PDIF Output: This RCA connector sends a S/PDIF stereo signal to your coaxial S/PDIF digital target device. 3. Optical S/PDIF Input: This TOSlink connector receives an optical S/PDIF stereo signal from your optical S/PDIF digital source. 4.
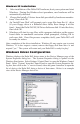
Hardware Installation NOTE: It is a good idea to make certain that an IRQ is available for the Delta DiO 2496 to install to before proceeding, as resource conflicts may cause a system to lock up. Open Control Panel | System | Device Manager, then with "Computer" highlighted at the top of the list, click Properties. This is a list of IRQs in use and their related devices. The Delta DiO 2496 typically uses one of these IRQ’s: 5, 7, 9-12, & 15.
Windows 95/98 Driver Software Installation Included with the Delta DiO 2496 is a series of Windows driver diskettes, containing the Windows drivers and control panel software. To install the Windows drivers, please follow these steps: Windows 98 Installation 1. After installing the Delta DiO hardware, boot your system and start Windows. During the Windows boot procedure, new hardware will be automatically detected by the Add New Hardware Wizard as shown here. Click ‘Next>’. 2.
Windows 95 Installation 1. 2. 3. 4. After installation of the Delta DiO hardware, boot your system and start Windows. During the Windows boot procedure, new hardware will be automatically detected. Choose the Install of "driver from disk provided by hardware manufacturer," then click OK. An ‘Install From Disk’ will prompt you to copy files from the A:\ drive (if your floppy drive is a different drive letter, then change it at this time).
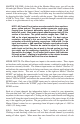
This example shows the M Audio Delta DiO and Midiman WINMAN 4x4/S (another product shown here only as an example) entries in the Windows Device Manager device list. The Delta DiO is properly installed with no conflicts, as is the WINMAN 4x4/S. If you do not see your M Audio Delta DiO in your Device Manager in this fashion, please jump ahead to the "Troubleshooting" section of this manual.
"Left Delta-DiO Monitor Mixer, Right Delta-DiO Monitor Mixer" when selected in your recording software. The Delta DiO’s output devices are named 1) Delta-DiO WavOut 1/2, which is the DiO’s analog output, and 2) Delta-DiO WavOut S/PDIF, which is both the coaxial and optical S/PDIF outputs wired in parallel. Analog and S/PDIF digital devices may be used at the same time for a total of 4 output channels. Because each device is stereo, you may see "left" and "right" references within your software application.
MASTER VOLUME: At the left side of the Monitor Mixer page, you will see the left and right ‘Master Volume’ faders. These faders control the overall volume of the mixer output and have the longest ‘throw’ and highest meter resolution of any level controls in the mixer page. The volume level faders may be controlled individually by dragging the fader ‘handle’ vertically with the mouse. The default fader setting is 0dB, or ‘Unity Gain’.
channels will be summed to the solo ‘buss’ (path), which is what one might consider an ‘in place’ solo as opposed to a PFL, or pre-fader listen (levels and pans still apply). Unchecking all solo boxes will again send all signals to both output paths (analog and S/PDIF). MUTE: Every channel has a "Mute" checkbox associated with it. Clicking on and checking the Mute box will remove that signal from the stereo buss. Unchecking the box will add the signal back into the stereo buss.
The rightmost vertical column of Patchbay/Router page, "H/W Out S/PDIF," connects the S/PDIF outputs of the DiO to one of four sources: 1. The default setting, "WavOut S/PDIF", connects the DiO’s S/PDIF outputs to your music software or Windows multimedia applet. In other words, when music software plays audio to the device named "Delta-DiO WavOut S/PDIF" it will be routed directly to the S/PDIF outputs of your DiO board. 2.
CODEC SAMPLE RATE: This section is enabled only when the board is set to use the internal crystal (Internal Xtal) as the source of its master clock. It is disabled (greyed-out) when the master clock is set to S/PDIF In. This section indicates the present board sample rate, as set by application software. The sample rate selected here will be used to drive the digital mixer and all outputs. The "Rate Locked" checkbox is used to force a sample rate upon the system.
S/PDIF Page The S/PDIF page of the Delta DiO Control Panel gives you control of the S/PDIF inputs and outputs. This is also where you set up the digital audio format, and select between the coaxial and optical inputs, choosing which is the current active digital input. To display this page, click the "S/PDIF" tab of the Delta Control Panel. Within the "Digital Input" group, you select which digital input is active, the Coaxial (RCA) or Optical S/PDIF input.
digital audio signal. The default is "None" and rarely will any user want to set the value to "50/15uSec" which indicates an S/PDIF emphasis mode. Professional Format Advanced Settings (Data Type): The user may assign the outgoing data as audio or non-audio data. Many devices ignore this setting. The obvious default is "audio." Professional Format Advanced Settings (Emphasis): The user may choose to indicate or not indicate if pre-emphasis has been applied to the outgoing digital audio signal.
select the current card under configuration, click the radio button to the left of the desired card in the list. Typical Delta DiO Setup Now that we’ve visited the wondrous intricacies of the Delta Control Panel, let’s look at a setup that involves a typical transfer of information from DAT to computer and back to DAT.
Transferring from DAT to DiO 1. Connect the DAT coaxial S/PDIF Output to the DiO coaxial S/PDIF Input using a good quality digital cable. 2. Connect the DiO analog outputs to some type of amplified sound system. The sound system should be equipped with speakers or headphones. 3. In order to verify proper S/PDIF Input routing, open the S/PDIF page of the Delta Control Panel software. In the Digital Input section, select "Coax/RCA." This will make the DiO’s coaxial S/PDIF input the currently active input. 4.
7. Within your recording software, select "Delta-DiO S/PDIF In" as the audio input device. 8. Start your software recording and then start your DAT material playing. You should be able to hear the DAT material through your sound system. This verifies that the digital audio is making it into the DiO correctly. Transferring from DiO to DAT, monitoring with DAT 1. Connect the DiO coaxial S/PDIF Output to the DAT coaxial S/PDIF Input using a good quality digital cable. 2.
3. Because you will be playing back at the recorded sample rate, you will want to set the DiO’s master clock to use the DiO internal crystal. Do this by opening the Hardware Settings page of the Delta Control Panel software and under Master Clock, selecting "Internal Xtal." Also, under the Codec Sample Rate section you may uncheck "Rate Locked" if it is previously checked. This allows for more flexible sample rate playback. 4.
Troubleshooting This section addresses potential problems that can occur in all operating system environments, with emphasis on hardware troubleshooting. Within the PC environment there are a limited number of hardware resources (Addresses, IRQs, and DMA channels) available for use. Since audio cards require many resources, most audio card installation problems arise from unavailable or improperly set resources. NOTE: The Delta DiO does not require any DMA channel resources and requires only one IRQ.
If the Delta DiO has requested an IRQ in use by another PCI device, but there are other IRQs available, moving the Delta DiO card to an alternate PCI slot may help. Changing PCI slots will cause the PnP system to recognize the card as new hardware and re-establish it with a different IRQ. Some newer BIOS (see your computer manual) allow the selection of an IRQ for each PCI slot on the motherboard. This can be very handy in resolving IRQ assignments for PCI devices.
Problem: No Sound. Possible Cause 1: There is a resource conflict with another device in your computer. Check the Delta DiO 2496 configuration (Address, IRQ) against those of the other devices on your computer. If necessary, change the settings for the one or more of the devices Possible Cause 2: The Delta DiO drivers are not properly installed or are not selected as the current audio output device. Possible Cause 3: Misrouted outputs in the Delta Control Panel.
Problem: I’m getting some pops and clicks in my audio recording. Possible Solution: Some accelerated graphics cards use excessive amounts of system bandwidth, preventing the recording buffer of an audio card from keeping up with demand. This can cause clicks in the recording. This problem may often be solved by reducing or turning off the graphics acceleration feature of the graphics card. In Windows, this is accessed from Settings | Control Panel | System | Performance | Graphics.
Lifetime Limited Warranty MIDIMAN warrants that this product is free of defects in materials and workmanship under normal use so long as the product is owned by the original purchaser and that purchaser has registered his/her ownership of the product by sending in the completed warranty card.