
User`s guide


90 Peak User’s Guide
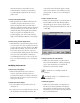
The Nudge Regions Dialog
The Nudge Regions function is useful for fine-tuning
the start and end times of Regions in the Playlist as
well as adjusting the crossfade times. Access the
Nudge Regions dialog by clicking on the icon in the
Playlist window. In this dialog you can dynamically
adjust start and end times of selected regions by
scrolling in the windows, and listen to the changes as
you make them by clicking on the Play button.
The Nudge Regions dialog
You can set the Pre-roll and Post-roll in seconds for
auditioning the crossfade. If the Preserve Timing
checkbox is checked, the duration between the Region
markers will remain fixed. If the Preserve Timing
checkbox is not checked, the Region markers can be
moved independently of one another. The Zoom tools
at the left of the window allow you to zoom in to the
sample level, or out for a larger view. You can also
allocate region Pre-roll and post-roll times in this
dialog. By clicking and dragging in the window, you
can adjust the fade times for the Fade Out (on top)
and the Fade In (on the bottom).
Nudge Regions is not available in Peak LE
Applying Plug-In Effects to Playlist
Events
You may apply up to four Premiere plug-in effects
processes per Playlist Event. This powerful feature
allows you to place different effects on different events
that are processed in real-time. This is very useful,
especially for creating remixes. Peak will also let you
process Playlist audio with any active VST plug-ins.
However, VST plug-ins will process the entire Playlist
and cannot process Playlist Events independent of one
another.
Please note the number of effects you can use is
limited to the CPU speed of your Macintosh. Some
effects, such as Waves TrueVerb
™
, may not be able to
run in real-time on slower CPU’s. In addition,
performance of Playlist effects is reduced when other
applications are open, or if File Sharing is in use
during playback.
To add a Plug-In DSP effect to a Playlist event:
1. Click on first unused DSP effect box on the playlist
event. You may select DSP effect boxes on
multiple events by holding down the Shift key
while you select DSP effect boxes.
2. Choose a desired Premiere format plug-in from
the Plug-Ins menu.
3. Configure the plug-in settings, and click OK or
Process, depending on the plug-in.
4. Peak will turn on the orange LED light for each
selected DSP effect box, indicating that they are
enabled.
To remove a DSP effect to a playlist event:
1. Click on the DSP effect box in the playlist event
that you wish to remove. You may select multiple
DSP effect boxes on multiple events by holding
down the shift key while you select DSP effect
boxes.