Easy-to-Use 49-Note USB Keyboard User Guide
Table of Contents Introduction. . . . . . . . . . . . . . . . . . . . . . . . . . . . . . . . . . . . . . . . . . . . . . . . . . . . . . . . . . . . . . 3 KeyRig 49 Keyboard Features. . . . . . . . . . . . . . . . . . . . . . . . . . . . . . . . . . . . . . . . . . . . . . 3 Keyboard. . . . . . . . . . . . . . . . . . . . . . . . . . . . . . . . . . . . . . . . .
Table of Contents MIDI Messages In-Depth . . . . . . . . . . . . . . . . . . . . . . . . . . . . . . . . . . . . . . . . . . . . . . . . . . 15 Program & Bank Changes . . . . . . . . . . . . . . . . . . . . . . . . . . . . . . . . . . . . . . . . . . . . . . . . . . . . . 15 NRPN/RPNs . . . . . . . . . . . . . . . . . . . . . . . . . . . . . . . . . . . . . . . . . .
| KeyRIg 49 User Guide 3 Introduction 1 Congratulations on your purchase of the M-Audio KeyRig 49: a 49-key full-size, velocity sensitive USB keyboard designed for easy integration with your Windows XP or Mac OS X computer. KeyRig 49 is a quality keyboard controller with the ability to control a multitude of music creation and virtual instrument applications, such as Ableton Live and Key Rig (included in this bundle). The KeyRig 49 keyboard is also an ideal companion to the popular GarageBand software.
| KeyRIg 49 User Guide 4 About this Guide 4 This User Guide covers setup and features of the KeyRig 49 USB keyboard. Even if you are experienced with MIDI and computer audio, we recommend reading this User Guide to help you get the most out of KeyRig 49. This keyboard can be used with many third-party music software applications. See your specific software’s documentation for more information on this.
| KeyRIg 49 User Guide 5 Installation and Setup 6 The KeyRig 49 USB keyboard is class-compliant. This means that you may simply connect the provided USB cable between KeyRig 49 and your Windows XP or Mac OS X computer and switch the keyboard on. Additional drivers are not mandatory for normal operation.
KeyRIg 49 User Guide | 6 Getting Started With Music Creation Software 7 If you are new to MIDI (Musical Instrument Digital Interface), you may find it challenging to understand why sounds have not simply been included in the keyboard. You will find that using a software-based sound source and recording system allows for access to an extremely large array of high quality sounds, a large graphic user interface, and freedom to work with many music creation applications.
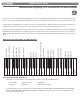
KeyRIg 49 User Guide | 7 The KeyRig 49 Keyboard 8 Key Names The letters printed above the white keys stand for the names of the musical notes the keys represent. The number next to each letter marks the octave each key belongs to. (More information on octaves can be found in the following section.) Black keys are “semitones” to their adjacent white keys and don’t have a dedicated letter. A semitone represents the distance in pitch from one note to its immediate neighbor.
KeyRIg 49 User Guide | 8 Modulation Wheel The Modulation wheel is typically used for modulation of the sound you are playing. This real-time controller was originally introduced on electronic keyboard instruments to give the performer options such as adding vibrato, just like players of acoustic instruments do. KeyRig’s Modulation wheel is assignable to control many possible parameters. (See chapter “Advanced KeyRig 49 Features in Edit Mode” for more information on this.
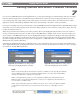
| KeyRIg 49 User Guide 9 Advanced KeyRig 49 Features in Edit Mode 9 The button to the left of the keys labeled “Edit Mode” is used to access additional advanced functions of the keyboard. When this button is pressed, the keyboard will enter Edit mode and the keys on the keyboard can be used to select functions and enter data. The light above the Edit Mode button indicates whether or not the keyboard is in Edit mode.
KeyRIg 49 User Guide | 10 To select an alternate function: 1. Press the Edit Mode button. 2. P ress the black key that represents the function you want to assign to the Octave buttons. KeyRig 49 will exit Edit mode as soon as you push one of these keys. PLEASE NOTE: Some of the functions that the Octave buttons can be used for cannot send out a value less than zero.
KeyRIg 49 User Guide | 11 Channel MIDI data from the keyboard can be sent on any of 16 MIDI channels. KeyRig 49’s default is to transmit MIDI data on channel 1. However, certain MIDI performance or recording scenarios may require the keyboard to send data on a different channel. You can change the channel on which data is sent using the following method: 1. Press the Edit Mode button. 2. P ress one of the 16 channel keys from D1 to E3, whichever one represents the channel you need.
KeyRIg 49 User Guide | 12 Bank LSB and Bank MSB Program changes are the most commonly used messages to change instruments and voices. However, the number of instruments accessible using only the program change MIDI command is limited to 128. Since some devices have more than 128 voices, they require a method to organize their large number of sounds into banks. These devices then access the sounds within these banks by using program change messages.
KeyRIg 49 User Guide | 13 Other Assignable Controllers on KeyRig The Modulation Wheel 10 It is possible to assign different MIDI controller numbers to the Modulation wheel. These parameters are called MIDI continuous controllers. There are 132 (counting from and including zero to 131) MIDI continuous controllers (MIDI CC’s). For these controller values to have any effect on the sound, the receiving software or device has to be able to read and respond to these MIDI controller messages.
KeyRIg 49 User Guide | 14 The Volume Slider As with the Modulation wheel, the Volume slider can also be assigned to any of the 132 controllers (0-131) shown at the back of this manual. To assign the Volume slider to a certain MIDI parameter: 1. Press the Edit Mode button. 2. Press the black key above D4 (D#4), representing “SLIDER ASSIGN.” 3. U se the Numerical Data Entry keys G3 – B4 to enter the number of the controller value you want to assign to the Volume slider. 4. Press the ENTER key (C5).
| KeyRIg 49 User Guide 15 MIDI Messages In-Depth 11 Program & Bank Changes When the MIDI standard was first established, it enabled the user to access only 128 different sounds using program change messages (0-127). As MIDI devices grew to be more sophisticated and contain more sounds, bank change messages were included in an updated MIDI specification to allow for more than 128 sounds to be accessed.
KeyRIg 49 User Guide | 16 can in turn contain 128 possible sounds selected via a separate program change MIDI message. This enables a user to theoretically recall over two million programs directly, using only MIDI commands. However, most devices only use a few different banks, and allow you to access them with either a Bank LSB message or a Bank MSB message. Please consult your synthesizer’s or software’s documentation for more information on which type of bank change messages they can process.
| KeyRIg 49 User Guide 17 Troubleshooting 12 KeyRig 49 has been tested in a wide range of systems and operating conditions. However, there are virtually limitless numbers of operating scenarios, any of which could affect your system’s performance. Though this section cannot cover all possible situations you may encounter, we would like to offer some suggestions for dealing with possible problems.
KeyRIg 49 User Guide | 18 Useful MIDI-Specific Troubleshooting Features 13 KeyRig 49 has been designed to make working with MIDI on your computer as simple as possible. However, sometimes things can go wrong. To counter this, there are two useful MIDI functions. All Notes Off Use this if you find there are sustaining notes that you cannot stop. To send an “All Notes Off” MIDI message: 1. Press the Edit Mode button. 2. Press the black key above D3 (D# 3), representing “ALL NOTES OFF.” 3.
| KeyRIg 49 User Guide 19 Technical Info 15 Caution: Electro Static Discharge, Electrical Fast Transient and Conducted RF interference may cause the unit malfunctioning. In such case, unplug the unit and plug it in again to restore normal operation. Note: Your M-Audio product has been tested to comply with FCC Standards FOR HOME OR OFFICE USE. Modifications not authorized by the manufacturer may void user’s authority to operate this device.
| KeyRIg 49 User Guide 20 Appendices - Useful MIDI Data 16 Appendix A - General MIDI Instruments PLEASE NOTE: The following table lists all General MIDI patch names using numbers from 0 – 127. Be advised that some GM modules count their sound patches from 1 – 128 instead. Both methods are common. As a result, and depending on the sound module you use, there may be an offset of -1 between the sent program change number and the recalled sound patch.
| KeyRIg 49 User Guide Appendix B - Standard MIDI Controller Numbers (MIDI CC’s) 00 Bank Select 38 Data Entry LSB 76 Controller 76 114 Controller 114 01 Modulation 39 Channel Volume LSB 77 Controller 77 115 Controller 115 02 Breath Control 40 Balance LSB 78 Controller 78 116 Controller 116 03 Controller 3 41 Controller 41 79 Controller 79 117 Controller 117 04 Foot Control 42 Pan LSB 80 Gen Purpose 5 118 Controller 118 05 Porta Time 43 Expression LSB 81 Gen Purpose 6 119 Controller
KeyRIg 49 User Guide | 22 Appendix C - Additional RPN Messages You may have noticed that although we have stated there are 128 MIDI controller messages (0 – 127), Appendix B shows 132 assignable controller messages. This is because messages 128 – 131 are a different type of MIDI message, defined in the MIDI Specification as RPN messages. M-Audio has created four messages that are sent like MIDI CCs, but actually transmit a series of RPN messages.
M-Audio USA 5795 Martin Rd., Irwindale, CA 91706 Technical Support M-Audio Germany Kuhallmand 34, D-74613 Ohringen, Germany Technical Support web: www.m-audio.com/tech e-mail: support@m-audio.de tel (pro products): (626) 633-9055 tel +49 (0)7941 - 9870030 tel (consumer products): (626) 633-9066 fax: +49 (0)7941 98 70070 fax (shipping): (626) 633-9032 Sales Sales e-mail: info@m-audio.de e-mail: sales@m-audio.