Contents Overview . . . . . . . . . . . . . . . . . . . . . . . . . . . . . . . . . . . . . . . 2 Features . . . . . . . . . . . . . . . . . . . . . . . . . . . . . . . . . . . . . . . . 4 Panel Description - Fig. 1 . . . . . . . . . . . . . . . . . . . . 6 Panel Description . . . . . . . . . . . . . . . . . . . . . . . . . . . . . 7 Dip-switch Descriptions . . . . . . . . . . . . . . . . . . . . . . . . . 9 Typical System Set-up - Fig. 2 . . . . . . . . . . . . . . 11 Typical System Set-up . . . . . . . .
Overview Mac Syncman is a professional quality, 1 Megahertz/RS-422, 2 In / 6 Out Macintosh MIDI interface and synchronization box - all built into one. Mac Syncman’s MIDI interface allows you to hook your Macintosh computer up to any MIDI equipment by way of the modem and printer ports. With 2 MIDI Ins, two different sources of MIDI information can be recorded simultaneously.
Additionally, Mac Syncman has a very high quality, built-in SMPTE regenerator. A SMPTE regenerator can take a bad SMPTE signal and regenerate it into perfect SMPTE. This regenerator can be used to recover an unreliable or damaged SMPTE stripe. Additional Mac Syncman features allow you to meet practically every common MIDI and tape synchronization need. It is well worth your while to read this manual thoroughly and familiarize yourself with all the Mac Syncman capabilities and features.
Features Interface Features • 1 Megahertz RS-422 Mac serial interface. • A dual 1 In/3 Out MIDI interface (2 MIDI Ins and 6 MIDI Outs - supporting 32 MIDI channels in all). One of the MIDI interface channels is connected to the modem port and the other to the printer port. • One MIDI Out (modem port) and MIDI In (modem port) are into the front of the Mac Syncman making it easy to plug in your master keyboard. • Selectable MIDI routing.
SMPTE sync stripes. • Selectable chase Delay time. Depending on the speed of your Macintosh and program, a longer or shorter delay may be required for the sequencer to properly “chase” when syncing to tape. The Delay dip-switch allows you to set a long (when up) or short (when down) delay time.
T2@@@@@@@@@@@@@@@@@@@@@@@@@@@@6K @< B@ @? ?@ @? ?@ @?g@@@@@@@@@6X?he?@ @?g@?g?@)Xhe?@ @?g@?g?@V/X?h?@ @?g@?g?@?V/Xh?@ @?g@?g?@eV)X?g?@ @?g@?g?@@@@@1?g?@ @?g@?hf@?g?@ @?g@?hf@?g?@ @?g@?hf@?g?@ @?g@?hf@?g?@ @?g@?hf@?g?@ @?g@?hf@?g?@ @?g@?hf@?g?@ @?g@?hf@?g?@ @?e@@@@@?hf@@@@@?e?@ @?e@?e@?hf@?e@?e?@ @?e@?e@?hf@?e@@@??@ @?e@?e@@@@@@@@@@@@@@@?e@?@??@ @?e@? @?@??@ @?e@? @?@??@ @?e@? @@@??@ @?e@? @?e?@ @?e@? @?e?@ @?e@@@@@@@@@@@@@@@@@@@@@@@?e?@ @? ?@ @? ?@ @= C@ R4@@@@@@@@@@@@@@@@@@@@@@@@@@@@0M Thru W2@@@@@@@@@@@
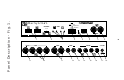
Panel Description (see Fig. 1) Front Panel 1. Serial Thru /MIDI switches. With these switches the Mac Syncman MIDI interface can be bypassed so that the Mac can be routed directly to the printer or modem without having to re-plug serial cables. There are two Thru switches - one each for the modem and printer port. When either of these switches is In, the port becomes a MIDI port. When either switch is Out, the port is routed directly to the modem or printer.
blink once, twice, three times, etc. If you then let the Write Switch up the Mac Syncman will start writing SMPTE from a SMPTE offset of 1 hour, 2 hours, 3 hours, or whatever number of times the Read/Write LED blinked. This feature gives you some control of SMPTE offset right from the front panel. 7. MIDI In - modem port. The MIDI In for the modem port. This MIDI In would typically be connected to your master keyboard MIDI Out.
connected directly to your modem. Because of this unique serial Thru feature, you do not have to unplug and re-plug cables to switch between the MIDI interface and your modem. 16. Serial In - printer port. This will normally be connected to the printer serial port on your Mac. The Mac Syncman sends and receives MIDI over either or both serial ports. 17. Serial Out - printer port. This will normally be connected to your printer.
would normally be set to MTC (Down). When this switch is Down, and the Off/MTC Switch is Down, Mac Syncman will generate MIDI Time Code whenever a SMPTE stripe is read. MIDI Time Code is used by almost all Mac sequencers including Vision, Cubase, Logic, Master Tracks and newer versions of Performer. When the DTL /MTC switch is Up, and the Off/MTC Switch is Down, Mac Syncman will generate “Direct Lock” Time Code instead of standard MIDI Time Code.
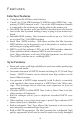
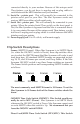
MIDI In Printer Modem Tape In Out In Out In Out In Print Modem Tape Serial Out Out Out Out Out In Modem Printer MIDI MIDI Tape Out Tape Deck (back panel) Serial Ports 11 Mac Syncman (top view) (front panel) Macintosh Typical Set-up MIDI Modem In Out MIDI Out MIDI In Master Keyboard Typical System Set-up - Figure 2 Sampler
Typical System Set-up (see Figure 2) A Typical System Set-up (see Fig. 2) consists of Mac Syncman, a Mac running some sequencer program, a tape deck, a master keyboard and one or more MIDI sound modules. Additionally, you may have a printer or a modem in your set up which you occasionally use for musical or non-musical applications (as hard to believe as this may be). We suggest that this Set-up be connected as follows: 1.
Frames: Off/MTC: DTL/MTC: Delay: Regenerate: Duplicate: Both Down . . . . .for 30 frames/second Down . . . . . . . . . . . . . . . . . . . . .for MTC Down . . . . . .for MTC (not Direct Lock) Up . . . . . . . . . . . . . . . .this should be off Up . . . . . . . . . .must be Off to sync at all Up . .turn off to avoid any possibility of feed back Ordinarily, when syncing to tape you need to first record a SMPTE sync stripe.
Operation To begin using Mac Syncman, make sure you have read the preceding sections of this manual. Your System should be set-up along the guidelines out-lined in the “Typical System Set-up” section above. Set the Mac Syncman switches to the positions indicated above, or which are appropriate for your application. If you are going to use Mac Syncman in SMPTE/MIDI Time Code Mode be sure the Off/MTC switch is Down. With the Macintosh there are very few sequencer programs that do not support MIDI Time Code.
4. Press the Mac Syncman Write switch. This starts Mac Syncman outputting a SMPTE signal which will be indicated by the Write LED going on. 5. Adjust your recording level to around - 5 dB. 6. Continue recording several minutes of SMPTE stripe. Naturally, you will need a stripe longer than the piece you are going to sync. 7. When done recording the stripe, again press the Mac Syncman Write switch. 8. Take your tape recorder out of record. 9.
Syncing to a SMPTE Stripe IMPORTANT: Make sure to look at the “Some Popular Sequencers” section in the back of this manual to see specific details on how to best setup your sequencer. 1. Make sure the Tape Out from your tape deck is connected to the Tape In on Mac Syncman. 2. Put your sequencer in MIDI Time Code (MTC) sync mode with the MIDI Time Code coming from the printer port. 3.
Misc. Info - Remotely Writing SMPTE SYNCMAN is also capable of writing a SMPTE stripe with any specified Offset. When SYNCMAN receives a Time Code Off-set message it will automatically start writing SMPTE with the correct, specified Offset. When started remotely, SYNCMAN will continue to write SMPTE until a MIDI System Stop message is received or until the SYNCMAN Write button is pressed. Mac Syncman comes with a utility that allows you to control these and other functions right from the computer.
Mac Syncman can regenerate or duplicate a SMPTE stripe. If the stripe is fine and you need to copy it you should probably duplicate it. If the stripe is damaged you will have to regenerate it. When Mac Syncman is regenerating, this is all it is doing - it cannot regenerate and sync at the same time. So if you need to sync to a badly damaged SMPTE stripe you need to regenerate it and then sync to the newly regenerated stripe.
Trouble Shooting If you have any problems using Mac Syncman you should first check the following: 1. Are all of your cables working and plugged in properly? 2. Are you using a high quality tape deck and tape? Have you tried using high quality Metal Tape? 3. Have you discovered the best Input and Output level settings on your tape deck. You may need to spend some time playing with different playback and record levels to find the most reliable settings.
Some Popular Sequencers Vision With Vision we recommend that you use Mac Syncman in SMPTE/MIDI Time Code Mode. To do this, make sure that the OFF/MTC and DTL/MTC dip-switches are both Down. On Mac Syncman select the SMPTE format you wish to use. We suggest 30 Frames which means the two left most dip-switches should both be Down. Now, with Vision, do the following: Go into the Options Menu and: Set Receive Sync Mode to MIDI Time Code. Set Receive Sync Port to printer port.
Set to Type of Sync to MIDI Time Code. Set SMTPE Format to 30 fps. Now set Chunk Start Time by going to the Counter Window and clicking on the second icon from the left at the top of the window, this will access a pull-down in which you should select Set Chunk Start. In the Set Chunk Start window set the start time to: 0:00:05:00 (5 seconds). Click on OK. Press Play on the Transport. With Performer versions earlier than 3.3, we recommend that you use Mac Syncman in Direct Lock Mode.
Down. Now with Master Tracks do the following: Go to the Goodies Menu. Select MIDI Set-up. Set the “Receive sync on port” to printer. Set “Sync Source” to MIDI Time Code. Set “SMPTE Format” to 30 fps (30 Frames/sec) Set “Start Time” to: Hr 0 Mn 0 Sc 5 Fr 0. This sets the sequence start time to 5 seconds. Exit the Goodies Menu. At the bottom right of the screen, in the small box where it says “INT Sync” click twice until it says “MTC Sync.” This switches the sync to MIDI Time Code.
Click-hold the Sync Button in either Transport area. In the flip menu that appears, choose “Open Tempo Sequence”. Change the SMPTE time position of the first (usually the only) tempo event to your desired start time (e.g.. 0: 0: 5: 0/ 0). Special Note on the Tascam 238 Tape Deck On the back of the Tascam 238 are two switches marked “Tape Sync” and “Filter.
Limited Lifetime Warranty MIDIMAN warrants that this product is free of defects in materials and workmanship under normal use so long as the product is owned by the original purchaser and that purchaser has registered his/her ownership of the product by sending in the completed warranty card.