Contents Microphone Design . . . . . . . . . . . . . . . . . . . . . . . . . . . . . . . . . . . . . . . . . . . . . . . . . . . . . . . . . . . .3 Microphone Types . . . . . . . . . . . . . . . . . . . . . . . . . . . . . . . . . . . . . . . . . . . . . . . . . . . . . . . . .3 Capsule Size . . . . . . . . . . . . . . . . . . . . . . . . . . . . . . . . . . . . . . . . . . . . . . . . . . . . . . . . . . . . . .4 The Backplate . . . . . . . . . . . . . . . . . . . . . . . . . . . . . . . . . . . . . . . .
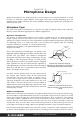
Microphone Design Chapter 1 While all microphones are designed for the common purpose of converting variations in sound pressure to electronic signals, different technologies have their benefits depending upon the application.This chapter examines the merits of different design types, capsule sizes, polar patterns, electronics and more. Microphone Types The three main types of microphones in common use today are dynamic, ribbon and condenser.
fixed magnet have very low output, thereby requiring more electronic gain a factor that necessitates high-quality preamp electronics in order to avoid noise. Condenser microphones Condenser mics are the most common for studio use. A thin electrically conductive diaphragm is suspended over a back plate, forming a delicate flexible capacitor.When sound waves excite the diaphragm, the distance between the diaphragm and back plate changes and with it the capacitance.
Small Capsules Small capsules are typically those with diaphragm diameters of less than about 1/2 . Categorically, they are extremely accurate through the audible range of 20Hz to 20kHz. Their poor signal-tonoise ratio, however, requires tricks with electronics and relegates small capsules to being most useful for measurement rather than recording. Medium Capsules Medium capsules have diaphragms that are approximately 1/2 inch to 3/4 inch in diameter.
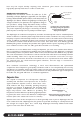
screw/contact resonator disk disk spacer backplate screws invariably prefer the sound of solid brass. Needless to say, we use solid brass backplates in all M-Audio mics. The spacing between the diaphragm and backplate is critical. In order to avoid problems with barometric pressure, the spacer ring has a break in order to allow air to move freely between these two components.
Omni also exhibits significantly less proximity effect than cardioids. One result is that omnis are somewhat less sensitive to the movements of an animated vocalist. Another is that omnis tend to have less need for EQ. As mentioned earlier, while omnis pick up 360 degrees of sound, they tend to be more directional as frequencies increase especially in larger capsules.
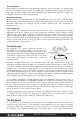
signal through headphones.That’s because one side of the mic is in phase with the performer (and therefore reinforcing their perception of their own sound) while the other side is not. Addressing the in-phase side while monitoring produces optimal monitoring results. Top Address vs. Side Address Designs top address The orientation of the diaphragm within the head of the microphone determines if the microphone is addressed from the top or the side.
An output transformer and/or amplifier serves as a sort of translator and, in audio, we expect that translation to be excellent in order to maintain frequency response, dynamic range, and signal-to-noise ratio. Just as a professional language translator costs more than someone who just took a few years of foreign language in high-school, pro-quality output transformers and amplifiers cost more than garden-variety ones.
still work.) The theory there is that the tube is used as a sort of processor to “warm” up the sound. The reality is that these are still solid state mics masquerading as tube mics as cheaply as possible. Because of the physics behind tube operation, tube mics have classically been subject to certain physical restriction on the length of the cable between the microphone and power supply. As a result, tube mics are normally restricted to cable lengths of about 15 feet.
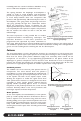
From a technical perspective, the two mics need to be as identical as possible in frequency response. A flat frequency response implies that there is no deviation in the output level versus the input level at any and all frequencies across the audible spectrum. While a flat frequency response is theoretically ideal, it is rarely achieved completely in any audio component. For example, a mic might exhibit a 1dB boost at 1kHz and start rolling off 3dB per octave at 14kHz.
Choosing & Using Microphones 12
Caring for Microphones Chapter 2 High-quality condenser mics like the M-Audio line represent an investment. A few basic tips will help ensure a lifetime of excellent performance. Shock Protection As you now know, condenser mics are constructed with extremely thin diaphragms and very high tolerances. As such, condensers should be protected from abuse, especially physical shock. (M-Audio capsules are rubber-mounted internally, but the need for caution still applies.
Cleaning and Storage Always store a condenser microphone in its case when not in use. Particulate matter such as dust can attach itself to the diaphragm and cause degradation of performance over time. In most cases, wiping the metal exterior of a microphone down with a dry or slightly damp rag will be sufficient to remove dust, dirt, fingerprints and the like.
Basic Miking Concepts Chapter 3 Microphone placement is an area in which art meets science. Microphone choice and placement is somewhat subjective, much in the same way that choosing a guitar and amp is a matter of personal preference. Furthermore, each situation brings a difference confluence of performer, sound space, recording equipment and creative forces.The question is not one of using the right or wrong mic or technique, but simply one of what works best in each unique situation.
a proximity effect where the low-mid frequencies increase as the distance between the source and mic decreases. (The proximity effect is not a big issue with omni patterns or medium-sized capsules of any pattern.) With large diaphragms, then, the placement of the mic affects volume, room ambiance and tonality. Large Capsules vs. Medium Capsules You can achieve excellent results in most situations using our large-capsule mics.
The Recording Environment Professional studios often have several different acoustic spaces available from small, relatively dead isolation booth to cavernous rooms with natural reflections and long delay times. Home recordists have fewer options, yet experimenting with recording in different rooms may yield interesting results. Large rooms and tall ceilings will give a more open sound than small rooms and low ceilings. The amount of furniture and reflectivity of various surfaces is also an influence.
common acoustic damping materials for home studio use. Music stands can also be reflective something you can compensate for by simply draping towels over them. While a reasonable amount of absorption is often desirable for isolation, too much damping can create an anechoic space that literally sucks the life out of a recording. In more permanent project studios, consider creating a flexible acoustic environment.
Minimize reflective surfaces. Hard surfaces like wood floors, smooth walls, windows and mirrors are a common culprit in phase issues because they reflect sound back into the microphone. If things sound odd, try moving the performer and/or mic. Also experiment with damping those reflections with blankets, towels, baffles and the like. Avoid boxing in mics. Microphones typically need a little breathing room in order to avoid reflection.
Choosing & Using Microphones 20
Stereo Miking Techniques Chapter 4 The use of stereo miking techniques utilizing matched pairs can make all the difference between mediocre and outstanding recordings. After all, we listen to the world around us in stereo via matched pairs of ears. Stereo miking can be used in applications ranging from individual instruments to small ensembles to full orchestras and other concert events.
separation and captures more room reflections. In general, the X-Y technique using cardioids yields an accurate stereo image exhibiting minimal acoustic reflections, although the separation is not as significant as some other stereo miking techniques. Blumlein Named after British stereo pioneer Alan Blumlein, the Blumlein technique takes advantage of the polar patterns inherent in figure 8 (bidirectional) mics.
together to create one side of the stereo signal, and subtracts the side signal from the mid signal to create the other.The result is a very accurate translation of the stereo listening field. The presence of an M-S balance control in the encoder also allows the engineer to control the ratio of mid signal to side signal, and therefore the perceived width of the stereo field.
degrees and fanned out to cover the physical spread of the orchestra. Another pair of mics is often placed further back in the hall on either side of the orchestra in order to capture room reflections in the ambient space. Decca Tree is favored in the film industry because it provides a spacious sound along with good stereo imagery that works well with processes like Dolby and surround sound. There is also the advantage of a discrete center mic for both monaural and center channel use.
Specific Miking Applications Chapter 5 Now that we ve covered some basics, it s time to look at some time-honored guidelines for common recording situations.While experimentation is definitely encouraged, these techniques will get you in the ballpark and, more importantly, provide additional understanding about microphones and placement techniques so that you can find what works in any given situation. Vocals Vocals are perhaps the most difficult subject to mic.
experiment with angling the mic down at the performer s mouth in order to avoid projecting the energy of the breath directly into the microphone.Also, make certain that the vocalist s headphones are the closed-cup variety, as open-cup designs tend to leak sound that the microphone will capture. As previously mentioned, a pop filter is highly recommended in order to soften plosives and to protect the condenser diaphragm from saliva. Pop filters can also help in controlling a singer s proximity to the mic.
mount is needed to minimize vibrations from tapping feet and the like. In most cases, cardioids are the best choice for miking acoustic guitar.While you can certainly attain good results with a large diaphragm mic, medium diaphragms are often preferred in order reduce proximity effect. 1. Bridge. Miking the bridge yields a very sweet sound.Angle the mic either away from the sound hole or tilted up from underneath.
1. Pop/rock. The closer the mics are to the hammers, the more percussive the resulting sound will be. For this reason, pop/rock recordings where the piano needs to cut through other tracks are often achieved by close-miking the hammers. Start by placing a matched pair of cardioid 1a 1 mics face down about six inches above the hammers and about one-third from each respective end.
• Single Mic. Using a single mic, the best you can attain is some sense of balance between the individual drums, along with the amount of room reflection versus pure drums. Using a boom, try angling a cardioid mic toward the kit at about 6 feet off the ground and about one foot in front or behind the kit. Alternately, place the mic four feet above the center of the kit.
Close-Miking Drums. Much of today s music focuses so strongly on the kick, snare and hi-hat that being able to mic these components of a drum individually is fairly critical. At a minimum, you also need a pair of overheads to catch everything else in stereo. In a perfect world, you have enough mics and channels to mic each element of the kit individually with the exception of the cymbals (hi-hat excluded) being captured by the stereo overheads.
However, you can experiment with large capsule mic s like the M-Audio Luna, which is noted for it s performance in the higher frequencies.If using a pair, they can either be used in an X-Y coincident fashion or spaced several feet apart over the left and right portions of the kit. In both cases, experiment with a height of anywhere between two and five feet above the kit, depending upon the room.
Choosing & Using Microphones 32
The M-Audio Family of Microphones Chapter 6 At this point, you ve learned a good deal about how microphones work, how they are built and how they are typically applied.Along the way, we ve occasionally referred to some of the specific models in the Groove Tubes family of mics. Here s a brief overview of the entire M-Audio lineup: All M-Audio mics share a great deal in common. Here s a brief review in the context of some of the mic construction features discussed in first part of this guide.
Troubleshooting Tips Appendix A Please consult the following before calling tech support (or even a friend). Problem: No audio from mic ¥ Phantom power not on.Turn on phantom power on your mic preamp or mixer channel. ¥ Gain is too low Make certain the pad is not turned on, both on the mic and preamp/mixer.Turn up input gain and/or channel trim. ¥ Mic cable isn t connected. Problem: Audible buzz ¥ Bad mic cable. Replace cable. ¥ Mic cable crossing a power cable.
Contact Information Appendix B M-Audio, formerly known as Midiman, is a leading provider of digital audio and MIDI solutions for today s electronic musicians and audio professionals. Founded in 1988, M-Audio now has independent offices in the US, Canada, UK, Germany, France, and Japan.