MicroTrack 24/96 Professional 2-Channel Mobile Digital Recorder User Guide
1 - Introduction MicroTrack 24/96 User Guide 1 - Introduction Congratulations on your purchase of the M-Audio MicroTrack 24/96. The MicroTrack 24/96 is a portable recorder that can record stereo audio signals directly to CompactFlash media in either WAV or MP3 format. The MicroTrack 24/96 can be connected to a computer via the USB connection to transfer audio files. The USB port is also used to recharge the internal battery of the MicroTrack 24/96.
2 - Installation Procedure English 2 - Installation Procedure No Drivers Required The MicroTrack 24/96 is a self-contained portable recorder that is ready to use right out of the box. The MicroTrack 24/96 is classcompliant, meaning that you do not need to install any special drivers when connecting the MicroTrack 24/96 to your computer. Charging the Battery with the USB Power Supply Before you begin using your new recorder, it is essential that you fully charge the MicroTrack 24/96 battery.
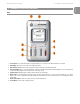
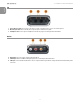
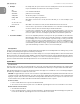
3 - Hardware Controls and Indicators MicroTrack 24/96 User Guide English 3 - Hardware Controls and Indicators Front 1. Power Button: Press and hold this button for approximately one second to turn the MicroTrack 24/96 on and off. 2. LCD Display: Shows the current status of the MicroTrack 24/96. 3. Clip Indicators: Will light when an input signal exceeds the headroom of the MicroTrack 24/96. 4.
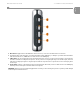
3 - Hardware Controls and Indicators Top English 9. Stereo Mic Input Jack: This 1/8” stereo mini-jack is used for connecting a mono or stereo electret microphone. 10. Mic/Line Input Jacks: These 1/4” TRS jacks accept microphone and line-level signals. 11. Headphone Jack: Connect a pair of headphones with an 1/8” plug for monitoring the MicroTrack 24/96. Bottom 12. RCA Outputs: Line-level outputs from the MicroTrack 24/96. 13.
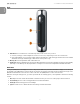
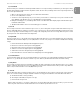
3 - Hardware Controls and Indicators MicroTrack 24/96 User Guide English Left 15. Menu Button: Toggles between the Main Menu and record screen, or acts as an exit button when in a sub menu. 16. Hold Switch: When active, all buttons on the MicroTrack 24/96 will be disabled. If you attempt to operate the MicroTrack 24/96 while the Hold switch is on, “HOLD switch on” will be shown on the LCD display. 17. L/M/H Switch: Sets the operating mode of the 1⁄4” TRS and 1/8” inputs.
3 - Hardware Controls and Indicators Right English 19. Nav Wheel: This is a multi-function control that is dependent on the current screen you are in. a. In a menu, moving up or down navigates the selections on the screen, and pressing in selects the current function b. In the main playback screen, pressing in toggles between play and pause, while moving up and down acts as fast forward and rewind. Pressing in and moving up or down acts as next or previous song. 20.
3 - Hardware Controls and Indicators MicroTrack 24/96 User Guide < Press up and down on the [NAV] wheel to move the selection up and down through this list. < To open a folder, select it and press in on the [NAV] wheel. < To exit a folder, press the [MENU] button. < To play a file, select it and press in on the [NAV] wheel. < To delete a file, select it and press the [DEL] button.
3 - Hardware Controls and Indicators English 6. Bit Depth: . . . . . . . . . . . .Like Sample Rate, the options shown in this menu will depend on the Encoder selected above. Keep in mind that file sizes will increase as this setting is increased. Tips: 16-bit WAV . . . . . . . . . is the standard audio CD rate. 24-bit WAV . . . . . . . . . .yields the best sound quality. 96kbps MP3 . . . . . . . . .will effectively capture voice dictations. 160kbps MP3 . . . . . . . .
3 - Hardware Controls and Indicators MicroTrack 24/96 User Guide 1. When you first enter this menu option, the screen will read “Format media?” 2. Press in on the [NAV] wheel to continue. 3. You’ll then see a message that says “Are you sure?” This is your last chance to cancel the process if you do not want to format (press [MENU] to exit). Otherwise, press in on the [NAV] wheel to start formatting. 4. During the formatting process, “Formatting” will be shown on the MicroTrack 24/96 display.
3 - Hardware Controls and Indicators 8) Language English This menu allows you to select the language to be used on the MicroTrack 24/96 display. More languages will be added in later firmware updates. 9) Factory Defaults Entering this menu option will allow you to reset all of the MicroTrack 24/96’s internal settings to the original factory defaults. (This also resets the internal counter for file names, so the next file you record will attempt to be “File0001.wav”.
4 - Operating Instructions The MicroTrack 24/96 is an easy-to-use, portable audio recorder. Its emphasis is on creating high-quality recordings that can be transferred easily to a computer. As such, the steps for operating the MicroTrack 24/96 are few and simple to understand. In essence, the MicroTrack 24/96 has two functions: Recording audio files and playing audio files.
4 - Operating Instructions < Tips: English i. If the signal is still too low and you are using a microphone at the 1⁄4” TRS input, lower the input level with the [LEVEL] control, and set the “L/M/H” to “H.” Now engage recording then use the [LEVEL] controls to set the signal again. Stop recording then delete the files. ii. If the signal is still too low, lower the input level with the [LEVEL] controls. Then, use the [MENU] button and [NAV] wheel to select “Record Settings” > “27dB TRS Boost.
4 - Operating Instructions MicroTrack 24/96 User Guide Now that a file has been recorded, you can play it back to check the recording. 1. Connect the outputs of the MicroTrack 24/96 so you can hear the playback. You can use any combination of the following: < Plug a pair of headphones into the 1/8” jack on the MicroTrack 24/96. < Connect the RCA outputs to an amplifier or mixer. 2. Use the [MENU] button and [NAV] wheel to navigate to the “Files” menu. 3. Use the [NAV] buttons to select a file to play.
5 - Using the MicroTrack 24/96 with a Computer English 5 - Using the MicroTrack 24/96 with a Computer The MicroTrack 24/96 will interact with a computer for two purposes. First, the MicroTrack 24/96 will charge its battery with power it receives from the computer. Second, the contents of the MicroTrack 24/96’s CompactFlash card or Microdrive can be transferred to the computer. Additionally, files can be uploaded to the MicroTrack 24/96 for use later.
5 - Using the MicroTrack 24/96 with a Computer MicroTrack 24/96 User Guide When you want to disconnect your MicroTrack 24/96 from your computer, it is important to properly exit host mode to prevent corrupted data on the drive. This procedure only applies if the MicroTrack is currently in host mode – meaning the “M-Audio” logo and USB icon are displayed on the screen. If you use the traditional shut down procedure on your computer, all drives will automatically be unmounted.
6 - Contact < 7 - Warranty Terms and Registration English 6 - Contact If you have any questions, comments or suggestions about this or any M-Audio product, we invite you to contact us by using the following information: M-AUDIO U.S. 5795 Martin Road, Irwindale, CA 91706-6211, U.S.A. M-AUDIO Deutschland (Germany) Kuhallmand 34, D-74613 Ohringen, Germany Sales Information: . . . . . . . . . . . . . . . . . . . . . . . . . . . . . . . . . . . . . . . . . . (626) 633-9050 Sales Information: . . . . . . . .
8 - Appendix MicroTrack 24/96 User Guide English 8 - Appendix Recording Time vs.
English Certain software contained in this product is copyrighted work of PortalPlayer, Inc. © PortalPlayer, Inc. 1999-2005. All Rights Reserved. PortalPlayer and the PortalPlayer logo are trademarks owned by PortalPlayer, Inc.