
Specifications


Recording a Pro Tools Session
9
6
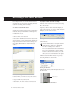
From the pop-up menu, select the interface in-
put you want to record. For example, select
Mic/Line 1 if your audio source is plugged into
the first input of your M-Audio interface.
7
Use the Signal Gain controls on your M-Audio
interface (if any) to maximize the signal going
into Pro Tools while avoiding clipping.
To record an audio track:
1
Click the Record Enable button for the track.
2
Choose Windows > Show Transport to display
the Transport window. Click Return To Zero (or
press Enter) to cue to the beginning of the ses-
sion.
3
Click Record in the Transport window to arm
Pro Tools for recording. The Record button will
flash red to indicate that Pro Tools is ready to
record.
4
When you are ready to start recording, click
Play or press the Spacebar.
5
Record your performance.
6
Click Stop in the Transport window or press
the Spacebar when you are finished recording.
To play back a recorded track:
1
If the track’s Record Enable button is lit, click
on it to take it out of Record mode.
2
Click Play in the Transport window or press
the Spacebar to start playback.
3
Click Stop in the Transport window or press
the Spacebar to stop playback.
Routing an input to a mono track
Clipping occurs when you feed a signal to
an audio device that is louder than the cir-
cuitry can accept. To avoid clipping, adjust
the Signal Gain control (if any). If the M-
Audio interface has front panel Clip LEDS,
adjust the gain to a level where the Peak
LEDs flicker occasionally.
Record enabling a track in the Mix window
Transport window
Rewind
Stop
Play
Record
Return To Zero
Go to End
Fast Forward