
Specifications


Connecting a Microphone
5
2
If your M-Audio interface has a Mic/Line
switch, press it to its out position.
3
If your microphone requires phantom power,
make sure the microphone is connected, then
press the Phantom Power switch on your M-Au-
dio interface. This switch sends 48V to
each
mic
input. The Phantom Power LED on your M-Au-
dio interface will light when phantom power is
being supplied.
4
If your M-Audio interface has a Signal Gain
control, carefully turn the control for the input
to the right to increase the input level of your
microphone signal.
To use a microphone that has a 1/4-inch
connector:
1
Plug the 1/4-inch connector from your micro-
phone into one of the Mic (or Mic/Inst) 1/4-
inch inputs on your M-Audio interface.
2
If your M-Audio interface has a Mic/Line se-
lector, press it to its out position.
3
If your M-Audio interface has a Signal Gain
control, carefully turn the control for the input
to the right to increase the input level of your
microphone signal.
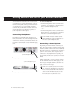
XLR connector plugged into Mic input on an Ozonic
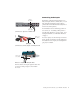
Mic/Line selector on the front of a FireWire 1814
Phantom Power switch on a FireWire 1814
Mic input
Mic/Line
selector
Phantom Power
switch
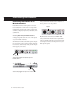
1/4-inch connector plugged into Mic/Inst input on a
FireWire 1814
Mic/Line selector on the front of a FireWire 1814
Signal Gain control on a FireWire 1814
Mic/Line
selector
Signal Gain Control