Radium Manual version: RAD-050503 User Guide Introduction . . . . . . . . . . . . . . . . . . . . . . . . . . . . . . . . . . . . . . . . . . . . .2 What’s in the Box . . . . . . . . . . . . . . . . . . . . . . . . . . . . . . . . . . . . . . . . .2 Radium Features . . . . . . . . . . . . . . . . . . . . . . . . . . . . . . . . . . . . . . . . . .2 Radium keyboard Overview . . . . . . . . . . . . . . . . . . . . . . . . . . . . . . . . .3 A Guide to Getting Started . . . . . . . . . . . . . . . . . . . . .
Introduction Congratulations on your purchase of the Radium, part of the USB Keystation series of MIDI controllers brought to you by M-Audio.You may use your Radium in conjunction with a USB equipped PC or Macintosh computer and appropriate music software to enter a full range of MIDI note and controller information. You will be able to discover the wonderful world of Computer Music with a set of complete musical instruments from your sound card, sound modules, or workstation.
Radium keyboard Overview The Radium is a fully functional MIDI controller. Its touch-sensitive keys can be set to play any octave or transposed pitch, while the Radium’s pitch wheel, mod wheel and data slider with the addition of sixteen programmable rotary knobs and sliders make it the most versatile MIDI controller of its class. Its compact size and powerful controller features make it the ultimate in portable keyboard controllers.
A Guide to Getting Started An outline of the steps needed to begin using your Radium on either a Mac or PC: 1. 2. 3. 4. Attach the Radium to your computer (see “Hardware Installation”). Install the Driver (see “Software Installation”). Hook your sound module to the Radium (see “Setting Up Your MIDI Studio”). Configure the Radium in your application software (see “Using the Radium in your Application Software”).
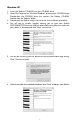
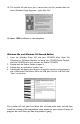
Windows XP 1. Insert the 'Radium' CD-ROM into your CD-ROM drive. 2. Open 'My Computer' or 'Windows Explorer' to locate your CD-ROM drive. Double-click the CD-ROM drive that contains the Radium CD-ROM. Double-click the 'Radium' folder. 3. Double-click the Radium driver icon to launch the installation procedure. 4. You will see an installer window advising you to have your Radium DISCONNECTED from the USB bus before continuing.After you verify that your device is disconnected, click 'Next' to continue. 5.
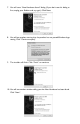
7. You will see a “New Hardware found” dialog. (If you don’t see this dialog at first, unplug your Radium and try again.) Click Next. 8. You will see another warning that the product has not passed Windows logo testing. Click "Continue anyway". 9. The installer will finish. Click “Finish” to continue. 10. You will see another window telling you that New Hardware has been found. Click “Next”.
11. Again, the computer reminds you that the product has not passed Windows Logo testing. Click "Continue anyway". 12. The driver has been installed. Windows XP Installation is now complete. Windows 2000 1. Service Pack 2 or higher is required for proper operation of the Radium driver. This service pack is available from Microsoft Downloads at www.microsoft.com/downloads. 2. Insert the M-Audio Driver CD into your CD-ROM drive. Open 'My Computer' or 'Windows Explorer' to locate your CD-ROM drive.
The installer will scan your hard drive (this can take some time) and will then install the necessary files and perform setup actions on your system.A series of progress bars will show you how the process is going. 6. At the next prompt, the installer will warn you that this product does not have a Windows Digital Signature. Click “Yes” to continue. 7. A dialog box will appear, stating that the installation has succeeded. Click “Finish” to complete the driver installation. 8.
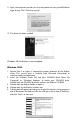
10. The installer will now warn you, a second time, that this product does not have a Windows Digital Signature - again, click “Yes”. Windows 2000 Installation is now complete. Windows Me and Windows 98 Second Edition 1. Insert the M-Audio Driver CD into your CD-ROM drive. Open 'My Computer' or 'Windows Explorer' to locate your CD-ROM drive. Doubleclick the CD-ROM drive that contains the Radium CD-ROM. 2. Double-click the Radium Folder to open it. 3. Double-click on the Radium Installer icon. 4.
5. A dialog box will appear, stating that the installation has succeeded. Click “Finish” to complete the driver installation. 6. Plug the Radium MIDI interface into your USB port. Be sure to either have the power supply connected and power switch set to 9V, or if not using power supply, be sure to set the power switch to USB Power. Upon doing so, the computer will find and install the necessary drivers. Windows Me or 98SE Installation is now complete.
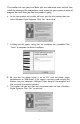
This release version of the Radium driver requires Macintosh operating system OS 9.2.2 or higher. Some updates are offered free to Apple owners. Please check the Apple website at http://www.info.apple.com for update information. OMS is a MIDI manager program developed by Opcode. We have included it on the CD disk for your convenience, and also offer it as a free download from our website’s MIDISPORT drivers page.
4. The “OMS Driver Search” box asks you to choose the port on which you’ve attached the Radium (either Modem or Printer). DO NOT choose a port (since we’re using USB), just click “Search.” OMS begins Searching. IMPORTANT: If the USB cable is not correctly hooked up to the Radium, or the Radium is not switched on, setup will fail. 5. After OMS successfully finds the driver,“OMS Driver Setup” the Radium will appear in a list as “KEYSTATION SERIES”. Click OK.
3. The MIDI Output of the Radium is connected to the MIDI In of a sound module. The audio output of the sound module can be plugged directly into a sound system, or into a mixer, which is then connected to a sound system. In the setup pictured below, the Radium is being used as a MIDI controller as well as a MIDI interface, inputting MIDI data to the computer and its application software, and outputting MIDI to a sound module from which sounds will be produced.
Using the Radium with Your Application Software Once the Radium driver has been installed, you will need to configure your MIDI application software to utilize the Radium. The manner in which this is done varies between applications, so we can just cover the basics here. Generally with both the Mac and PC, most MIDI applications have a MIDI port configuration or settings dialog box, sometimes called “MIDI Devices” or “MIDI Setup.
1. Power up the Radium using a 9VDC adapter. Set the power switch to the the 9vDC setting. 2. Make sure that the MIDI port “transmit” channel within you music application matches the MIDI “receive” channel of the other instrument. 3. Refer to the diagram in the section, “Setting Up Your MIDI Studio” for audio connections. Default Settings The Radium will select the following default parameter values when its power is first turned on.
Top Panel Features 1. Pitch Bend Wheel: The Pitch Bend wheel is used for raising or lowering the pitch of a voice during performance, starting from and always returning to a center “detent” point.The range of pitch values depends on the sound generator (sound card or module) being used. Please refer to the manuals of your devices for information on how to change the Pitch Bend range. To bend the pitch up, move the wheel away from you. To bend the pitch down, move the wheel towards you. 2.
5. Octave Up & Octave Down Buttons: These buttons allow you to set the octave orientation of the Radium’s keyboard. 6. Data Entry Slider: This slide controller allows you to adjust the value of parameters such as Volume,Velocity, Aftertouch, and virtually any assignable MIDI control parameter directly from your keyboard. Setting the data slider is covered in the next section. 7. MIDI/SELECT button: Use this button to select different MIDI commands using certain keys from your keyboard.
represents the controller’s function or the Controller #, the DATA ENTRY slider will immediately function to select the transmitted value of that specific controller when the slider is moved.This can be very useful for manipulating various functions during actual performance, mixing or recording, etc.. Assignable Sliders and Knobs The Radium keyboard comes with 9 banks of factory presets. These presets work well with a variety of MIDI devices.
2. Choose the number of the desired controller slider or knob, using the number key group (1 - 16), then press the Enter key.The display will show a “P” in anticipation of the “parameter” number. 3. Assign the desired MIDI controller parameter number, using the number key group (1-127), then press Enter. (See the chart displayed in “Appendix A” fo this manual for a list of controller numbers.) The display will show a “C” in anticipation of the MIDI “channel” number. 4.
Number Keys: The Radium allows you to use the numeric keys instead of the DATA ENTRY slider to specify the Control Change parameter data.This is done by pressing the MIDI/SELECT button, CC (No. or Data) key, required number key(s), and the Enter key.As an example, to assign a Control Change value of 7, and CC Data value of 123: 1. 2. 3. 4. 5. 6. 7. Press the MIDI/SELECT button. Press the CC No. key. Press the key labeled “7.” Press the Enter key, in order to specify the Control Change as 7.
Radium Prest Bank Descriptions: - Please note that verification of listed synthesizer* MIDI-controller information (against manufacturer’s published specifications) may be necessary, since some manufacturers vary from the MIDI Manufacturer’s Association standard referenced in this table. *All listed synthesizers and modules are trademarks of their respective owners, and are in no way associated or affiliated with M-Audio.
Rear Panel Features 1. Sustain Jack - This jack allows you to connect an optional footswitch to the keyboard. When the footswitch is depressed, notes played on the keyboard will continuously sound as long as the footswitch is held, while MIDI controller information is sent from the Radium. 2. MIDI “Keyboard” Out Jack - This standard MIDI jack is a direct MIDI out from the keyboard in “standalone” mode, and is used to send MIDI messages to another MIDI instrument (such as sound module). 3.
Technical Support & Contact Information For additional technical assistance, contact M-Audio Technical Support by telephone (626-445-8495, 9-5 PST M-F), by fax (626-445-7564) or by e-mail (techsupt@m-audio.com). If you have questions, comments or suggestions about this product, or any MAudio product, we invite you to contact us directly at: M-AUDIO U.S. M-AUDIO U.K. 45 E. Saint Joseph St. Arcadia, CA 91006-2861 U.S.A. Unit 5, Saracen Industrial Estate Mark Rd.
Radium Warranty Information M-Audio warrants that this product is free of defects in materials and workmanship under normal conditions for 90 days, so long as the product is: owned by the original purchaser; the original purchaser has proof of purchase from an authorized M-Audio dealer; and the purchaser has registered his/her ownership of the product by sending in the completed warranty card.
Specifications Tested to comply with FCC Standards For Home or Studio Use 25
Appendix A - MIDI Controller Information 26
Appendix B - Radium MIDI Implementations 27