
User's Guide

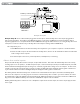


Table Of Contents
- ProKeys Sono 88 User Guide
- Table of Contents
- Introduction
- ProKeys Sono 88 Features
- What’s in the Box?
- Minimum Requirements
- Controls and Connectors
- Hardware Connections
- ProKeys Sono as a Standalone Instrument
- Basic ProKeys Sono Setup in Windows
- ProKeys Sono Setup in Mac OS X
- Using ProKeys Sono with a Computer
- ProKeys Sono Audio Setup and Controls
- The ProKeys Sono Audio Control Panel (Windows Only)
- Routing MIDI Data to and from your Computer
- Advanced ProKeys Sono Functions in Edit Mode
- MIDI Messages In-Depth
- Troubleshooting
- Appendices - Useful MIDI Data
- Technical Specifications
- Technical Info
- Warranty
- Contact

|
10
ProKeys Sono 88 User Guide
Example Operating Scenarios
The following diagrams illustrate two scenarios in which ProKeys Sono is connected to external hardware.
/UTPUT
2 ,<-ONO
!UX)NPUT
)NSTRUMENT -ICROPHONE 3USTAIN -)$)/UT
6$#
2 ,
0RO+EYS3ONOBACK
0OWERED
-ONITORS
#$0LAYER
#OMPUTER
'UITAR
-IC
53"
Example Setup #1
Example Setup #1 shows M-Audio ProKeys Sono with a microphone connected to the Microphone input, and an electric
guitar plugged into the Instrument input. A CD player is connected to the auxiliary inputs. The main outputs of ProKeys Sono are
connected to a monitoring system (powered speakers, in this case) while a computer powers the keyboard through the USB
connection. A sequencing application on the computer handles all incoming and outgoing audio and MIDI data. This is covered
in greater detail in the “Using ProKeys Sono with a Computer” section of this guide.