
Owner Manual

X3. SECTION 4 OF THE CONSUMER PRODUCT SAFETY COMMISSION’S
OUTDOOR HOME PLAYGROUND SAFETY HANDBOOK
X3.1 Select Protective Surfacing – One of the most important things you can do to reduce the likelihood
of serious head injuries is to install shock-absorbing protective surfacing under and around your play
equipment. The protective surfacing should be applied to a depth that is suitable for the equipment
height in accordance with ASTM Speci cation F 1292. There are di erent types of surfacing to choose from;
whichever product you select, follow these guidelines:
X3.1.1 Loose Fill Materials:
X3.1.1.1 Maintain a minimum depth of 9 inches of loose- ll materials such as wood mulch/ chips,
engineered wood ber (EWF), or shredded/ recycled rubber mulch for equipment up to 8 feet high; and 9
inches of sand or pea gravel for equipment up to 5 feet high. NOTE: An initial ll level of 12 inches will com-
press to about a 9-inch depth of surfacing over time. The surfacing will also compact, displace, and settle,
and should be periodically re lled to maintain at least a 9-inch depth.
X3.1.2 Use a minimum of 6 inches of protective surfacing for play equipment less than 4 feet in height. If
maintained properly, this should be adequate. (At depths less than 6 inches, the protective material is too
easily displaced or compacted.) NOTE: Do not install home playground equipment over concrete, asphalt,
or any other hard surface. A fall onto a hard surface can result in serious injury to the equipment user.
Grass and dirt are not considered protective surfacing because wear and environmental factors can reduce
their shock absorbing e ectiveness. Carpeting and thin mats are generally not adequate protective surfac-
ing. Ground level equipment such as a sandbox, activity wall, playhouse or other equipment that has no
elevated play surface does not need any protective surfacing.
X3.1.3 Use containment, such as digging out around the perimeter and/orv lining the perimeter with
landscape edging. Don’t forget to account for water drainage.
X3.1.3.1 Check and maintain the depth of the loose- ll surfacing material. To maintain the right amount
of loose- ll materials, mark the correct level on play equipment support posts. That way you can easily see
when to replenish and/or redistribute the surfacing.
X3.1.3.2 Do not install loose ll surfacing over hard surfaces such as concrete or asphalt.
X3.1.4 Poured-in-Place Surfaces or Pre-Manufactured Rubber Tiles You may be interested in using surfacing
other than loose ll materials like rubber tiles or poured-in-place surfaces.
X3.1.4.1 Installations of these surfaces generally require a professional and are not “do-it-yourself”
projects.
X3.1.4.2 Review surface speci cations before purchasing this type of surfacing. Ask the installer/
manufacturer for a report showing that the product has been tested to the following safety standard:
ASTM F1292 Standard Speci cation for Impact Attenuation of Surfacing Materials within the Use Zone of
Playground Equipment. This report should show the speci c height for which the surface is intended to
protect against serious head injury. This height should be equal to or greater than the fall height – the
vertical distance between a designated play surface (elevated surface for standing, sitting, or climbing) and
the protective surfacing below – of your play equipment.
X3.1.4.3 Check the protective surfacing frequently for wear.
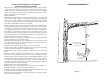
X3.1.5 Placement – Proper placement and maintenance of protective surfacing is essential. Be sure to:
X3.1.5.1 Extend surfacing at least 6 feet from the equipment in all directions.
X3.1.5.2 For to-fro swings, extend protective surfacing in front of and behind the swing to a distance equal
to twice the height of the top bar from which the swing is suspended.
X3.1.5.3 For tire swings, extend surfacing in a circle whose radius is equal to the height of the suspending
chain or rope, plus 6 feet in all directions.
6
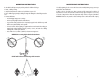
At least 6 feet from trunk
or 1½ times the length
of the swings rope
15 inch minimum
ground clearance
Rope
Double
knot
CLEARANCE REQUIREMENTS
Figure 3
3