Security Wi-Fi Camera Morvelli FHD22 User Manual
Website: Morvelli.com Support: support@morvelli.com Live Chat on Morvelli.
1. Contents……...................................................... 3 2. Warranty Service……………………………......... 4 3. FAQ/Troubleshooting……………….................... 5 4. Features and Device Overview……................... 9 4.1 Principles of Work......................................... 9 4.2 Camera Elements Description..................... 11 4.3 Camera Sounds Description......................... 12 5. Connection & Installation.................................... 13 5.1 Connection & Installation (iOS)...........
2. Warranty Service Thanks for your order and your trust. WiFi camera Morvelli FHD22 has a 12-month warranty. The warranty starts from the date of purchase of the camera. We will continue to improve quality of our product. If you have any problems in using our product, please contact us as soon as possible. We will give you the best possible solution within 24 hours, all your feedback, questions or concerns will help us improve our service and product quality. Product Service: support@morvelli.
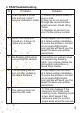
3. FAQ/Troubleshooting N Problem Solution 1 I can’t create a Smart 1) Check the SPAM folder in Life account (I don’t your e-mail receive verification code) 2) Sign up for an account through the recommended email services: Gmail, Bing, Yahoo 3) Register an account via your mobile phone number 2 When the camera is turned on, it does not make any sounds It may happen as the result of a failed update installation. To solve the problem, contact us via support@morvelli.
5 6 is plugged in, you need to reset (hold down the reset key on the back of the camera for 7-10 seconds) and try again 2) Make sure there are no stickers or dirt on the camera. 3) Make sure that the camera lens is directed exactly at the smartphone with the QR code, and not to the side. If necessary, correct the direction of the 6 Night backlight does not work Perhaps the camera is installed next to (or opposite) a mirror or light surface.
8 The camera will not connect to my Wi-Fi router 1) Perhaps you have a router (Wi-Fi network) that operates at 5GHz. Solution: Connect the camera via Ethernet cable or use WIFI extender (increases the range of the Wi-Fi signal and converts the frequency from 5Ghz to 2.4GHz) 2)If your router operates at two frequencies (5Ghz and 2.
12 The camera moves on Motion Track function is enabled (can be disabled in camera settings) 13 Video archive not 1) Wi-Fi signal is weak 2) Low internet speed (in your router or smartphone) 14 There is an We use a special file encrypted to prevent unauthorized access to your video archive. To play videos on your PC, contact our technical support.
4. Features and Device Overview 4.1. Principles of Work The Morvelli FHD22 Wi-Fi camera is designed for remote online monitoring indoors. The device records movements in the frame and continuous video on an external microSD-card, also it can safe “alarm” videos in the “cloud” archive. The Morvelli FHD22 camera has very high level of information protection against unauthorized access (AES encryption type - 128). You can be sure that your personal information is protected and confidential.
Viewing video from the camera is possible anywhere in the world. Connecting to the camera is possible from any mobile device (smartphone, tablet) using application “Smart Life”. The camera must be connected to the Internet via a Wi-Fi network (2.4 GHz router) or via an Ethernet cable, and the smartphone must have Internet access. The Smart Life app is free for both owners of Android and iOS devices.
4.2. Camera Elements Description 1. Image Sensor 2. Infrared LEDs 3. Lens 4. Speaker 5. Microphone 6. Ethernet Port 7. MicroSD Port 8. Reset Button 9.
4.3 Camera Sounds Description There are 5 sounds for the camera: 1. Short welcome melody * - the sound of turn on the camera. 2. Two short sounds “Beep Beep” – standby mode for connecting the camera to a mobile device via the «Smart Life» application 3. Long single sound - Reading a QR code from your mobile device. 4. Short melody * - loss of Wi-Fi signal or lack of Internet. 5.
5. Connection & Installation 5.1.Connection & Installation (iOS) For a successful connection you need: 1. iPhone or iPad 2. Wi-Fi Camera Morvelli FHD22 3. Wi-Fi router with the internet that works at 2.4 GHz Recommendations before installation. Before connecting, please make sure of the following: 1. Your router operates at a frequency of 2.4 GHz (routers operating at a frequency of 5 GHz are not supported). You can check this information with the manufacturer of the router. Note.
Step 1: Smart Life Application & Account Registration 1. Connect iPhone to your Wi-Fi network (with the Internet). 2. Download and install the Smart Life app in the App Store.
3. Go to the Smart Life app and register a new account. 4. A verification code will be sent to your e-mail (which you indicated in the previous step). To confirm the registration, enter the code in the registration field.
5. Finish registering. Enter the account name, number of rooms and other information as desired. Step 2: Turning on and preparing the camera 1. Connect power to the camera. Wait for the camera to load (approximately 1 minute). 2. There is a «Reset» button at the back of the camera. Hold this button for about 5-10 seconds. You will hear a characteristic sound. Reset After a successful reset, you will hear a distinctive sound.
Step 3: Connecting the camera to your Smart Life account. 1.Go to the Smart Life app. Click «Add Device». 2. First select the «Video Surveillance» category. Then select «Smart Camera» from the list. 3. A page with resetting the camera will open. We have completed this point in the previous step. Click «next step».
4. In this step, your Wi-Fi network to which we connected earlier will be displayed. Enter the password for this network and click «Confirm». 5. The full screen of your iPhone will display a QR code. You need to scan this QR code with the Morvelli FHD22 camera. Place your iPhone opposite the camera lens at a distance of 3-7 inches. 3-7 in 6. After successfully scanning the QR code, the camera will emit a distinctive sound.
7. Click «I heard a Prompt». The camera will start to connect, and when the process reaches 100%, the connected camera will be displayed on the screen.
5.2.Connection & Installation (Android) For a successful connection you need: 1. Android devices (smartphones, tablets) 2. Wi-Fi Camera Morvelli FHD22 3. Wi-Fi router with the internet that works at 2.4 GHz Recommendations before installation. Before connecting, please make sure of the following: 1. Your router operates at a frequency of 2.4 GHz (routers operating at a frequency of 5 GHz are not supported). You can check this information with the manufacturer of the router. Note.
Step 1: Smart Life Application & Account Registration 1. Connect Smartphone to your Wi-Fi network** (with the Internet connection). *-On Android smartphones in the list of available Wi-Fi networks, you can see at what frequency your router works. Routers with 5 GHz are displayed additionally (an example is shown in the screenshot) The Morvelli FHD22 camera does not support networks with a frequency of 5 GHz.
**-In the Network detail, you can view the security type of your Wi-Fi network. These may be such options: A) No security (not supported by camera) B) WEP (not supported by camera) C) WPA / WPA2 (recommended) 2. Download and install the Smart Life app in the Play Store.
3. Go to the Smart Life app and register a new account. 4. A verification code will be sent to your e-mail (which you indicated in the previous step). To confirm the registration, enter the code in the registration field.
5. Finish registering. Enter the account name, number of rooms and other information as desired. Step 2: Turning on and preparing the camera 1. Connect power to the camera. Wait for the camera to load (approximately 1 minute). 2. There is a «Reset» button at the back of the camera. Hold this button for about 5-10 seconds. You will hear a characteristic sound. Reset After a successful reset, you will hear a distinctive sound.
Step 3: Connecting the camera to your Smart Life account. 1.Go to the Smart Life app. Click «Add Device». 2. First select the «Video Surveillance» category. Then select «Smart Camera» from the list. 3. A page with resetting the camera will open. We have completed this point in the previous step. Click «next step».
4. In this step, your Wi-Fi network to which we connected earlier will be displayed. Enter the password for this network and click «Confirm». 5. The full screen of your iPhone will display a QR code. You need to scan this QR code with the Morvelli FHD22 camera. Place your iPhone opposite the camera lens at a distance of 3-7 inches. 3-7 in 6. After successfully scanning the QR code, the camera will emit a distinctive sound.
7. Click «I heard a Prompt». The camera will start to connect, and when the process reaches 100%, the connected camera will be displayed on the screen.
6. Settings and Control Device 6.1.
N Name Description 1 Name of your house In this menu, you can customize your home: name, and number of rooms, add new users to your home, set up geolocation to display temperature and other weather parameters. 2 Multiview This menu will appear as soon as you add two or more cameras. In this menu, you can view video from several cameras at once. 3 Voice assistant You can perform some actions with the camera using voice commands.
8 Smart scripts Here you can set up and sync with Siri smart scripts, for example, via Siri, enable or disable the camera motion sensor via voice commands. 9 Profile Settings Menu for managing your Smart Life account (managing app notifications, changing password, setting a digital key to access the camera, deleting an account, and more).
6.2.
N 32 Name Description 1 Date and time Displaying the current date and time. 2 Camera settings Camera settings (enable / disable motion sensor, tracking sensor, timers settings, flipping the screen, sound mode settings, video storage settings and much more). 3 Signal strength The signal strength between the camera and Wi-Fi network (router) is recommended to be at least 50%. 4 Turn on / off the sound on the camera Enabling or disabling audio playback from the camera.
11 Cloud Storage Setting up and watching videos from cloud storage (subscription required). 12 Direction Rotation and tilt the camera. 13 Alarm On / Off motion sensor and tracking sensor, timers settings.
6.3 Camera Settings 6 1 7 2 8 3 9 10 4 11 12 5 13 N 34 Name Description 1 Device Information Information about camera (Owner, IP Address, Time Zone, Signal Strength). 2 Tap-to-Run Automation Here you can set up and sync with Siri smart scripts, for example, via Siri, enable or disable the camera motion sensor using voice commands. 3 Voice assistants Connecting of Amazon Echo Voice Assistant.
4 Basic Function Settings Flip of the screen (if your camera is set upside down) and adjusting the talk mode (one-way or two-way audio). 5 Detection Alarm Settings On / Off motion and tracking sensors, timers settings. 6 Storage Settings Information about the memory card, on / off video recording to the memory card, recording mode (continuous or by motion sensor), setting the video recording schedule, formatting the memory card. 7 Purchase VAS Cloud storage, subscription.
7. Storage Options 7.1. Storage Options for Records There are 3 main options for recording and keeping video from the camera 1. On a memory card (16-128GB) The video is recorded to the memory card in an encrypted AWS format. It will protect your personal videos if camera or memory card would be stolen. You can always view your video archive from the mobile device to which the camera is attached. For playing these videos on your PC, please contact our technical support support@morvelli.
3. Recording video to the memory of your mobile device or PC. You can directly record video to the memory of your mobile device or PC in online mode or when you are watching a video archive. Y����������������������� website Morvelli.
7.2. Maintained Memory Cards (microSD, TF card) 1. Memory card format There are 3 types of memory cards: mini SD cards, SD cards, and micro SD cards. 1. mini SD 2. SD 3. micro SD 2. Memory card сapacity The camera supports memory card capacity from 16GB to 128GB The Morvelli FHD 22 camera supports micro SD cards.
0.6 0.
7.3. microSD slot The memory card slot is located at the back of the camera. Memory card slot 40 1 Before inserting or removing a memory card, turn off the camera. 2 Before using a memory card, it is advisable to format it on a PC in a FAT. FAT32 or exFAT system. 3 The memory card settings menu will not be visible in the application until you insert a memory card. 4 The camera will not format the memory card if it is empty (if there are no video recordings on it).
8. Access to the Camera for other users How to add another user to access the camera: 1. Register a second Smart Life account 2. In the first account (to which the camera is attached) go to your home profile settings and add a new user: Main menu -> Me-> Home Management-> Tap on your Family name -> Add member-> Enter the name and e-mail of the second account.
2 4 42 3 5
3.In the first account (to which the camera is attached) go to your camera settings and add a new user: Main Menu -> Tap on your camera name -> Settings-> Share Device-> Add Sharing->Enter the name and e-mail of the second account.
9. Application for Windows and Mac After the camera is connected to your Smart Life account, you can manage and view information from the camera on your PC (Windows or Mac) To do this, follow 4 easy steps: 1 Download the Android emulator for Windows or Mac For example, we use Bluestacks program. Go to bluestacks.
You can find more detailed Blue stacks setup instructions on our website Morvelli.
10. Accessing the camera using an Internet Browser If you want to access the camera from any Internet browser (Chrome, Safari, Mozzila, Internet Explorer, Opera etc) you need to follow 3 simple steps STEP 1 Enter the link to the site in the address bar of your browser: https://ipc-eu.ismartlife.me STEP 2 Go to the Smart Life App on your device and click in the upper corner plus (add a new device) STEP 3 Click on the icon and scan the QR code with your phone on your computer screen.
11.
Website: Morvelli.com Support: support@morvelli.com Live Chat on Morvelli.