8-Ohm Ceiling Speakers For Music and Home Theater Owners Manual
INTRODUCTION M&S ceiling speakers are designed to provide clear, sharply-focused audio reproduction while remaining unobtrusively in the background. You’ll find a variety of power ratings and designs in flush-mount or recessed versions. M&S Systems has a full range of ceiling speakers that will bring out the best in any home-theater or whole-house stereo music system.
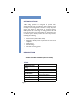
Page 2 S50C Frequency Response Maximum Power Rating Impedance Overall Dimensions Specifications 50 Hz to 20 kHz 50 Watts 8 Ohms 9” Diameter x 3 3/8” Depth Two way; 6½” woofer, 1” soft dome swivel tweeter Mounting Dimensions 7 ¾” Diameter x 3” Depth Grille Metal Color White S40C Frequency Response Maximum Power Rating Impedance Overall Dimensions 60 Hz to 20 kHz 40 Watts 8 Ohms 9” Diameter x 3 3/8” Depth Two way; 6½” woofer, 1” mylar Specifications swivel tweeter Mounting Dimensions 7 ¾” Diameter x 3”
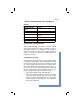
S30C3 Frequency Response Maximum Power Rating Impedance Overall Dimensions Specifications 70 Hz to 16 kHz 30 Watts 8 Ohms 10 ¾” Diameter x 4” Depth Dual cone 8”, wide range response Mounting Dimensions 9 1/2” Diameter x 3 3/4” Depth Grille Metal Color White S30C2 Frequency Response Maximum Power Rating Impedance Overall Dimensions Specifications 100 Hz to 15 kHz 30 Watts 8 Ohms 7 ¾” Diameter X 3 3/8” Depth Dual cone 5 ¼”, wide range response Mounting Dimensions 6 ½” Diameter X 3 1/8” Depth Grille Metal
Page 4 MONO CEILING SPEAKERS (SOLD SEPARATELY) S40C2 Frequency Response Maximum Power Rating Impedance Overall Dimensions Specifications 45 Hz to 15 kHz 40 Watts 8 Ohms / 8 Ohms 9” Diameter x 3 ½” Depth Dual Voice coil; Dual cone 6 ½” speaker Mounting Dimensions 7 ¾” Diameter x 3” Depth Grille Metal Color White UNPACKING YOUR SPEAKERS After carefully unpacking your speakers, the carton and the packing material should be saved for possible use later.
• Use a piece of bat insulation at least 3” thick over the back of the speaker. This insulation should not have a backing or if it does, the backing must be installed facing away from the speaker. • Use a fine mesh to cover the back of the speaker to protect against bulk type insulation materials. This will not work with insulation containing fine powders.
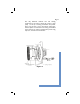
Page 6 Step 2. To begin installation of the speakers, first locate the area where the wires are installed. At each location, cut a hole to the dimensions shown for the model being installed (Mounting Dimensions) in the tables found on pages 1-3. The cutout should be centered in the stud space opening.
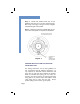
Step 5. Divide each adhesive bead strip in half. (Adhesive bead strips are in the clear self-closing bag). Place strips on the edge of the grill as shown in Figure 2. Reinstall the grill on the speaker. Step 6. Follow the instructions included with the volume control and amplifier to complete the installation.
Page 8 The only difference between new and existing construction is the order in which the process is done (steps 1, 2 and 3). In existing construction the speaker hole is cut, the wire is run to the volume control box, and the speaker is connected to the wiring and installed in the wall. You are ready to complete the process using steps 4, 5, and 6 for new construction.
SERVICE & TROUBLESHOOTING M&S Systems is committed to producing high quality products for the home. If you have any questions or problems with the speaker systems or the system is not operating properly, contact your M&S installer or call M&S Systems at (800) 366-9422.
M&S SYSTEMS Limited 2-Year No-Fault Product Warranty M&S SYSTEMS warrants for 2 years all products to be free of defects (M&S SYSTEMS honors the 10-Year No-Fault warranty for AirVac Gold power units). The warranty period begins from either (1) the date of “first user” purchase of this product or (2) the first close of escrow date on a residence in which this new product was originally installed.
2861 Congressman Lane Dallas, TX 75220 Phone: 800-877-6631 www.mssystems.