dmc1/dmc1CD Owner’s Manual
dmc1 Safety First READ ALL INSTRUCTIONS CAREFULLY BEFORE INSTALLING OR USING THE dmc1 SYSTEM THE dmc1 MUST BE INSTALLED BY M&S SYSTEMS DEALERS OR INSTALLERS, AND MUST CONFORM TO ALL LOCAL BUILDING AND ELECTRICAL CODES. Warning: Always follow these safety instructions. Retain these instructions for future system reference. DO NOT expose the dmc1 to moisture. Doing so can create fire or shock hazards and impair the warranty.
dmc1 The exclamation point within an equilateral triangle is intended to alert the user to the presence of important operating and maintenance (servicing) instructions in the literature accompanying the product. USE ONLY M&S Systems replacement parts and have them installed by an M&S Systems dealer or installer. Unauthorized substitutions can result in fire, electric shock, or other hazards.
dmc1 Table of Contents Safety First ................................................................................................................i Table of Contents...................................................................................................iii Table of Figures......................................................................................................iv Introduction ...........................................................................................................
dmc1 Table of Figures Figure 1—System Settings.................................................................................................................2 Figure 2—Clock Settings: Set Time................................................................................................3 Figure 3—Preset radio Stations.......................................................................................................5 Figure 4—Scan Progressions..........................................................
dmc1 Introduction The dmc1 is an intercom and sound system designed for today’s home. Its compact size and modern, elegant look complement any décor. But it offers more than just sensible good looks. It gives you peace of mind as it allows you to communicate with family members and monitor specified rooms. And you can listen to music from radio, CDs, or other sources throughout your home with high-quality sound. Please read all of the safety instructions before changing any settings on your dmc1.
dmc1 Door Station The Door Station is an exterior intercom speaker and doorbell installed at home entrances. The dmc1 system supports up to 3 door stations. The door station allows for communications from within the house to visitors. Any station with its Intercom Selector Switches set to Intercom or Radio/INT can communicate with the Door Station.
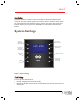
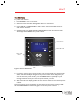
dmc1 AUTO AUTO Set normal time and music Auto On/Off times TIME TIME l2:20 :20P PRESET PRESET POWER POWER SET TIME TONE TONE SOURCE SOURCE ∧ ∧∧ TUNE TUNE ∨ LISTEN LISTEN TALK TALK DOOR DOORTALK TALK ∧ VOLUME VOLUME Change hours and minutes ∨ Figure 2—Clock Settings: Set Time To change clock settings: 1. Press TIME. The hour field for Normal Time blinks, and SET TIME appears on the display. 2. Press VOLUME UP or VOLUME DOWN to change the hour. An A or P indicates AM or PM, respectively. 3.
dmc1 Music Settings Music Source You can select from four music sources: • • • • AUX—Any source you connect, such as an external CD player or a stereo system AM radio band FM radio band CD player (dmc1 System CD player). This source can also be used to hook up an external audio device if the system does not include a dmc1CD player. For CD functionality, see Master Station Operation/CD Player Operation. To select a music source: 1. Press POWER to turn on music. 2.
dmc1 Preset Radio Stations To preset radio stations: 1. Press POWER to turn on the music. 2. Select FM or AM. See Music Settings/Music Source for instructions. 3. Use TUNE UP or TUNE DOWN to find a station. See Tune the Radio above for seek and scan functions. 4. Simultaneously press TUNE UP and TUNE DOWN to enter Store Preset mode. The display shows PRESET and a preset number. 1. Turn music on FM AUTO |0|.| TIME POWER TONE 2. Select AM or FM PRESET 03 PRESET 3.
dmc1 Scan Mode Two scan modes are available: • • Scan 1—Allows the Room/Patio stations to scan through the four music sources (AUX, AM, FM, CD). On radio bands AM and FM, Scan 1 scans through the preset radio stations: AM 1-8 and FM 1-8. See Music Settings/Radio Settings for information on how to preset radio stations. Scan 2—Allows Room/Patio stations to scan through the four music sources (AUX, AM, FM, CD.) On radio bands AM and FM, Scan 2 scans all strong stations before moving on to the next source.
dmc1 AUTO SCAn1 TIME PRESET POWER TONE SOURCE ∧∧ TUNE TUNE ∨ PRESET + SOURCE Change Scan mode. ∧ LISTEN TALK VOLUME DOOR TALK ∨ Figure 5—Scan Mode Audio Settings Volume • • • Music—Adjusts the volume for system music Master Station—Adjusts the volume for the speaker on the Master Station only Intercom—Adjusts the volume for the system intercom Tone • • • • Loudness Treble Bass Balance (if you have the optional stereo power amplifier) To change volume and tone settings: 1.
dmc1 Note: When music is off, use VOLUME UP and VOLUME DOWN to adjust Master Volume. 3. Press TONE. The Loudness function appears. Press VOLUME UP to turn Loudness on. Press VOLUME DOWN to turn Loudness off. 4. Press TONE. The Treble function appears. Use VOLUME UP and VOLUME DOWN to adjust the treble from 0-14. 5. Press TONE. The Bass function appears. Use VOLUME UP and VOLUME DOWN to adjust the bass from 0-14. 6. Press TONE. If you have the optional stereo power amplifier, the Balance function appears.
dmc1 Turn music on AUTO POWER 12:20P TONE TIME Select setting to change ON LOUDNESS PRESET SOURCE ∧∧ TUNE TUNE ∨ ∧ LISTEN TALK DOOR TALK Change setting VOLUME ∨ Figure 7—Tone Settings: Loudness Display Brightness DOOR DOORTALK TALK 1. Simultaneously press TUNE UP and POWER. The display cycles through brightness levels: low, medium, and high, then repeats the cycle. 2. Press the buttons repeatedly until you reach the brightness you prefer.
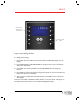
dmc1 Selector switch for Master Station M 1 INTERCOM 2 3 Selector switches for Room Stations Key to Intercom selector switch settings OFF RADIO/INT MONITOR 4 5 6 7 m&s 8 Selector switch for Patio Station 9 Privacy button P PRIVACY Figure 8—Intercom Settings Intercom When a station is set to Intercom (Intercom only): • • • • • You can talk and listen from this station. The room does not receive music. The room cannot be monitored. The room cannot hear other rooms that are set to Monitor.
dmc1 Note: When a station is set to Radio/INT, the sound and activity in that room can be heard by another room station by pressing the LISTEN button. • The station hears the door chime and communicate with and listen to a door Station. Off When a station is set to OFF: • • • • • You can communicate from a Room Station but you cannot communicate from a Patio Station. Other Room Stations cannot listen to the room. The room cannot receive music or intercom-related audio. The room cannot be monitored.
dmc1 Door Talk/Listen • • • Press TALK and LISTEN simultaneously to enter Door Talk mode. This allows you to talk to the Door Stations. All other stations set to Intercom or Radio/INT can hear the conversation, unless they have the PRIVACY button activated. Release the TALK and LISTEN buttons to listen to the Door Station. The Listen mode is active for a total of 25 seconds after you release the TALK and LISTEN buttons. You may talk again at any time by pressing TALK and LISTEN.
dmc1 AUTO 12:20P POWER OFF TIME PRESET SOURCE ∧∧ TUNE TUNE ∨ TONE ∧ LISTEN TALK DOOR TALK VOLUME ∨ AUTO + POWER Turn Monitor Override on and off Figure 9—Monitor Override Privacy When the PRIVACY button is activated at a station, the station cannot be listened to or monitored. • • • The room can still communicate using the Talk feature. The room still receives music. The room will still hear the door chime.
dmc1 Master Station Operation Radio Operation 1. Press POWER to turn on music. 2. Select either FM or AM as the music source. See Master Station Settings/Music Settings/Music Source for instructions. 3. Use TUNE UP or TUNE DOWN to select a station, or press PRESET to select a preset station. Room/Patio Station Operation VOLUME UP + VOLUME DOWN Scan music sources. Hold for 4+ seconds to activate Security/Home Automation function. (Not available on Patio Station.
dmc1 Turn Music Source On and Off You can turn the Music Source on and off from any Room/Patio Station. • • To turn the Music Source on, press the MUSIC VOLUME UP button. To turn the Music Source off, press the MUSIC VOLUME DOWN button until the volume level goes to zero. Adjust System Music Volume Adjust the system music volume from any Room/Patio Station by pressing VOLUME UP or VOLUME DOWN. Select Music Source The system music source can be selected from any Room/Patio Station.
dmc1 When the button on the Door Station is pressed, the chime is heard on all stations set to Intercom or Radio/INT, even if the PRIVACY button is activated. • • All system audio (music and intercom) is muted when the chime rings. If the Door Station is engaged in a talk or listen session, the chime is not heard. CD Player Operation (Optional) 1. Load up to 6 CDs in the CD changer. 2. Press POWER to turn on music. 3. Select CD as the music source.
dmc1 RF Remote Control (Optional) Up to 4 different remotes can be programmed to control the Master Station. The system obtains a unique code from the remote, virtually insuring that no one else can interfere with your system and you will not interfere with anyone else. To program the RF remote: 1. Simultaneously press and release AUTO and SOURCE. RF and SET appear on the display. 2. Press and hold any button on the remote until the RF and SET disappear from the display. The remote is now ready to use.
dmc1 Notes www.mssystems.com | 800.421.
dmc1 M&S Systems 2-Year Warranty M&S Systems warrants its products to be free of defects for 2 years. Except for the AirVac Gold power units. The warranty period begins on either (a) the date of purchase or installation date of this product or (b) the date of closing on a new residence in which this product was originally installed. The warranty extends to the original user of the product and to each subsequent owner of the product during the term of the warranty.