
Operating instructions


6
REPLACING PATIO STATIONS
Do not remove the existing patio station rough-in. The
DMC3-4 retrofi t system is designed to fi t into the existing
enclosure. It is important to note that M&S patio stations are
weather resistant not water proof. M&S patio stations should
not be located in an area that is in direct line of water from
sprinklers, rain or other devices such as power washers.
Please use the DMCFRW fi nish-out frame in outdoor
and high sun areas. The DMCFRW plastic is designed to
withstand sun and resist fading.
If a patio requires a surface mount application use the
DMC1HRWS. This is a surface mount box and cover that
will support DMC3RW, or DMC4RW patio stations.
To install a patio station follow the “Replacing Room Stations”
instructions detailed in the previous section.
REPLACING DOOR STATIONS
Remove the old door station but do not remove the rough-in
box or surface mount box.
When replacing a NuTone door speaker you must use the
DMCFD fi nish-out frame. The M&S door station sets in the
DMCFD and the screws attach to the existing rough-in.
Connect the door station with the corresponding color wires.
Screw the door station or door station with DMCFD frame
into the rough-in box as shown in Figure 10.
EXTERNAL MUSIC SOURCE
The DMC3-4 retrofi t system supports the use of external
music sources. A commonly available audio input wall plate
can be used. You can use an existing connection or run a
new coax cable pair to support local source connection (see
Figure 11).
To install a new local source follow these steps:
1. Choose a location for the audio input wall plate that will be easily
accessible to the sources that are to be connected to the system
(close to the receiver, TV or DVD player for example).
✔ NOTE: The external source wire run to the DMC3-4 must not exceed
50 feet.
2. At this location, attach a single gang box to a wall stud at a center
height of normal wall outlets. Use a low voltage plaster ring in existing
construction installations. Make sure the single gang box extends past
the wall stud and into the room so it will be fl ush with the sheetrock.
3. Run shielded audio cables from the DMC3-4 Master Station location
to the audio input location. Connect the cables to the wall plate.
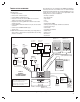
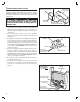
DOOR STATION
WITH BUTTON
RED & BLACK
SPEAKER
WIRES
DMCFD
FINISH-OUT
FRAME
ORANGE & YELLOW
DOOR BUTTON / CHIME
WIRES
DOOR CHIME
BUTTON
Figure 10. DMCFD Door Station Installation
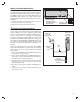
Figure 11. External Audio Input
AUDIO INPUT
WALL PLATE
JUNCTION
BOX
ATTACH PLATE
WITH TWO SCREWS
CONNECT AUDIO
INPUT CABLES TO
BACK OF INPUT PLATE