LIGHTCOMMANDER II 24/6 LIGHTCOMMANDER II 48/6 User´s Manual Version 2.
Lightcommander II User´s Manual Table of Contents 0. Introduction ................................................................................... 4 0.1 How to use your Operator´s Manual .......................................................... 4 0.2 Specifications and Installation ................................................................... 5 0.3 Display and Top Menu .............................................................................. 5 1. Single Channels ............................
Lightcommander II User´s Manual 6. Preview and Modifying ................................................................ 25 6.1 BLIND Function ....................................................................................... 25 6.2 PREVIEW - Output Listing ...................................................................... 25 6.3 Output Limit ............................................................................................ 26 6.4 Previewing and Modification of Memories ................
Lightcommander II User´s Manual 0. Introduction The MA Lightcommander II has been recognized for years as one of the best and most reliable boards for medium size show and high quality productions. With our new software 2.X, which is available since January 1994 and can also be installed in all older boards, we enable the Lightcommander II to perform numerous new functions. One of them, the WideMode, doubles the number of usable channels, other functions will make the board even more user friendly. 0.
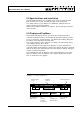
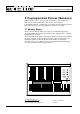
Lightcommander II User´s Manual 0.2 Specifications and Installation The MA Lightcommander II is available in two versions: 24/6 and 48/6. Both versions have a 100 - 240 Volt AC input on the back panel. The signal outputs to your dimmers are: DMX 512 (1990) and 30 / 54 channel analog via Socapex EF337. Apart from the different numbers of channels, the two boards perform the same functions. 0.
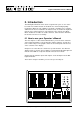
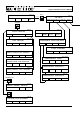
Lightcommander II User´s Manual QUIT Page 39 HOLD Page 5 > 1sec HOLD TOP MENU HOLD OFF PROGRAM PRG CHASE CHASE TO MEMORY SEQUENCE MEMORY UTILITY SETUP PREVIEW Page 25 OUTPUT MONITOR LIMIT SELECT MEMORY X-FADE Page 11 PROGRAMMING MEMORY QUIT DISPLAY MEMORY SAVE OUTPUT SAVE PRESET 2 Page 26 LIMIT MONITOR 100 % 0 % OFF Page 14/23 PROGRAMMING CHASE-SEQUENCE ALL 100 % EDIT DELETE CHASE SEQUENCE Page 18 CHASE TO MEMORY Page 31 LEARN SPEED DELETE SOUND MODIFY ON/OFF STEP GRAPHI
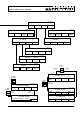
Lightcommander II User´s Manual Page 33-40 UTILITIES SETUP WIDE SWITCH MEMORY PATCH BACKUP Page 38 BACKUP SAVE LOAD FROM CARD TO CARD THEATRE SEQUENCE EXCHANGE MEMORY Page 39-40 Page 3435 OUTPUT CURVE EXTERN Page 33,36,38 SETUP CLOCK OUTPUT EXTERN SWOP DISABLE MIDI IN MIDI OUT ALT:CTRL.
Lightcommander II User´s Manual 1. Single Channels 1.1 Presets and Masters There are two sets of faders (Preset 1 and 2) and one set of flash buttons to control the single channels. The Main Master controls the output and should be at 100% during standard operations. Adjustments on the Presets can be faded in and out independently using the two Preset Master faders.
Lightcommander II User´s Manual 1.3 Extra Channels (AUX 1-6) Beside the 24 rsp. 48 channels of the presets the Lightcommander II offers six additional channels via the potentiometers AUX 1 to AUX 6. Adjustments on this pots are independent from the Main Master, Blackout button or Preset Masters and are specially designed for the control of colour changers or other stage effects.
Lightcommander II User´s Manual 2. Preprogrammed Pictures (Memories) Adjusted stage scenes can be stored as Memories. Sixteen Memory Master faders with flash buttons offer control of this pictures. If the SWOP function is switched on, pressing a memory button will recall this picture and erase all other channels or memories on stage. 2.1 Memory Pages Each of the 16 Memory faders can carry up to eight different pictures.
Lightcommander II User´s Manual 2.2 Programming Memories Programming Memories is guided by menus of the build-in LCD display. Operation mode: 1. Adjust stage scene via Preset faders or by recalling preprogrammed memories. 2. PROGRAM MEMORY 3. Selection of one of the Memory buttons. 4. SAVE OUTPUT 5. The QUIT button switches back to the TOP MENU. 1-5 The first red button underneath the display switches the menu to "PROGRAMMING - MEMORY". The 3.
Lightcommander II User´s Manual 2.3 Switch Memories Additional 64 pictures can be stored onto the 8 Switch Memory buttons. Via the page selection it is possible to store and recall 8 pictures per button. Programming switch Memories works the same way as programming standard memories. FLASH Mode: Like the Flash buttons of the 16 standard memories, the Switch Memory buttons will recall the memory as long as the button is held down.
Lightcommander II User´s Manual 3. Chaser Programs Beside the static memories it is possible to store up to 50 chaser effects with up to 99 steps each. There are three different kind of chase programs regarding the way of setting the steps: ON-OFF Chase: on each step a selection of channels is switched on to 100%. REAL-LEVEL Chase: the brightness of the single channels can be freely adjusted per step. MEMORY Chase: each step recalls one of the stored memories.
Lightcommander II User´s Manual 3.1 Programming ON-OFF Chases All chaser programs have to be stored step by step. 1. 2. PRG CHASE/ SEQUENCE Selecting a program number via the Encoder wheel. The second display button on Top Menu switches to "PROGRAMMING CHASE-SEQUENCE" 3. CHASE button. Selecting the chase mode. The box in front of ON/OFF has to be marked. PROGRAMMING - CHASE-SEQUENCE 01 MEMORY ON/OFF LEVEL STEPS: 01 FREE: 95.72 % EDIT 4.
Lightcommander II User´s Manual 3.2 Programming Real-Level Chases On Real-Level Chases the single channels can have freely adjusted values for each step. Programming works like with the ON-OFF chases but LEVEL has to be selected via the CHASE button. If the selected program number was already used by any other chase, changing the chase mode to LEVEL will clear the old program. If the mode was changed accidentally, selecting the "NO" button will cancel the operation and keep the old program. 1. 2. 3. 4. .
Lightcommander II User´s Manual 3.4 Recalling a Chase Chases can be controlled via the special chaser section right hand of the main master fader. "Number"-button The upper section of the display shows program number and step of the actually running chaser program. Via the Encoder a new program number can be preselected as NEXT :.... "ON"-button starts the "NEXT" chaser program. "OFF"-button stops the actual chase. The brightness of this chaser effect can be mastered by the chaser master fader. 3.
Lightcommander II User´s Manual 3.6 Controlling the Fade between Chase Steps The change between steps of a chase can be preformed as switching to the new values or as a slow fade. The fade functions gets activated by the FADE button in the chaser section. On the Lightcommander II any fade will work as a dipless crossfade. A single channel i.e., which is at 100% in the first and at 80% in the second step, will not fade down and come up again, but will fade linearly from 100 to 80%.
Lightcommander II User´s Manual 3.7 Chases on Memory Faders The four memory faders 13-16 can be used to recall chases. One single program may even be recalled several times with different speed. The actual chaser speed is indicated by the LED in the memory button. 1. CHASE TO MEMORY 2. Selection of one of the Memories 13-16 by its Flash button. The display shows, whether there is already a chase linked to this memory. The 3.Display button at the Top Menu switches to "CHASE TO MEMORY".
Lightcommander II User´s Manual 4. Dipless Crossfade (X-Fade) Right hand of the memory master faders the Lightcommander offers a special X-Fade section for dipless crossfades between stage scenes. Unlike the effect of changing from one memory to another by moving up or down the faders, on dipless X-fades any channel changes linearly to its new value.
Lightcommander II User´s Manual 4.1 Automatic Crossfade between Memories 1. 2 x "X-Fade Menu" button switches to the Setup. X - FADE SETUP DIRECT MEMORY PREPARE MEMORY SELECT SELECT REC.FADE 2. Select "DIRECT MEMORY" and "MEMORY" via the first two display buttons 3. "X-Fade On/Off" button starts the X-fade mode X - FADE -- A 2.25 2.25 Outfade time of the actual stage scene 4. 5. 6.
Lightcommander II User´s Manual 4.2 Manual Crossfades between Memories Instead of fading automatically with adjusted times it is possible to fade manually by moving the X-fader 1. 2. 3. 3a. ... ... like on automatic mode ... Selecting MANUAL (4th display button) X - FADE MEMORY 04 A 09 A NEXT: 2.25 2.25 * MOVE FADER * OUTFADE INFADE Without any function Without any function on manual mode on manual mode 06 A MANUAL Selected for manual X-fades 4.
Lightcommander II User´s Manual 4.3 X-Fading a Chaser Program The steps of any chase can be recalled on the sequence section. Adjusting fade times or fading manually works similar like on selecting the scenes via the memory buttons. The LED within the GO button lites as long as the X-fade runs. After finishing the fading the LED goes out. 1. 2 x "X-Fade Menu" button X - FADE SETUP DIRECT MEMORY PREPARE MEMORY MEMORY 01 06 STEPS CHASE TYP: ON / OFF SEQUENCE TIMED SEQUENCE SELECT SELECT REC.FADE 2a.
Lightcommander II User´s Manual 5. Preprogrammed Lighting Shows (Sequences) Beside the chaser programs there are another 50 sequence programs to be stored and recalled on the X-fade section exclusively. Compared to the chaser programs this sequences may have preprogrammed times per step and may recall a chase as one of the steps. 5.1 Programming Sequences 1. 2. PRG CHASE SEQUENCE The menu allows to select another 50 program numbers marked as sequences. Selecting SEQUENCE and a program number.
Lightcommander II User´s Manual 5.2 Recalling Sequences 2 x "X-Fade Menu" button. 1. 2a. Selection of SEQUENCE (preprogrammed times get ignored) or TIMED SEQUENCE (program will recall the preprogrammed fade times) 2b. Selecting a sequence program number via encoder. X - FADE SETUP DIRECT MEMORY PREPARE MEMORY SELECT SELECT REC.FADE "X-Fade On/Off" button start the X-fade mode. 3. X - FADE Go TIMED SEQUENCE 01 02 1.00 2.25 OUTFADE 4a.
Lightcommander II User´s Manual 6. Preview and Modifying Any program of the Lightcommander can be previewed and modified before it comes to stage. The actual output values can be listed in percentage and the Limit function enables to reduce the overall brightness of any channel. 6.1 BLIND Function During programming, previewing or modifying, the channel LED´s no longer show the output intensity, but show the contents of the selected program. During "PROGRAMMING MEMORY" they show preset 2 intensity only.
Lightcommander II User´s Manual 6.3 Output Limit Press the PREVIEW button 1. 2. First button toggles to the Limit function. The LED´s of all channels, which got a reduction yet, lit up. The display lists the limitations whereas FF=100% means, that there is no reduction on this channel.
Lightcommander II User´s Manual 6.4 Previewing and Modification of Memories Previewing a memory: 1. PREVIEW button 2. Any memory flash button The LED´s show the channel values as stored in the memory. The display lists these values in percentage. Selected channel with numbers on black background can be modified via encoder.
Lightcommander II User´s Manual 6.5 Modifying Chase or Sequence Steps - PRG CHASE SEQUENCE CHASE or SEQUENCE Selection of the program number via encoder EDIT Selecting of the program like on programming Turning the encoder recalls the step to be shown on the LED´s. If BLIND is switched off, the steps can be seen on stage. PROGRAMMING - CHASE No. 01 ON/OFF CHASE ( USE CHANNEL BUTTON ) FREE: 95.
Lightcommander II User´s Manual 6.6 Previewing a Chase 6.6.1 Preview at the Chaser Section Chases store the speed and fade time of their last recall. Before starting with the ON button, the program and its times can be previewed and modified. The NUMBER button on the chaser section enables to preselect a new chaser program number via encoder.
Lightcommander II User´s Manual 6.7 Preview and Modifying a running X-Fade In case a chase or sequence is loaded to the X-fade section, the actual and following steps can be previewed and modified. Beside changing single channels intensity it is possible to change the order of the scenes or to insert a memory. 6.7.1 Preview on the following X-fade Steps PREVIEW button The GO button still recalls the next picture while the display lists the output values.
Lightcommander II User´s Manual 6.7.2 Modifying X-Fade Steps By using PREVIEW - X-FADE be modified for any of the steps. the intensity of the single channels can Modifying REAL LEVEL steps: 05 - 11 03 17 - 23 06 - 12 - 18 - 24 STEP 06 - 29 - 30 - 35 - 36 - 41 - 42 - 47 - A5 - 48 - A6 CHASE -- Selecting the step by pressing the STEP button and selecting the step via encoder Channels, selected by their buttons, can be modified via the encoder or preset 2 faders may be used in Grap Mode.
Lightcommander II User´s Manual 6.7.3 Changing X-Fade Scene Order When recalling chase or sequence programs via the X-fade section, the scenes are recalled step by step as set in the program. This order can be changed using the NEXT- or the GO-Minus function. Program type X - FADE TIMED SEQUENCE 01 02 1.00 2.25 OUTFADE Program number INFADE No.
Lightcommander II User´s Manual 7. Special Functions The UTILITY/SETUP menus of the Lightcommander offer various special functions and setup facilities. 7.1 Single Channel Setups 7.1.1 Doubling the Channel Number (WIDE Function) One of the most interesting features of software version 2.X is the possibility to double the number of channels. This way the Lightcommander II 24/ 6 offers 24+24+6=54 channels (LC II 48/6: 48+48+6=102).
Lightcommander II User´s Manual 7.1.2 Connection Desk Channel to Dimmer Channel (Softpatch) The channels of the Lightcommander represented by the numbers under the flash buttons can be freely patched to the dimmer channel numbers. Any desk channel may control several dimmer channels simultaneously whereas the other way round the dimmer channel can only listen to the control commands of one single desk channel.
Lightcommander II User´s Manual 7.1.3 Dimmer Curve Standard dimmerpacks usually show an non-linear increase on brightness when moving up the channel fader. By choosing a special non-linear output modulation this effect can be compensated. Therefore all channels which are supposed to control dimmer channels have to be set to "CURVE" on the Lightcommanders setup menu.
Lightcommander II User´s Manual 7.2 Changing Board Operation Mode 7.2.1 Switch Memories Especially for working with color scrollers or multi-functional fixtures it is possible to change the operation mode of the Switch Memories (see 2.3) FLASH mode: The memory is on stage as long as the button is held down. When using with Swop effect all other signals get erased during this time. TOGGLE mode: The memory gets switched on by pushing the button.
Lightcommander II User´s Manual 7.2.3. Theatre Sequence There are two special modi for Theatre Sequences available with only a little difference. In general every sequence receives within both modi a step name consisting of numbers instead of a step number. This name will be unchanged while inserting or deleting steps. So step 1. 1 will be created by inserting a new step between step 1 and 2.
Lightcommander II User´s Manual 7.3 Backup on Cue Cards The complete programs of the Lightcommander can be saved to cue cards (ITT CANNON - STAR CARD CSC-0032K-SM-3ll or compatible ones). UTILITY/ SETUP BACKUP Testing the card. When using a new card or in case of empty batteries an ERROR message will be displayed BACKUP CARD: 01/24/94 20:15:12 MA 48/6 V 2.
Lightcommander II User´s Manual 7.7 HOLD Function The HOLD function will freeze the output of the desk. Changes can then be made on the desk without those changes occuring on the stage. When ready, those changes can be output from the desk by reducing the main master to 0, and than back to 100 %. Select the HOLD menu by pressing and holding the QUIT button HOLD The HOLD button freezes the output. Now all changes on the desk can be made "invisibly".
Lightcommander II User´s Manual 8.2 MIDI Functions The course of a lighting show can be recorded to a MIDI Sequencer and played back later on. MIDI can also be used to link more than two desks by using the MIDI THRU connector. Compared to the real Master-Slave operation (see 8.1) there are some limitations on using MIDI. Recording a show to a MIDI Sequencer: 1. MIDI OUT of the Lightcommander has to be connected to the Sequencer input. 2. UTILITY/ SETUP EXTERN Selecting of the EXTERN Menu 3.
Lightcommander II User´s Manual Lightcommander II 24/6 + 48/6 MIDI Codes The Lightcommander uses Control Change Data exclusively. Within the MIDI menu two different sets of control orders can be chosen, To avoid coincidences, either one or the other can be used. As soon as MIDI OUT is switched on, all master adjustments and the page are sent as initialization. Chaser and X-fades are stopped. As soon as MIDI IN is switched on, all internally running memories, chases and X-fades are cancelled.
Lightcommander II User´s Manual 9. Input and Output Mains (power supply) The Lightcommander works without any voltage selection on mains input 90 to 240 V AC (40 to 60 Hz). Input connector and power switch are on the back panel. Analog output The analog output signals come out on Socapex EF337 Connectors. 1. Socapex Pin layout: Pin 1 - 30 Dimmer 1-30 Pin 36+37 Common/ground 2.
Lightcommander II User´s Manual CONNECT 34 COPY 28 Copying the selected step 28 Coupling 38 Crossfade 17, 19 Crossfades between Memories 21 Cue Card 37 CURVE 35 D Date and time 37 DBO 8 DELETE 28 Deleting the selected step 28 Dimmer channel 34 Dimmer Curve 35 Dimmerpacks 35 Dipless Crossfade (X-Fade) 19 DIRECT MEMORY 19, 20 Display 5 DISPLAY MEMORY 11 DMX 512 (1990) output 34, 41 Doubling the Channel Number 33 Index Symbols "1 : 1" 34 A Add - Swop Buttons 8 Adjusting Date And Time 37 ALL ACCESS 36 ALL
Lightcommander II User´s Manual K O Keyswitch 36 KILL mode 36 "ON"-button 16 ON-OFF Chase 13, 14 OPEN 34 OUTFADE 19 Outfade time of the actual scene 19 OUTPUT 34, 41 Output Limit 26 Output values 25 L LCD display 5 LEARN 18 LED´s 8 Limit 26 LINEAR 35 LINK 23, 38 LIVE 25 LOAD FROM CARD 37 LOCK PROGRAMMING 36 LOCK DESK 36 P Page 10 PATCH 34 Pin layout 41 PREPARE MEMORY 19 Preprogrammed Lighting Shows 23 Preset Master fader 8 Presets 8 PREVIEW 29 Preview a Chase 29 Preview and Modifying a running X-Fade
Lightcommander II User´s Manual S SAVE OUTPUT 11 SAVE PRESET 2 11 SAVE TO CARD 37 Sequences 23 SINGLE 17 Single Channels 8 Socapex EF337 34, 41 Softpatch 34 SOUND 16 Sound input 41 Special Functions 33 SPEED 29 "Speed" button 17 Storage capacity 11 SWAP 16, 17 Switch Memories 12, 36 SWITCH OFF 19 Swop Buttons 8 Swop Disable 35 SWOP effect 36 SWOP function 8 T Terminating the X-fade mode Theatre Sequence 37 TIMED SEQUENCE 24 TOGGLE mode 36 Top Menu 5 19 U UTILITY/SETUP 33 W WIDE Function 33 X X - Fade
Lightcommander II User´s Manual Safety Instructions: 1. 2. 3. 4. Read all the instructions in the user´s manual. Keep the user`s manual for later use. Follow all the instructions on the unit. Pull the plug before cleaning the unit; don't use any liquid or spray cleaner. Clean with a damp cloth. 5. Don´t use the unit near water. 6. Don't´ put the unit on unstable tables etc.. It might fall down and get damaged. 7.
Lightcommander II User´s Manual DECLARATION OF CONFORMITY according to guide lines 89/336 EWG and 92/31 EWG: Name of producer: Address of producer: MA Lighting Technology GmbH Höhenweg 6 D-97249 Eisingen declares that the product Name of product: Type: MA Lightcommander 24/6 and 48/6 LC 24/6 and LC 48/6 answers the following product specifications: Safety: EMV (EMC): EN60065, resp.