
Installation Guide


12
Faldón para bañera
105466, 105469 y 105517
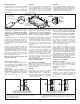
Colocar la bañera dentro del nicho. Nivelar
la bañera al reborde del nicho o al interior
del mismo. Asegurarse de que la bañera
esté a nivel horizontal y verticalmente.
Comprobar que la base del reborde de la
bañera (fig. 11.1) esté a la altura correcta.
Si fuera necesario, ajustar a la altura
adecuada (18 1/2").
Medir la altura del faldón como se indica
en la fig.11.2. La base del reborde de la
bañera no debe ser inferior a esa medida.
Acomodar el faldón debajo del reborde de
la bañera. Colocar la parte superior del
faldón debajo del reborde de la bañera.
Para lograrlo, deberá inclinar el faldón.
Enderezar el faldón asegurándose de que
la parte superior permanezca debajo del
reborde de la bañera (fig. 11.3).
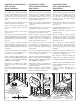
Apoyar la parte A del faldón sobre la parte
B de la bañera (fig. 11.4). Nota: Es normal
que las dos columnas sobrepasen un poco
el reborde de la bañera. Asegurarse de
que el faldón esté a nivel horizontal y
verticalmente.
Atornillar el faldón a la pared y al piso tal
como se indica en la fig. 11.5. Se deberan
colocar diez (10) tornillos. Los agujeros
preperforados (3/16") sirven de guía para
la colocación de los tornillos. Asegurarse
de que el faldón permanezca a nivel.
Haciendo presión, aplicar una tira de
sellador de silicona en los tres lugares
identificados con la letra C, entre el reborde
de la bañera y del faldón (fig. 11.6).
Reajustar el faldón a fin de solidificarlo y
fijarlo a la bañera (fig. 11.4). Para lograr
una máxima adherencia, dejar secar la
silicona durante al menos 24 horas.
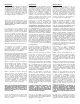
Acercar el panel del faldón a la bañera y
dejar que el magnetismo de los imanes guíe
la instalación (fig. 11.7 - fig. 11.8).
Tablier pour baignoire
105466, 105469 et 105517
Placer la baignoire dans l’alcôve. Égaliser
la baignoire avec le rebord de l’alcôve ou
à l’intérieur. S’assurer que la baignoire est
à niveau horizontalement et verticalement.
Vérifier que la base du rebord du bain
(fig.11.1) soit à la bonne hauteur. Ajuster en
conséquence (18 1/2
po)
.
Mesurer la hauteur du tablier tel que démontré
en fig.11.2. La base du rebord du bain ne doit
pas être inférieure à cette mesure.
Positionner le tablier sous le rebord de la
baignoire. Placer le haut du tablier sous
le rebord du bain en inclinant le tablier.
Redresser celui-ci en s’assurant que le
haut du tablier est toujours sous le rebord
de la baignoire (fig. 11.3).
Appuyer la partie A du tablier sur la partie
B de la baignoire (fig. 11.4). P.S. Il est
normal que les deux colonnes dépassent
un peu du rebord de la baignoire. S’assurer
que le tablier est à niveau horizontalement
et verticalement.
Visser le tablier au mur et au sol tel que
démontré en fig. 11.5. Dix (10) vis doivent
être fixées. Des cavités déjà pré-percées
(3/16 po) guident le positionnement des
vis. S’assurer que le tablier reste à niveau.
Pousser et mettre une bande de silicone
à trois endroits (C) entre le rebord de la
baignoire et du tablier (fig. 11.6). Replacer
le tablier afin de le solidifier et de le fixer au
bain (fig. 11.4). Laisser sécher la silicone
au moins 24 heures pour garantir sa pleine
adhérence.
Approcher le panneau du tablier près du
bain et laisser le magnétisme des aimants
guider la pose (fig. 11.7-fig. 11.8).
Bathub apron
105466, 105469 and 105517
Place the bathtub in the alcove, aligning
it with the edge or the inner part of the
alcove. Make sure that the bathtub is level
horizontally and vertically. Check that the
bottom part of the rim of the tub (Fig.11.1)
is at the proper height. Adjust as necessary
(18 1/2").
Measure the height of the apron, as shown
in Fig 11.2. The bottom part of the rim of the
bathtub must not be lower than this mark.
Position the apron under the rim of the
bathtub. Incline the apron to insert the
upper part under the rim. Push the rest
of the apron in place, ensuring that the
entire apron edge is located under the rim
(Fig. 11.3).
Place part A of the apron over part B of
the bathtub (Fig. 11.4). Note that the two
columns will extend slightly beyond the rim
of the tub. Check that the apron is level
horizontally and vertically.
Screw the apron into the wall and floor,
as shown in Fig. 11.5, using 10 screws.
The pre-drilled holes (3/16") will guide the
positioning of the screws. Check that the
apron is still level.
Move the apron edge in order to apply
silicone sealant in three spots (C) between
the rim of the bathtub and the upper part
of the apron (Fig. 11.6). Return the apron
edge to its proper position and secure in
place (Fig. 11.4). Let the sealant dry for at
least 24 hours for maximum adhesion.
Affix the apron panel, using the magnets to
guide you (Figs. 11.7 and 11.8).
C
C
C
A
B
Fig. 11.1
Fig. 11.2
Fig. 11.3
Fig. 11.4
Fig. 11.7
Fig. 11.8
Fig. 11.6
Fig. 11.5