
Installation Guide


APRON INSTALLATION
SLEEK & SKYBOX
Aprons
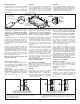
Install the wood pieces under the
fl ange of the bathtub using silicone, as
shown in Fig. 14a.
ALLOW TO DRY FOR 24 HOURS.
Install vertical and horizontal studs
in
front of the bathtub (leave a space in front
of the support so as not to interfere with the
installation of the apron, if applicable)
.
(Fig. 14b-14c)
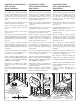
Install the apron and secure it into po-
sition using #8 x 3/4” screws (19 mm)
and screw anchors. Install the screw
caps. (Fig. 14c)
NOTE: The access panel is held in
place with Velcro.(Fig. 14d)
INSTALLATION D’UN TABLIER
Tabliers SLEEK & SKYBOX
Installer les pièces de bois fournies
sous le rebord de la baignoire, tel qu’il-
lustré à la Fig. 14a, à l’aide de silicone.
LAISSER SÉCHER 24 HEURES.
Fixer des supports verticaux et hori-
zontaux à l’avant de la baignoire (lais-
ser un espace devant le support afi n
de ne pas nuire à l’installation du ta-
blier). (Fig. 14b-14c)
Installer le tablier et le fi xer en position
à l’aide des vis #8 x 3/4 po (19 mm) et
des receveurs de cache-vis. Installer
les cache-vis. (Fig. 14c)
REMARQUE: Le panneau d’accès est
fi xé avec du Velcro. (Fig. 14d)
INSTALACIÓN DEL FALDÓN
Faldones SLEEK & SKYBOX
Utilice sellador de silicona para colocar
las piezas de madera proporcionadas
debajo del reborde de la bañera, como
se indica en la Fig. 14a.
DEJE SECAR DURANTE 24 HORAS.
Instale montantes verticales y hori-
zontales delante de la bañera (deje un
espacio en frente del soporte para no
interferir con la instalación del faldón,
si corresponde) (Fig. 14b-14c)
Instale el faldón, póngalo en posición y
sujételo con tornillos #8 de 3/4” (19 mm)
y anclajes. Coloque los cubretornillos.
(Fig. 14c)
NOTA: El panel de acceso se man-
tiene en su lugar con cintas de Velcro.
(Fig. 14d)
1/2"
(13 mm)
2"x4"
H
#8 x ¾"
6X
Fig. 14a
Fig. 14b
6X
VELCRO
Fig. 14c Fig. 14d
Silicone
1/2"
(13 mm)
hours
heures
24
15