installation instructions Guide d’installation Guía de Instalación For roofcap Pour toit Para techo MODEL • MODÈLE • MODELO 101345 • 101595 • 101647 Read all instructions carefully before proceeding. Lire toutes les instructions attentivement avant de commencer l’installation. Leer detenidamente todas las instrucciones antes de comenzar la instalación. IMPORTANT • Record the serial number IMPORTANT • Noter le numéro de série IMPORTANTE • Registre el número de serie Save this guide for future reference.
Preparation • Préparation • Preparación Note: The roof should be installed at a temperature near 16°C (60°F) and must not be installed in unheated areas where temperatures might drop below 0°C (32°F). Note : Le toit doit être installé à une température d’environ 16°C (60°F), et ne doit pas être installé dans des zones non chauffées où la température peut descendre sous 0°C (32°F). Please read our instructions before you install and use your new tub wall kit.
Required tools and materials • Outils et matériel requis • Herramientas y material necesarios • Measuring tape • Pencil (no felt marker) • 60” straight edge ruler or similar cutting guide • Plastic and laminate cutter • Mineral spirits (Paint thinner) No Lacquer Thinner or Acetone • 1 Cartridge of Siliconized Latex Caulking* • • • • • Metal saw Caulking gun Masking tape Sandpaper 1 to 2 Cartridges of Wall Adhesive, Polystyrene or ABS Compatible according to your model • 2 Soft clean cloths *Premium qual
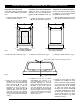
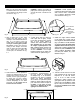
Roofcap installation • Installation du toit • Installatión del techo Installation with tub wall kit: Use masking tape to hold down panels A and C while installing the roofcap. Fig. 1. 1. Take the ceiling dimensions W, X, Y and Z as shown in Fig. 1. Installation avec contour de baignoire: Utilisez du ruban à masquer sur les panneaux A et C pour les maintenir en position pendant l’installation du toit. Fig. 1. 1. Prenez les dimensions au plafond W, X, Y, Z, tel qu’illustré à la Fig. 1. W Z X Fig.
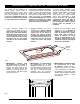
Tip: You can use a sheet of paper to indicate where the roof must be cut in relation to the bump in front as shown in Fig. 3.1. cONSEIL: Utilisez une feuille de papier pour tracer la ligne de coupe vis-à-vis la bosse à l’avant du toit Fig. 3.1. CONSEJO: Puede ayudarse con una hoja de papel para indicar donde debe cortar el techo coincidiendo con el saliente abombado frontal como ilustrado en la Fig. 3.1. X Z Fig. 3 4.
Wall preparation • Préparation du mur • Preparación de la pared The roofcap can be installed over drywall, plaster, painted walls or plywood. Wall surface must be solid, dry, clean and smooth. Scrape off any loose paint, wallpaper or plaster. It is strongly recommended that raw plaster or new wallboard be primed or water sealed prior to installation. Le toit peut être installé sur du placoplâtre, du plâtre, des murs peints ou du contreplaqué. La surface au plafond doit être solide, sèche, propre et lisse.
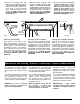
8. Secure the roofcap in place using masking tape. Allow to dry before removing the masking tape. Fig. 8. 8. Appliquez du ruban à masquer pour maintenir le toit en position. Laissez l’adhésif sécher avant de retirer le ruban à masquer. Fig. 8. 8. Fíjelo el techo todo con cinta adhesiva. Deje secar el adhesivo antes de quitar la cinta adhesiva. Fig. 8. TIP: Vertical studs can be installed temporarily on the contour of the roof cap for better adhesion.
10. Remove the masking tape. The zones to be sealed must be dry and free of dirt and grease. Remove protective plastic from glossy side of roof (as needed) Fig. 9. Caulk the joints in an even manner. Allow to dry for 24 hours before using the bathtub Fig. 9.1. 10. Enlevez le ruban à masquer. Les zones à sceller doivent être sèches, et exemptes de saletés et de graisse. Retirer la pellicule de plastique qui protège le côté lustré du toit (au besoin) Fig. 9. Calfeutrez les joints de manière uniforme.
Limited warranty • Garantie limitée • Garantia limitada MAAX Canada Inc. (hereafter “MAAX”) offers the following express limited warranty on each of its products. This warranty extends only to the original owner/end-user for personal household use. For commercial uses, additional limitations apply. MAAX Canada Inc. (ci-après “MAAX”) offre la garantie limitée expresse suivante sur chacun de ses produits.
This warranty does not apply to products or equipment not installed or operated in accordance with instructions supplied by MAAX and all applicable rules, regulations and legislation pertaining to such installations. La présente garantie ne s’applique pas aux produits qui n’auraient pas été installés ou utilisés conformément aux instructions fournies par MAAX ainsi qu’à tout règlement ou loi applicable à de telles installations.
MAAX will provide the warranty service described above when the following conditions have been met: (1) the failure is of the nature or type covered by the warranty; (2) the user has informed an authorized MAAX Agent or Warranty Service Department representative of the nature of the problem during the warranty period; (3) conclusive evidence (e.g.
www.maax.com Technical Services / Service technique / Servicio técnico T. 1 888 304-4388 F.