
Installation Instructions


7 10014424
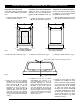
8. Fíjelo el techo todo con cinta
adhesiva.
.
Fig. 8.
Para lograr una mejor
adherencia, se pueden instalar
provisoriamente montantes verticales
alrededor del contorno del techo. Al
hacerlo, tenga cuidado de no rayar la
superficie.
9.
Cuando el pegamento es
bien seco, retire la cinta adhesiva del
techo y de las paredes y prosigue la
instalación refiriéndoles a la guía
con el contorno de bañera (guía
10014462).
8. Appliquez du ruban à masquer pour
maintenir le toit en position.
. Fig. 8.
Pour obtenir une
meilleure adhérence sur tout le
pourtour du toit, on peut installer
temporairement des montants
d’appui en prenant soin de ne pas
égratigner les surfaces de finition.
9.
Lorsque l’adhésif est bien
sec, retirez le ruban à masquer du
toit et des murs et poursuivez
l’installation en vous référant au
guide fournis avec le contour de
baignoire (guide 10014462).
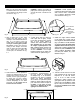
8. Secure the roofcap in place using
masking tape.
. Fig.
8.
Vertical studs can be installed
temporarily on the contour of the
roof cap for better adhesion. Thus,
care should be taken to protect the
surface from scratches.
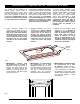
9.
When the adhesive is quite dry,
remove the masking tape from the
roof and walls and continue the
installation referring to the guide
provided with the tub wall kit
(10014462).
Fig. 8