
Installation Instructions
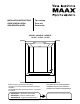


8 10014424
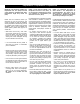
The manufacturer suggests using only
soft detergents or soapy lukewarm
water with a soft cloth. Rinse well and
dry off using a cloth or damp chamois
rag.
The advice and illustrations contained
in this technical brochure reflect what
the manufacturer believes to be,
based on its experience, the best way
to proceed with a normal installation.
.
Le fabricant suggère d’uti liser uniquement
des détergents doux ou de l’eau tiède
savonneuse avec un chiffon doux. Bien
rincer et assécher à I’aide d’un chiffon ou
d’un carré de chamois humide.
Les conseils et illustrations contenus
dans le présent dépliant technique
reflètent ce que le fabricant croit
être, d’après sa propre expé rience,
la meilleure façon de procéder à une
installation normale.
.
El fabricante sugiere utilizar únicamente
detergentes suaves o agua tibia
jabonosa con un paño suave. Después,
enjuague bien y seque con un paño o
gamuza húmeda.
Los consejos e ilustraciones contenidos
en el presente folleto técnico reflejan
lo que el fabricante cree que, según
su experiencia, es la mejor manera de
efectuar una instalación normal.
.
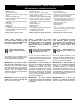
10. Remove the masking tape.
.
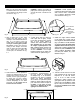
Remove protective plastic from
glossy side of roof (as needed)
Fig. 9. Caulk the joints in an even
manner.
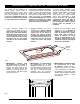
Fig. 9.1.
Apply tape on both sides of the
seam (as illustrated) to protect the
bathtub and the roofcap and apply the
caulking agent in the 3/16in. seam;
immediately smooth out the caulking
with a wet finger and remove the tape
being careful not to touch the caulked
seam Fig. 9.2.
.
10. Enlevez le ruban à masquer.
. Retirer la pellicule de
plastique qui protège le côté lustré du
toit (au besoin) Fig. 9. Calfeutrez les
joints de manière uniforme.
Fig. 9.1.
Poser du ruban à masquer de chaque
côté du joint (tel qu’illustré) pour protéger
la baignoire et le toit et appliquer le
calfeutrant dans le joint de 3/16”; lisser
immédiatement le calfeutrant avec le
doigt mouillé et retirer le ruban en faisant
bien attention de ne pas toucher au joint
calfeutré Fig. 9.2.
.
10. Quite la cinta adhesiva.
Fig. 9. Selle
las juntas de manera uniforme.
Fig. 9.1.
Coloque cinta adhesiva de ambos
lados de la junta (como ilustrado)
para proteger la bañera y el panel,
y aplique masilla para calafatear la
junta de 3/16 pulgadas; extienda al ras
inmediatamente la masilla con el dedo
humedecido y retire la cinta cuidando
no tocar la junta sellada Fig. 9.2.
.
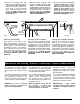
Fig. 9.2
Fig. 9.1
Fig. 9
Caulking
Calfeutrant
Calafateador
5 mm (3/16")