installation instructions Guide d’installation Guía de Instalación For bathtub, shower and tub-shower Pour baignoire, douche et baignoire-douche Para bañera, ducha y bañera-ducha 10024491 Read all instructions carefully before proceeding. Lire toutes les instructions attentivement avant de commencer l’installation. Leer detenidamente todas las instrucciones antes de comenzar la instalación.
Introduction Introduction Introducción Thank you for your confidence in MAAX Inc. in purchasing your unit. Merci d’avoir fait confiance à MAAX inc. pour l’achat de votre unité. Gracias por haber mostrado confianza a MAAX Inc. al comprar su unidad. We can assure you that MAAX has used the best materials and has applied the strictest quality control measures to ensure that each and every unit meets the highest quality standards.
Before You Begin Avant de débuter Antes de comenzar • Carefully read the instructions before beginning the installation. • Lire attentivement les instructions avant de débuter l’installation. • Lea atentamente las instrucciones antes de iniciar la instalación. • Consult local building codes to make sure the installation complies with standards. • Consulter les codes de construction locaux pour assurer une installation conforme aux normes.
General Rules Règles générales Structure Installation Do not build the surrounding structure before receiving your unit. Structure measurements Reglas generales should be verified against the unit to ensure a proper fit. Installation de la structure Ne pas construire la structure avant d’avoir reçu l’unité. Afin d’assurer une installation parfaite, les dimensions de la structure doivent être vérifiées à partir des dimensions de l’unité.
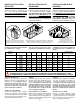
Positionnement de la robinetterie Positionner la robinetterie à la hauteur recommandée. Fig. 4. Bathtub and Tub-shower Baignoire et Bain-douche Bañera y Bañera-ducha Posicionamiento de la grifería Posicione la grifería recomendada. Fig. 4. 5" (127 mm) 78" (1981 mm) Faucets 4" (102 mm) 45" (1143 mm) the Position the faucets at the recommended height. Fig. 4. 78" (1981 mm) Positioning a la altura Shower Douche Ducha Fig. 4 Fig.
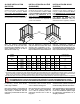
Drop-In Installation (Bathtub) Installation en îlot (baignoire) Instalación en islote (bañera) Framing Encadrement Estructura Construct the island in accordance with Fig. 5 and table dimensions. Note: Structure measurements must be verified against the unit to ensure a proper fit. All dimensions are expressed in inches and millimeters. Construire l’îlot selon le schéma de la Fig. 5 et les dimensions du tableau.
Finishing Up Install the finish covering over the island and fill the joints with silicone sealant. Fig. 7 Finition Acabado Poser le revêtement de finition sur tout l’îlot et recouvrir les joints avec un scellant au silicone. Fig. 7. Fig. 6 Fig. 7 SILICONE SEALANT SCELLANT AU SILICONE SILICO NO SCILA DORA Colocar el revestimiento de acabado sobre todo el islote y cubrir las junturas con sellador de silicona. Fig. 7.
Alcove Installation (Bathtub) Installation en alcôve (baignoire) Instalación en nicho (bañera) Framing Encadrement Estructura Construct the alcove in accordance with Fig. 8 and table dimensions. Note: Structure measurements must be verified against the unit to ensure a proper fit. All dimensions are expressed in inches and millimeters. Construire l’alcove selon le schéma de la Fig. 8 et les dimensions du tableau.
Securing the Bathtub Fixation Install a standard 1" x 3" piece of wood (not provided) (3/4" x 2 1/2") (2 cm x 6.3 cm) all around the alcove, at «C» height. The 1" x 3" must be cut down to 1¼" inside dimension B. Fig. 9. Fixer une pièce de bois (non fournie) de 1" x 3" standard (3/4" x 2½") (2 cm x 6,3 cm) tout autour de l’alcôve, à la hauteur “C”. Les pièces de 1" x 3" doivent être coupées à 1 1/4" à l’intérieur de la dimension B. Fig. 9.
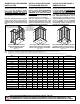
Shower and Tub-Shower Installation Installation de douche et baignoire-douche Instalación de ducha y bañera-ducha Framing Encadrement Estructura Construct the alcove in accordance with Fig. 11 and table dimensions. Note: Structure measurements must be verified against the unit to ensure a proper fit. All dimensions are expressed in inches and millimeters.
MODEL MODÈLE MODELO # / No Showerstall / Douche / Ducha (Fig. 11.
Note: If the overflow is not predrilled at the plant, drill it directly on the finished side (inside) in accordance with the instructions provided with the drain and overflow. Note : Si le trop-plein n’est pas pré-percé en usine, percer celui-ci directement sur le côté fini (intérieur) selon aux instructions fournies avec le drain et trop-plein.
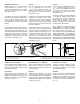
Reinforcements In order to ensure maximum strength in the unit walls, at a height of 48" from the bottom of the unit, add pieces of wood between the back of the walls and the frame. Fig. 13. Important: These pieces of wood must not interfere with faucets and plumbing accessories. Do not force the unit walls towards the inside.
Fig. 15 Self drilling screw #10 Vis auto-perçante no 10 Tornillo autorroscante no 10 Silicone Silicona Spring nut Écrou-ressort Tuerca plana Fig. 15.2 Fig. 15.1 Installing a Roof Cap Assemblage du toit For roof cap installation proceed as follows. (N.B.: additional framing is required, See Fig. 11.1, table Dimension C’). Si un toit est installé, suivre les étapes ci-dessous. (N.B.: une partie supplé mentaire doit être prévue au cadrage. Voir Fig. 11.1, tableau Dimension C’). A.
Fig. 17 Fig. 16 Fig.
Troubleshooting Dépannage Guía de posibles problemas Water accumulates around the drain and the bathtub does not completely empty. • Check that the installation is level and that the bathtub sits firmly on its base; if necessary, shim with wood wedges under the wood base only. L’eau s’accumule autour du drain et la baignoire ne se vide pas complètement. • Vérifier si l’installation est de niveau et si la baignoire est bien appuyée sur sa base.
Limited warranty Garantie limitée Garantía limitada MAAX Bath Inc. (hereafter “MAAX”) offers the following express limited warranty on each of its products. This warranty extends only to the original owner/end-user for personal household use. For commercial uses, additional limitations apply. MAAX Bath Inc. (ci-après “MAAX”) offre la garantie limitée expresse suivante sur chacun de ses produits. Cette garantie s’adresse uniquement au propriétaire/utilisateur original pour un usage personnel domestique.
This warranty does not apply to products or equipment not installed or operated in accordance with instructions supplied by MAAX and all applicable rules, regulations and legislation pertaining to such installations. La présente garantie ne s’applique pas aux produits qui n’auraient pas été installés ou utilisés conformément aux instructions fournies par MAAX ainsi qu’à tout règlement ou loi applicable à de telles installations.
authorized MAAX Agent or Warranty Service Department representative of the nature of the problem during the warranty period; conclusive evidence (e.g.
www.maax.com Technical Services / Service technique / Servicio técnico T. 1 877 GET-MAAX (1 877 438-6229) Canada F. 1 800 201-8308 © MAAX Bath Inc., 2008 United States / États-Unis Estados Unidos F.