
Installation Instructions


Unpacking:
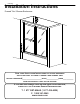
Care should be taken when unpacking your Shower Enclosure. Place the Glass Panels in an upright, safe location to avoid
damage.
Cleaning:
Never use scouring powder, pads or sharp instruments on metal work or Glass Panels. We recommend the use of a
squeegee after each shower to eliminate water spots on the inside of the Glass Panels. An occasional wiping down of the
Glass Panels and anodized aluminum parts with a mild detergent, diluted in water, is all that is needed to keep your
Shower Enclosure looking brand new.
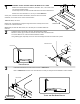
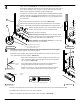
Carefully read the Installation Instructions BEFORE you start. This will enable you to become familiar with the installation
sequences and the required tools.
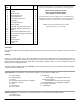
Tools Required - For installation of your Shower Enclosure, you will need the following tools:
A - Safety glasses.
B - Measuring tape.
C - Pencil.
D - Hack saw (with 32 teeth per inch blade).
E - Miter Box or Square.
F - Level.
G - Electric Drill.
H - Center punch.
I - Drill bit, 1/8”
(for installation on a fiberglass enclosures)
Drill bit, 1/4” masonry.
(for installation on ceramic tiles or marble)
J - Power screwdriver or a #2 phillips screwdriver.
K - #2 phillips screwdriver
L - Caulking gun
Materials Required - For installation of your Shower Enclosure, you will need the following materials:
A - Masking tape.
B - Silicone sealant.
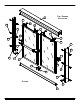
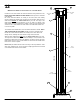
Item Part Description Qty.
No.
1 Header 1
2 Track 1
3 Wall Channel 2
4 Glass Panel Door 2
5 Hanging Bracket 4
6 #6 x 5/16" long Screw 4
7 Towel Bar 1
8 Towel Bar Bracket 2
9 Door Handle 1
10 #8 x 3/8" long Flat Head Screw 5
10 #8 x 1/4" long Pan Head Screw 2
11 Roller 4
12 #8 x 7/16" long Machine Screw 4
13 #10 x 1 1/4" long Pan Head Screw 6
14 Wall Anchor 6
15 Bumper 2
16 Center Guide 1
17 End Guide 2
18 Tape 1
If you have missing parts, do not return the Tub / Shower Enclosure
to the store, call us toll free for an immediate, courteous response.
When ordering replacement parts,
please specify the Model Number,
Item Number & Part Description
To help identify the proper parts, please refer to the following page
for Illustrations of Parts. Assembly hardware is shown throughout the
Installation Instructions, at actual size, for ease of identification.
Additional Screws and Wall Anchors are included
in the Parts Bag for your convenience.