
Installation Instructions

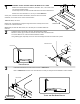


REVERSIBLE
HEADER PROFILE
6
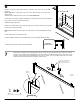
At this point, re-measure the wall-to-wall distance, dimension “H” and re-check subtraction,
to be certain of the correct Header Dimension.
“Measure twice, cut once”.
Measure the “Header Dimension” along the length of the Header. Carefully cut the Header
to fit the Tub / Shower Enclosure.
Please note, to obtain the best results, use a 32-tooth per inch hacksaw blade and miter
box.
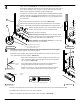
Measure the finished wall-to-wall distance, dimension “H”, at the top of the Wall
Channels.
Please note, that if a steel tape is used, be sure to add the width of the case to the
measurement.
Subtract 1/16” from dimension “H”, this is your “HEADER DIMENSION”.
Dimension H
Slide the Header down on top of the Wall Channels.
Certain models have a Reversible Header.
Before installation, determine if the Straight Side or the Curved Side will face forward.
7
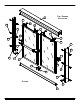
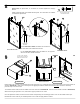
Apply silicone sealant into the Hanging Bracket groove at each corner of the door as noted. Before the silicone
sealant can dry, position the Hanging Brackets as shown and insert the rounded “ball” end into the center Groove
provided. Once inserted, slide each Bracket to it’s corner as shown. Once in position, install a #6 x 1/4” Screw
through each bracket mounting hole provided and into the door.
SILICONE
SEALANT
SILICONE
SEALANT
BRACKET MOUNTING HOLES
TO BE FACE INWARD AS
SHOWN FOR INSTALLATION
GROOVE
ACTUAL SIZE #6 X 1/4” LONG SCREW
6
SKETCH 7A
5
6