
Assembly Instructions


Top view
Vista superior
2x4
Leg
Pata
2x4
Leg
Pata
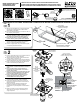
After finishing the floor (tiles, etc..), place the bathtub
on the side over cardboard and install the waste & overflow
without fastening into the final position.
Place the bathtub bottom up. Adjust the waste & overflow by
aligning it with apron's predrilled holes shown (image 1B) so
that the pierced holes on the apron are in line with the center
line of drainage. If you have the optional template, use the
provided measure to adjust the waste & overflow.
Después de terminar el acabado del piso (azulejos, etc..),
colocar la bañera sobre el costado sobre un cartón e instalar
el desagüe y rebosadero sin fijarlos en la posición final.
Colocar la bañera al reves. Ajuste el desagüe-rebosadero
alineandolo con los agujeros pre perforados del delantal
ilustrados (imagen 1B) de manera que los agujeros
perforados del detantal queden alineados con la línea central
del drenaje. Si tiene la plantilla opcional use la medida
suministrada para ajustar el desagüe.
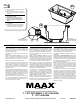
Recover the male slip joint and remove the prevention cap. Install
the male part of the slip joint with the drain line using the drain
adapter if needed.
Place the slip joint male end,
.
Place the apron over the bathtub to level the legs with it by fastening
or loosing them so that these last touches the ground once the
installation is complete (see image 5B at the end of this guide). Use
a straight object (for example with a 2x4) to ease the alignment.
If the faucet must be installed on the deck of the bathtub, do the
installation at this stage.
en laissant une
distance maximale de 3/4" entre cette pièce et le tablier
Recuperar la junta de expansión macho y retirar el tapón de
prevención. Instalar la parte macho de la junta de expansión con la
línea de desagüe utilisando el adaptador para desagüe en caso de
ser necesario.
Colocar el extremo macho de la junta de expansión de forma que la
distancia entre este y el delantal no exceda 3/4".
Colocar el delantal sobre la bañera con el fin de nivelar las patas con
el delantal al atornillandolas o desatornillandolas de forma que estas
toquen el suelo una vez completada la instalación (ver nota al final de
esta guía). Utilisar un objeto recto(por ejemplo un 2x4) para facilitar
el alineamiento.
Si la grifería debe estar instalada en el borde de la bañera, proceder.
Apron
Delantal
Slip joint (Male)
Junta de expansión (Macho)
Drain adapter
Adaptador para desagüe
Top view
Vista superior
Using the template or the bathtub skirt trace the inside rim of the skirt.
Use this line as minimal limit for tile installation.
Usar la plantilla o el delantal para trazar el interior del delantal. Usar
esa línea como limite mínimo para la instalación de azulejos.